
Related Manuals for ADTRAN NetVanta 340 Series


Summary of Contents for ADTRAN NetVanta 340 Series
- Page 1 NetVanta 340 Series Hardware Installation Guide 1200422L1 NetVanta 340 Unit 61200422L1-34A November 2004...
- Page 2 To the Holder of the Manual The contents of this manual are current as of the date of publication. ADTRAN reserves the right to change the contents without prior notice. In no event will ADTRAN be liable for any special, incidental, or consequential damages or for commercial losses even if ADTRAN has been advised thereof as a result of issue of this publication.
- Page 3 NetVanta 340 Series Hardware Installation Guide Conventions Conventions Notes provide additional useful information. Cautions signify information that could prevent service interruption. Warnings provide information that could prevent damage to the equipment or endangerment to human life. 61200422L1-34A © 2004 ADTRAN, Inc.
- Page 4 Safety Instructions NetVanta 340 Series Hardware Installation Guide Safety Instructions When using your telephone equipment, please follow these basic safety precautions to reduce the risk of fire, electrical shock, or personal injury: 1. Do not use this product near water, such as a bathtub, wash bowl, kitchen sink, laundry tub, in a wet basement, or near a swimming pool.
- Page 5 Advance notification and the opportunity to maintain uninterrupted service are given. 4. If experiencing difficulty with this equipment, please contact ADTRAN for repair and warranty information. The telephone company may require this equipment to be disconnected from the network until the problem is corrected or it is certain the equipment is not malfunctioning.
- Page 6 FCC Radio Frequency Interference Statement NetVanta 340 Series Hardware Installation Guide FCC Radio Frequency Interference Statement This equipment has been tested and found to comply with the limits for a Class B digital device, pursuant to Part 15 of the FCC Rules. These limits are designed to provide reasonable protection against harmful interference in a residential installation.
- Page 7 NetVanta 340 Series Hardware Installation Guide Industry Canada Compliance Information Industry Canada Compliance Information The Industry Canada label applied to the product (identified by the Industry Canada logo or the “IC:” in front of the certification/registration number) signifies that the Industry Canada technical specifications were met.
- Page 8 NetVanta 340 Series Hardware Installation Guide Warranty and Customer Service ADTRAN will repair and return this product within the warranty period if it does not meet its published specifications or fails while in service. Warranty information can be found at: http://support.adtran.com...
- Page 9 Your reseller should serve as the first point of contact for support. If additional pre-sales support is needed, the ADTRAN Support web site provides a variety of support services such as a searchable knowledge base, latest product documentation, application briefs, case studies, and a link to submit a question to an Applications Engineer.
- Page 10 These courses include overviews on product features and functions while covering applications of ADTRAN's product lines. ADTRAN provides a variety of training options, including customized training and courses taught at our facilities or at your site. For more information about training, please contact your Territory Manager or the Enterprise Training Coordinator.
-
Page 11: Table Of Contents
Contents of ADTRAN Shipments ........ - Page 12 Table of Contents NetVanta 340 Series Hardware Installation Guide © 2004 ADTRAN, Inc. 61200422L1-34A...
- Page 13 Wall Mounting the NetVanta 340 ..........23 61200422L1-34A © 2004 ADTRAN, Inc.
- Page 14 List of Figures NetVanta 340 Series Hardware Installation Guide © 2004 ADTRAN, Inc. 61200422L1-34A...
- Page 15 10/100BaseT Ethernet Port Pinouts ......... . 27 61200422L1-34A © 2004 ADTRAN, Inc.
- Page 16 List of Tables NetVanta 340 Series Hardware Installation Guide © 2004 ADTRAN, Inc. 61200422L1-34A...
-
Page 17: Introduction To The Netvanta Solution
PPPoE Relay and PPPoE Client (RFC 2516) I.610 F4/F5 OAM loopback support Full support of ATM WAN statistics Stateful Inspection Firewall Firewall Cyber assault protection Denial of Service (DoS) protection DHCP/DNS Support DHCP Client, DHCP Server, DNS Proxy 61200422L1-34A © 2004 ADTRAN, Inc. - Page 18 For more information on router configuration for a specific application, refer to the quick configuration documents provided on the ADTRAN website at www.adtran.com. For details on the command line interface, refer to the AOS Command Reference Guide, also on the website.
-
Page 19: Unpack And Inspect The System
After unpacking the unit, inspect it for possible shipping damage. If the equipment has been damaged in transit, immediately file a claim with the carrier and contact ADTRAN Customer Service (see Warranty and Customer Service on page 8). -
Page 20: Physical Description
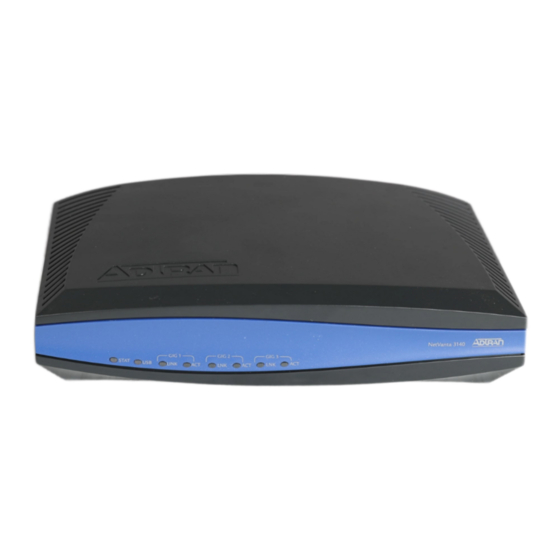
Physical Description NetVanta 340 Series Hardware Installation Guide PHYSICAL DESCRIPTION Reviewing the Base Unit Front Panel Design Figure 1 shows the NetVanta 340 front panel. Figure 1. NetVanta 340 Front Panel Layout Front Panel LEDs Table 2 describes the front panel LEDs. -
Page 21: Reviewing The Rear Panel Design
NetVanta 340 Series Hardware Installation Guide Physical Description Reviewing the Rear Panel Design Figure 2 shows the NetVanta 340 rear panel. The Activity and Link LEDs, which are present on all NetVanta Ethernet ports, are pointed out. Activity LED (amber) Link LED (green) Figure 2. -
Page 22: Unit Installation
Unit Installation NetVanta 340 Series Hardware Installation Guide UNIT INSTALLATION The instructions and guidelines provided in this section cover hardware installation topics such as wall mounting and supplying power to the unit. To prevent electrical shock, do not install equipment in a wet location or during a lightning storm. -
Page 23: Wall Mounting
NetVanta 340 Series Hardware Installation Guide Unit Installation Wall Mounting Instructions for Wall Mounting Step Action Decide on a location for the NetVanta 340. Keep in mind that the unit needs to be mounted at or below eye-level so that the LEDs are viewable. -
Page 24: Getting Started
3. Open your internet browser and enter 10.10.10.1. in the URL field. The NetVanta 340 login window appears. 4. Enter the default username (admin) and password (adtran), and click the OK button. For security purposes, you should set up an admin password immediately. Use the page of the Web GUI to change this password. -
Page 25: Factory Default Switch
NetVanta 340 Series Hardware Installation Guide Unit Installation Factory Default Switch • If pressed during bootup, the default switch will cause the unit to stay in bootstrap mode. Since the unit has no serial port, Telnet has been built into the boot code. The default IP address is 10.10.10.1. - Page 26 Unit Installation NetVanta 340 Series Hardware Installation Guide © 2004 ADTRAN, Inc. 61200422L1-34A...
-
Page 27: Appendix A. Connector Pin Definitions
Table A-1. ADSL Connector Pinouts Name Description — Unused ADSL Tip ADSL Ring — Unused Table A-2. 10/100BaseT Ethernet Port Pinouts Name Description Transmit Positive Transmit Negative Receive Positive Receive Negative 4, 5, 7, 8 — Unused 61200422L1-34A © 2004 ADTRAN, Inc. - Page 28 Appendix A. Connector Pin Definitions NetVanta 340 Series Hardware Installation Guide © 2004 ADTRAN, Inc. 61200422L1-34A...
-
Page 29: Index
LEDs 20 rear panel 21 getting started 24 shipping contents 19 installing unit 22 unpacking and inspecting the system 19 interfaces 21 wall mounting NetVanta 340 23 LEDs 20 warranty 8 web GUI passwords page 24 61200422L1-34A © 2004 ADTRAN, Inc. - Page 30 Index NetVanta 340 Series Hardware Installation Guide © 2004 ADTRAN, Inc. 61200422L1-34A...
Need help?
Do you have a question about the NetVanta 340 Series and is the answer not in the manual?
Questions and answers