
Related Manuals for Cerio IW-100 A1


Summary of Contents for Cerio IW-100 A1
- Page 1 CERIO Corporation IW-100 A1 eXtreme Wave 2 11n/ac 2.4/5Ghz 2x2 In Wall PoE Access Point ( 100mW ) Quick Start Guide V1.0a...
-
Page 2: Table Of Contents
Product Outward Appearance ....................3 Panel Function Descriptions ....................5 Installation the In wall Access Point ..................6 Software Configuration ......................7 Login IW-100 A1 Web Page ..................... 10 V1.0a... -
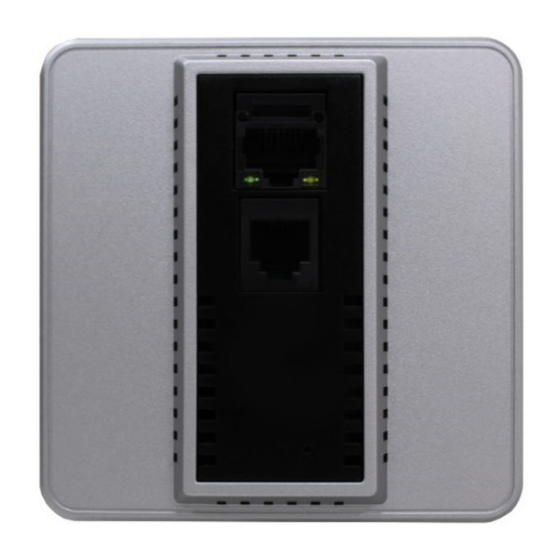
Page 3: Product Outward Appearance
1. Product Outward Appearance EU Device Reverse side Product Product Front + Faceplate Product Front Reverse side + Faceplate Product V1.0a... - Page 4 US Device Reverse side Side Product Product Product Front + Faceplate Reverse side + Faceplate Product Front Product V1.0a...
-
Page 5: Panel Function Descriptions
2. Panel Function Descriptions Product Front (1) RJ-45 Ethernet Port (2) Ethernet LED When right side orange light lit indicates starting device, enter the software boot program LED will goes out. When system is operating normally, client connection Ethernet port and transfer data then LED is green light flashing. -
Page 6: Installation The In Wall Access Point
Step 1: Pulled out on the wall for RJ45 Ethernet cable( With PoE Source ), Use the RJ45 Ethernet cable(connected to the IW-100 A1 in rear of the PoE port. Step 2: Slide the Wall AP into the frame until it is flushed into the Wall. -
Page 7: Software Configuration
Software Configuration PC to device setup by OS Windows7 Step 1 : Please click on the computer icon in the bottom right window, and click “Open Network and Sharing Center” Step 2 : In the Network and Sharing Center page, Please click on the left side of “Change adapter setting”... - Page 8 Step 3 : In “Change adapter setting” Page. Please find Local LAN and Click the right button on the mouse and Click “Properties” Step 4 : In “Properties” page, please Click “Properties” button to TCP/IP setting V1.0a...
- Page 9 Step 5 : In Properties page to setting IP address, please find “Internet Protocol Version 4 (TCP/IPv4)” and double click or click “Install” button. Double click Or click Install button Step 6 : Select “Use the following IP address”, and fix in IP Address : 192.168.2.# ex.
-
Page 10: Login Iw-100 A1 Web Page
WMI (https://192.168.2.254). There will be a “Certificate Error”, because the browser treats system as an illegal website. 1. Login IW-100 A1 Web Page Launch Web Browser Launch as web browser to access the web management interface of system by entering the default IP Address, http://192.168.2.254, in the URL field, and then press Enter.
Need help?
Do you have a question about the IW-100 A1 and is the answer not in the manual?
Questions and answers