Table of Contents
Advertisement
Quick Links
Advertisement
Table of Contents

Subscribe to Our Youtube Channel
Related Manuals for Bticino AXOLUTE Nighter


Summary of Contents for Bticino AXOLUTE Nighter
- Page 1 349320 - 349321 AXOLUTE & Nighter Whice Installation manual 09/09-01 PC...
-
Page 3: Table Of Contents
AXOLUTE & Nighter Whice Contents 1 Introduction Warnings and tips Package content 2 Description Main functions Front view Video door entry function keys Navigation keys Rear view 3 Installation Wall installation with metal base supplied 4 Quick configuration 5 Advanced configuration Flexibility in composition Customisation of texts Other functionalities... -
Page 4: Introduction
Video station: - must only be installed indoors; - must not be exposed to drips or splashes of water; - must only be used on Bticino digital 2-wire video door entry systems. Package content the package contains: •... -
Page 5: Description
2 Description Main functions the Bticino axolute Video station is the evolution of the video handset which can be used in man- aging the home system. as well as all the 2-wire digital door entry functions, in systems combined with the My Home multimedia system, axolute Video station can manage the home: from security to well-being to entertainment (display of the alarm state, sound system, temperature setting in single rooms) with sound system amplifier function. -
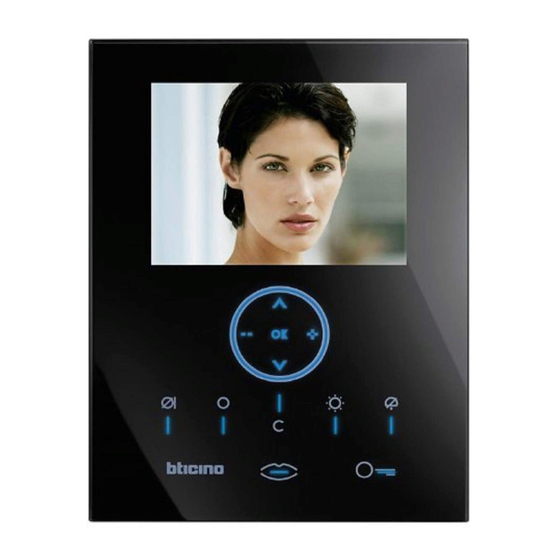
Page 6: Front View
2 Description Front view 8" colour lCD screen Microphone Navigation keys led and Video door entry function keys... -
Page 7: Video Door Entry Function Keys
AXOLUTE & Nighter Whice Video door entry function keys mute Disables/enables the microphone during a sound connection. activating the Mute during the conversation the connection key lED turns red. activation Entrance Panel/Cycling activates the switching ON of the associated Entrance Panel and cycles any other Entrance Panels/cameras. -
Page 8: Rear View
Mini-usB connector for connection to the PC loudspeakers to play voice and stereo sound screw to fasten the Video station to the metal base Connector for extra power supply Connector for connection of the Bticino 2-wire digital system Bus stretch end ON/OFF microswitch... -
Page 9: Installation
AXOLUTE & Nighter Whice 3 Installation Wall installation with metal base supplied to fasten the base use screw anchors and screws of the correct size. Do not fasten the base directly to the flush-mounted box. 346000 230 Vac after making all the connections fasten the axolute Video station to the base being careful to arrange the wires so that they are not damaged. -
Page 10: Quick Configuration
4 Quick configuration QUiCk ConfigUration by mEans of m ConfigUrator Note: If the apartment has the 2-wire apartment interface item 346850 the Axolute Video Station should be configured using Advanced Configuration the quick configuration is recommended for standard video door entry systems where no special functions are required and short installation times are important. - Page 11 AXOLUTE & Nighter Whice selection of mode m the main menu page will be made up of a set of predefined video door entry functions which can be selected with M = 0 – 6. m= 0 m= 4 INTERCOMMUNICATING I CAMERA I m= 1 m= 5...
- Page 12 4 Quick configuration iintErCommUniCating: intercommunicating call to the Handset with address N same as the number indicated by the icon selected. (e.g.: INtERCOMMuNICatING 4 intercom- municating call address to the Handset with N = 4) CamEra: direct activation of the camera with the same address as the associated Entrance Panel increased by a number equal to that indicated by the icon selected.
-
Page 13: Advanced Configuration
AXOLUTE & Nighter Whice 5 Advanced configuration Configuration from PC by means of the tiaxoluteNighterandWhicestation software in the CD sup- plied lets you configure the main menu page without being limited to a predefined set of func- tions. the type, parameters and text of each function can be customised. •... -
Page 14: Customisation Of Texts
5 Advanced configuration Customisation of texts the items in the axolute Video station menu (e.g. sCENaRIO 4 = Night sCEN, COMMuNICatION = Intercom in the home) can be customised. the following are also possible for the following systems: aLarms • customise the messages associating a descriptive text to the zone where the alarm comes from •... -
Page 15: Other Functionalities
AXOLUTE & Nighter Whice Other functionalities sCEnarios anD CommUniCation More than one call for scenarios and communication can be added in the first page. In this way up to 30 scenario or communication functions can be entered COMMUNICATION INTERCOMMUNICATING I SCENARIO I In the example at the side 12 communication functions and 18 scenarios can be entered. -
Page 16: Connection To The Pc
5 Advanced configuration Connection to the pc to transfer the configuration made with the tiaxoluteNighterandWhicestation software or up- date the firmware connect to the axolute Video station to the PC using usB-miniusB cable. in order for the communication to occur, the axolute Video station must be powered and not physically configured. -
Page 17: Settings
AXOLUTE & Nighter Whice 6 Settings after configuring the axolute Video station, you can view and modify the configuration settings in the sEttINGs menu. SETTINGS CONFIGURATION SETTINGS ADJUSTMENT SERVICES For information about these menus please consult the User manual in the CD enclosed. MESSAGGES BELLS INFORMATION... -
Page 18: Configuration Menu
6 Settings access to the Configuration menu select sEttings Press ok to confirm SETTINGS Configuration menu select ConfigUration Press ok to confirm CONFIGURATION a WaRNING message is displayed ! WARNING ! AREA RESERVED FOR select QUit CONFIGURATION OF THE DEVICE Press ok to quit >... -
Page 19: Options
AXOLUTE & Nighter Whice 6.1.1 options On selecting OPtIONs access is possible to the following system settings. > OPTIONS select oPtions PARAMETER MODE H CONFIGURATION RESET Press ok to confirm > SLAVE <NO> select (e.g.: sLaVE) MASTER CLOCK <NO> PAGING <NO> DEFAULT select <no>/<yEs>... -
Page 20: Handset Configuration
6 Settings 6.1.2 Handset configuration On selecting H CONFIGuRatION the address (N) of the axolute Video station and/or the associ- ated Entrance Panel (P) can be edited. OPTIONS select H ConfigUration PARAMETER MODE > H CONFIGURATION RESET Press ok to confirm select aDDrEss (N) and/or (P) H CONFIGURATION >... -
Page 21: Reset
AXOLUTE & Nighter Whice 6.1.3 reset selecting REsEt cancels all the data and returns the axolute Video station to the factory settings. OPTIONS select rEsEt PARAMETER MODE H CONFIGURATION > RESET Press ok to confirm the following message is displayed CANCEL THE CONFIGURATION OF THE Press ok to quit the menu... -
Page 22: Trouble Shooting
mEmo CarD 7 Trouble shooting ProbLEm soLUtion - check that the handset and entrance panel have been correctly wired and configured (must have on pressing the Entrance panel activation/Cycling the same P address); ( ) key no picture appears - the audio/video channel may be busy, wait for it to become free and try again. -
Page 23: Push To Talk Mode
AXOLUTE & Nighter Whice Push to talk mode Receiving a call from the entrance panel. Press the Connection key to answer the call. the lED is ON. During the conversation you can activate the PusH tO talk function. Press the Connection key for at least 2 sec- onds to talk to the entrance panel. -
Page 24: Appendix
8 Appendix tECHniCaL Data Power supply from sCs bus: 18 – 28 V absorption (Max) 600 ma (when there is no audio signal) Operating temperature 0 – 40 °C... - Page 25 AXOLUTE & Nighter Whice Notes...
- Page 26 Notes...
- Page 28 BTicino SpA Via Messina, 38 20154 Milano - Italy www.bticino.com Bticino spa reserves at any time the right to modify the contents of this booklet and to communicate, in any form and modality, the changes brought to the same.
Need help?
Do you have a question about the AXOLUTE Nighter and is the answer not in the manual?
Questions and answers