Advertisement
Table of Contents
- 1 Wall Mounting Installation
- 2 Front View
- 3 Back View
- 4 Legend
- 5 Bell Selection
- 6 Bell Selection from the Secondary Entrance Panel (S=1)
- 7 Selection Call to the Floor Bell
- 8 Selection Call Intercom Bell
- 9 Configuration MOD
- 10 Paging Function
- 11 Office Function
- 12 Door State Function
- Download this manual
95 mm
192
mm
• Installazione a parete
• Wall mounting installation
• Installation murale
• Wand-Installation
3
45 mm
• Altezza consigliata salvo diversa normativa vigente.
• Recommended height, unless different regulations are
specified.
• Hauteur conseillée sauf autre norme en vigueur.
• Empfohlene Höhe falls die gesetzlichen Vorschriften nichts
anderes vorschreiben.
• Altura recomendada salvo normativa vigente diferente
• Aanbevolen hoogte behoudens andere normen in voege.
• Altura aconselhada a não ser se a norma em vigor for
diferente.
• Προτεινόμενο ύψος με εξαίρεση διαφορετικό κανονισμό.
• Рекомендуемая высота, если не указаны другие
требования.
• Geçerli normatif tarafından farklı şekilde belirlenenler hariç
olarak, tavsiye edilen yükseklik.
• Zalecana wysokość z zastrzeżeniem innych obowiązujących
przepisów.
• Instalación mural
• Wandinstallatie
• Instalação de parede
• Επιτοίχια εγκατάσταση
1
4
• Настенная установка
• Duvara montaj
• Instalacja naścienna
2
344272
Advertisement
Table of Contents

Related Manuals for Bticino 344272


Summary of Contents for Bticino 344272
- Page 1 344272 95 mm 45 mm • Altezza consigliata salvo diversa normativa vigente. • Recommended height, unless different regulations are specified. • Hauteur conseillée sauf autre norme en vigueur. • Empfohlene Höhe falls die gesetzlichen Vorschriften nichts anderes vorschreiben. • Altura recomendada salvo normativa vigente diferente • Aanbevolen hoogte behoudens andere normen in voege. • Altura aconselhada a não ser se a norma em vigor for 192 diferente. • Προτεινόμενο ύψος με εξαίρεση διαφορετικό κανονισμό. • Рекомендуемая высота, если не указаны другие требования. • Geçerli normatif tarafından farklı şekilde belirlenenler hariç olarak, tavsiye edilen yükseklik. • Zalecana wysokość z zastrzeżeniem innych obowiązujących przepisów. • Installazione a parete • Instalación mural • Настенная установка...
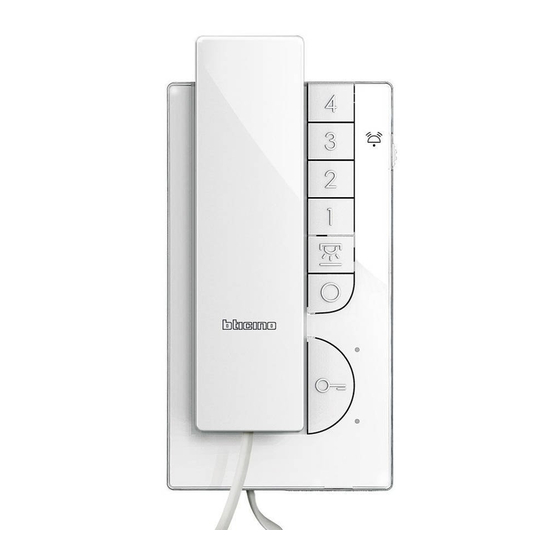
- Page 2 • Vista frontale • Vista frontal • Вид спереди • Front view • Vooraanzicht • Önden görünüş • Vue frontale • Vista frontal • Widok z przodu • Ansicht von vorn • Εμπρόσθια όψη 1. 4 toetsen die aan de hand van de configuratie geprogrammeerd kunnen worden 2. Rode LED signalering uitsluiting oproep. 3. Volumeregeling beltoon / uitsluiting oproep. 4. Bedieningstoets inschakeling traplicht.
- Page 3 Attenzione: il citofono deve rispettare le seguenti Atención: el interfono debe respetar las siguientes Предостережение: при монтаже внутреннего regole installative normas de instalación: видеоблока следует соблюдать следующие правила - se debe instalar sólo al cubierto; - устройство следует устанавливать только внутри - deve essere installato solo in ambienti interni; - non deve essere esposto a stillicidio o a spruzzi - no debe estar expuesto a goteo o salpicones de agua; помещений; - no tape las aberturas de ventilación; - устройство следует защищать от попадания на него d’acqua; - non ostruire le aperture di ventilazione; - se debe utilizar exclusivamente en sistemas 2 hilos капель или брызг воды; - deve essere usato unicamente su sistemi 2 fili SCS SCS BTicino. - запрещается перекрывать вентиляционные BTicino. Cualquier uso impropio del artículo puede отверстия; Ogni uso improprio dell’articolo puó comprometterne comprometer sus características de seguridad. - устройство должно использоваться только с le caratteristiche di sicurezza. двухпроводными системами SCS BTicino Let op: Bij de installatie van de telefoon moet men de Нарушение правил эксплуатации может привести к Caution: the internal unit must respect the following volgende voorschriften in acht nemen выходу прибора из строя. installation rules - binnenshuis installeren; - it must only be installed indoors; - niet aan waterdruppels en -stralen blootstellen; Dikkat: dahili ünite, aşağıdaki kurma kurallarına - it must not be exposed to water drops or splashes;...
- Page 4 Legenda Leyenda Условные обозначения • • • Legend Legende Açıklamalar • • • Légende Legenda Legenda • • • Erläuterung Υπόμνημα • • Attivazione del PE Activating the EP Activation du PE (con f i- Aktivierung der Türstati- Activación del PE Rechtstreekse activering (configurato con P+1) (configured with P+1) guré avec P+1) en mode on (mit P+1 konfiguriert) (configurado con P+1) van het deur s tation (als in mo d o di r et t o sen z a directly without the call direct sans l’appel ou auf direkte Weise ohne...
- Page 5 –+ Legenda MOD=9 Leyenda Условные обозначения • • • Legend Legende Açıklamalar • • • 346210 Légende Legenda Legenda • • • P+1 P+1 Erläuterung Υπόμνημα • • MOD=5 –+ MOD=9 Apertura serratura del Door lock opening of EP Ouverture serrure du PE Türöffnung der Türstati- Apertura cerradura Rechtstreekse opening PE (con f i g urato con P+3) (con f igured with P+3) (con f i g u r é avec P+3) en on (mit P+3 konfiguriert)
- Page 6 Legenda Leyenda Условные обозначения • • • Legend Legende Açıklamalar • • • Légende Legenda Legenda • • • Erläuterung Υπόμνημα • • Intercom all’interno Intercommunicability Intercommunication Gegenseitige Intercomunicación Intercom binnen in dell’appartamento in inside an apartment in à l’intérieur de Kommunikation en el apartamento het appartement in impianti con interfaccia systems with apartment l’appartement sur innerhalb der Wohnung en instalaciones con installaties met interface di appartamento interface item 346850 installations avec...
- Page 8 • Selezione suoneria • Läutwerk wählen • Selecção toques • Zil sesi seçimi • Bell selection • Selección del timbre • Επιλογή κουδουνιού • Wybór dźwięku sygnału wywołania • Sélection sonnerie • Beltoon kiezen • Выбор мелодии • Selecção do toque para chamada da unidade externa principal (S=0). • Selezione suoneria da posto esterno principale (S=0). • Selection call from main outdoor station (S=0) bell. • Επιλογή κουδουνιού από κύριο εξωτερικό σημείο (S=0).
- Page 9 Configurazione MOD Configuración MOD Конфигурация MOD Konfiguration MOD Configuratie MOD MOD konfigürasyon Configuration MOD Configuração MOD Konfiguracja MOD MOD configuration Διαμόρφωση MOD 20 = B 40 = C 80 = D Configurazione scelta per funzionamento tasti. Gewählte Konfiguration für die Tastenfunktionen. Configuration choisie pour fonctionnement touches. Configuration chosen for key operation. Configuración modo de funcionamiento botones. Gekozen configuratie voor de functie van de toetsen. Configuração escolhida para o funcionamento das teclas. Επιλεγμένη διαμόρφωση για την λειτουργία πλήκτρων. Конфигурация, выбранная для режима работы кнопок. Tuşların çalışma modu için seçilen konfigürasyon Konfiguracja wybrana dla trybu pracy klawiszy.
- Page 10 Funzione Cerca persone Función buscapersonas Функция Paging (Оповещение) Funktion Personensuche Functie buzzer Kişi arama fonksiyonu Fonction cherche-personnes Função de procura pessoas Funkcja Poszukiwanie osób Paging function Λειτουργία αναζήτησης ατόμων • Questa funzione permette di diffondere un messaggio vocale, dettato al microfono del dispositivo, tramite gli altoparlanti dell’impianto Diffusione sonora. L’attivazione avviene premendo brevemente il tasto “Connessione” con il dispositivo in stato di riposo, il led verde acceso indica che la funzione è attiva. Per terminare la funzione premere nuovamente il tasto “Connessione”. • Mit dieser Funktion kann man eine Audiomeldung durch das Mikrophon der Vorrichtung über die Lautsprecher der Schalldiffusionsanlage aussenden. Die Aktivierung erfolgt durch einen kurzen Druck der Taste „Verbindung“ wenn die Vorrichtung auf Ruhestand geschaltet ist. Die grüne eingeschaltete Leuchte meldet dass die Funktion aktiv ist. Um die Funktion auszuschalten, die Taste „Verbindung“ nochmals drücken. • Cette fonction permet de diffuser un message vocal dicté au micro du dispositif par l’intermédiaire des haut-parleurs du système de Diffusion sonore. L’activation est obtenue en appuyant briève- ment sur la touche “ Connexion” quand le dispositif est au repos; allumé, le voyant vert indique que la fonction est active. Pour désactiver la fonction, appuyer à nouveau sur la touche “ Connexion”. • This function plays a voice message, spoken at the device microphone, through the Sound system loudspeakers. It is activated by pressing the “Connection” key with the device in rest state. The ON green LED indicates that the function is active. To end the function press the “Connection” key again.
Need help?
Do you have a question about the 344272 and is the answer not in the manual?
Questions and answers