Table of Contents
Advertisement
Quick Links
Advertisement
Table of Contents

Related Manuals for Intellinet 502566


Summary of Contents for Intellinet 502566
- Page 1 WIRELESS SUPER G ROUTER USER MANUAL MODEL 502566 INT-502566-UM-0606-02...
-
Page 2: Fcc Interference Statement
REGULATORY NOTES AND STATEMENTS Wireless LAN, Health and Authorization for Use Radio frequency electromagnetic energy is emitted from wireless LAN devices. The energy levels of these emissions, however, are far much less than the electromagnetic energy emissions from wireless devices like mobile phones. Wireless LAN devices are safe for use per frequency safety standards and recommendations. -
Page 3: Export Restrictions
However, there is no guarantee that interference will not occur in a particular installation. If this equipment does cause harmful interference to radio or television reception, which can be determined by turning the equipment off and on, the user is encouraged to try and correct the interference by one or more of the following measures: 1. -
Page 4: Table Of Contents
Windows 2000 ... 12 Windows XP ... 13 5. Configuration ... 14 Login to the Router through a Wireless LAN ... 14 Login to the Wireless Super G Router ... 14 Using the Web Browser ... 14 Setup Wizard ... 15 Advanced Configuration ...20... -
Page 5: Section Page
About This Manual Congratulations on purchasing the INTELLINET NETWORK SOLUTIONS Wireless Super G Router, Model 502566. This integrated access device combines Internet gateway functions with a wireless LAN and Fast Ethernet switch. It provides a complete solution for Internet surfing and office-resource sharing, and it is easy to configure and operate. -
Page 6: Introduction
All linked computers can make full use of broadband capabilities over such a device. The INTELLINET NETWORK SOLUTIONS Wireless Super G Router not only comes equipped with a wide range of features, but also can be installed and configured right out of the box. This device supports a simple local area network (LAN) and Internet access share, offering great savings. -
Page 7: Features
FEATURES • High-speed data-transfer rate • Supports NAT for sharing one IP address with all LAN/WLAN users • Supports PPPoE and PPTP protocols for dial-up ADSL • Supports 64/128-bit WEP encryption • Supports WPA-PSK, WPA2-PSK, WPA, WPA2 security • Supports DHCP server/client •... -
Page 8: Unpacking And Setup
Do not place heavy objects on the router. • Fix the direction of the antennas. Try to place the router in a position that can best cover your wireless network. Normally, the higher you place the antenna, the better the performance will be. -
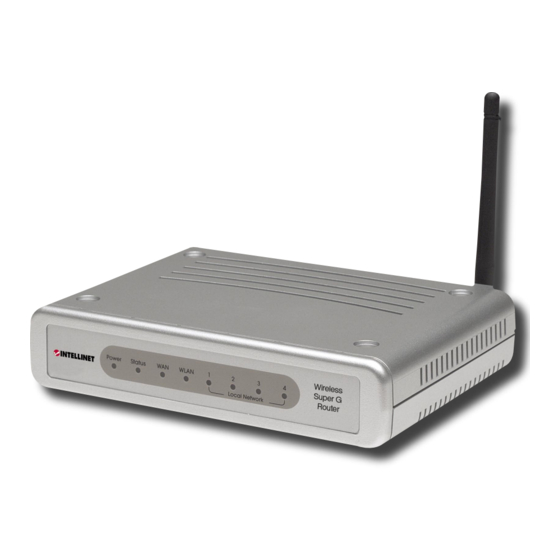
Page 9: Hardware Installation
Power — This indicator lights green when the hub is receiving power; otherwise it is off. Status — This indicator blinks green when the router is working. If it stays on or off, the router is not working. WAN (Link/ACT) — This indicator lights green when the WAN port has been connected to an xDSL/cable modem successfully. -
Page 10: Hardware Connections
HARDWARE CONNECTIONS Connecting the router 1. Plug in one end of the network cable to the WAN port of the router. 2. Plug in the other end of the network cable to the Ethernet port of the xDSL or cable modem. -
Page 11: Pc Network Tcp/Ip Settings
4. PC NETWORK TCP/IP SETTINGS The network TCP/IP settings differ based on the computer’s operating system (Win95/98/Me/NT/2000/XP) and are as follows. WINDOWS 95/98/M 1. Click on the “Network neighborhood” icon found on the desktop. 2. Click the right mouse button and a context menu will be shown. -
Page 12: Windows 2000
6. Select “None” for the “Gateway” field. WINDOWS 2000/NT Double click on the “My computer” icon on the desktop. When the “My computer” window opens, open the “Control panel” and then the “Network dialup connection”applet. Double click on the “Local area network connection”... -
Page 13: Windows Xp
WINDOWS XP Point the cursor and right click on the “My Network Place” icon. Select “Properties” to enter the TCP/IP setting window. 1. Set “IP address” to “Obtain an IP address automatically.” 2. Set “DNS” to “Obtain DNS server address address automatically.”... -
Page 14: Configuration
5. CONFIGURATION First make sure that the network connections are functioning normally. This Wireless Super G Router can be configured using Internet Explorer 5.0 or newer Web browser versions. LOGIN TO THE ROUTER THROUGH A WIRELESS LAN Before configuring the router through a WLAN, make sure that the SSID, Channel and WEP are set properly. -
Page 15: Setup Wizard
Setup Wizard is provided as the part of the Web configuration utility. You can get the wireless router configuration ready to run in six easy steps by clicking on the “Wizard” button on the function menu. The screen at the right will appear. - Page 16 Step 4. Set the Internet connection Select how the router will set up the Internet connection: • Obtained IP automatically • Fixed IP address • PPPoE to obtain IP automatically • PPPoE with a fixed IP address • PPTP Obtain IP automatically (DHCP client)
- Page 17 PPPoE to obtain IP automatically If connected to the Internet using a PPPoE (dial-up xDSL) modem, the ISP will provide a password and username, and then the ISP uses PPPoE. Choose this option and enter the required information. PPPoE with a fixed IP address If connected to the Internet using a PPPoE...
- Page 18 PPTP If connected to the Internet using a PPTP (xDSL) modem, enter your IP address, subnet mask, gateway, server IP, PPTP account and PPTP password in the appropriate fields. If your ISP has provided you with a connection ID, enter it in the “Connection ID”...
- Page 19 Step 6. Setup completed Setup Wizard is now completed. The new settings will be effective after the router is restarted. Click “Restart” to reboot the router. If you do not want to make any changes, click “Exit” to quit without any changes.
-
Page 20: Advanced Configuration
Domain Name: Type the local domain name of the network in the text box. This item is optional. This screen enables the user to set up the router WAN connection; specify the IP address for the WAN; add DNS numbers; and enter the MAC address. - Page 21 DNS 1/2/3: Type up to three DNS numbers in the text boxes. Your ISP will provide this information. MAC Address: If required by your ISP, type the MAC address of the router WAN interface in this field. Password...
-
Page 22: Wireless
Default NTP server: The Simple Network Time Protocol (SNTP) server allows the Wireless Super G Router to synchronize the system clock to the global Internet through the SNTP server. Specify the NTP domain name or IP address in the text box. - Page 23 WEP Encryption mode in ASCII or HEX. WEP Key: Select the level of encryption from the drop-down list. The router supports 64- and 128-bit encryption. Key 1 — Key 4: Enables the user to create an encryption scheme for wireless LAN transmissions.
- Page 24 Lifetime: Select the Lifetime of the Encryption Key (5 Minutes to 1 Day). As soon as the lifetime of the Encryption Key is over, the Encryption Key will be renewed by the RADIUS Server. Encryption Key: Select the Encryption Key Length (64 bits or 128 bits) that you would like to use.
-
Page 25: Status
Antenna Transmit Power: Adjust the power of the antenna transmission by selecting from the drop-down list. Status This selection enables user to view the status of the router LAN, Wireless and WAN connections, and view logs and statistics pertaining to connections and packet transfers. - Page 26 WAN via the router. Click “DHCP Renew” to reassign IP addresses to client stations connected to the WAN. This screen enables the user to view a running log of router system statistics, events and activities. The log displays up to 200 entries. Older entries are overwritten by new entries.
- Page 27 Syslog Server: Type the IP address of the Syslog Server if you want the router to listen and receive incoming Syslog messages. Log Type: Enables the user to select what items will be included in the log: •...
-
Page 28: Routing
Dynamic. Routing Table enables the user to view the information created by the router that displays the network interconnection topology. Static This enables the user to set parameters by which the router forwards data to its destination if the user’s network has a static IP address. Network Address: Type... -
Page 29: Access
Disabled, RIP 1 or RIP 2. Routing Table This screen enables the user to view the routing table for the router. The routing table is a database created by the router that displays the network interconnection topology. - Page 30 Filters Using filters denies or allows user access. There are five types of filters to select from: MAC Filters, URL Blocking, IP Filters, Protocol Filters and Domain Blocking. MAC Filters MAC Filter: Enables you to allow or deny Internet access to users within the LAN based on the MAC address of their network interface.
- Page 31 URL Blocking You can enable URL Blocking to deny users from accessing the specified URL. Add those specified URLs in the text box. IP Filters This screen enables you to define a minimum and maximum IP address range filter; all IP addresses falling in the range are not allowed Internet access. The IP filter profiles are listed in the table at the bottom of the page.
- Page 32 Virtual Server This screen enables the user to create a virtual server via the router. If the router is set as a virtual server, remote users requesting Web or FTP services through the WAN are directed to local servers in the LAN. The router redirects the request via the protocol and port numbers to the correct LAN server.
- Page 33 Enable: Click to enable or disable the application profile. When the profile is enabled, users will be able to connect to the application via the router’s WAN connection. Click “Disabled” on a profile to prevent users from accessing the application on the WAN.
- Page 34 This screen enables the user to set up the firewall. The router provides basic firewall functions by filtering all the packets that enter the router using a set of rules. The rules are in an order sequence list: the lower the rule number, the higher the priority the rule has.
-
Page 35: Management
Enable: Click to enable or disable the firewall rule profile. Name: Type a descriptive name for the firewall rule profile. Action: Select whether to allow or deny packets that conform to the rule. Source: Defines the source of the incoming packet that the rule is applied to. - Page 36 (normally, the DNS name). System Contact: A description of the contact information for the person responsible for the router. Community: The SNMP system name for exchanging SNMP community messages. The name can be used to limit SNMP messages passing through the network.
-
Page 37: Tools
Restore Factory Default Settings: Click “Restore” to restore the default settings. All configuration changes will be lost. Firmware This screen enables the user to keep the router firmware up to date. Follow the instructions below. Download the latest firmware from the manufacturer’s Web site, and save it to disk. - Page 38 Select the file and click “Upgrade” to update the firmware to the latest release. Ping Test The ping test enables the user to determine whether an IP address or host is present on the Internet. Type the hostname or IP address in the text box and click “Ping.”...
-
Page 39: Technical Specifications
6. TECHNICAL SPECIFICATIONS GENERAL Standards Protocol Radio Technology Data Transfer Rate Topology Receiver Sensitivity TX Power Network Cables Frequency Range Modulation Schemes Security Channels Number of Ports PHYSICAL AND ENVIRONMENTAL DC inputs Power Consumption Temperature Humidity Dimensions EMI: IEEE 802.3u 100BASE-TX Fast Ethernet IEEE 802.11g;... - Page 40 Are you completely satisfied with this product? Please contact your INTELLINET NETWORK SOLUTIONS dealer ™ with comments or questions. Copyright © INTELLINET NETWORK SOLUTIONS All products mentioned are trademarks or registered trademarks of their respective owners.
Need help?
Do you have a question about the 502566 and is the answer not in the manual?
Questions and answers