Advertisement
Quick Links
Advertisement

Subscribe to Our Youtube Channel
Related Manuals for Flywoo CineRace20 ANALOG PRO


Summary of Contents for Flywoo CineRace20 ANALOG PRO
- Page 1 FLYWOO CineRace20 ANALOG PRO V1.0 CineRace20 ANALOG PRO Manual...
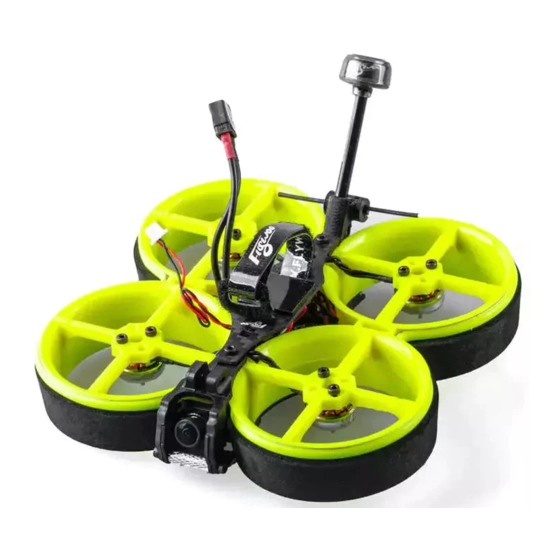
- Page 2 CineRace is double duct design , not a simple guard anymore. . It can fly as flexible as a racing drone, and as stable as Cinewhoop. Pilots can quietly enjoy the fun of shooting a video without jelly and up to 12 minutes Super long flight time with Flywoo's latest 4S HV 900mah Battery !
- Page 3 FLYWOO CineRace20 ANALOG PRO V1.0 Features 1. Almost all parts are injection molded. ABS\PC material. More sturdy and durable. 2. Very easy to disassemble and install, only fixed by two aluminum columns. 3. Pilots can freely combine their favorite colors to be more individual 4.
-
Page 4: Specification
Weight: 94.7g (without battery) FC & ESC : GOKU GN 405S 20A AIO Frame: CineRace20 Frame Kit Motors: NIN V2 1203PRO 3400Kv Props: Gemfan D51 -5 VTX: HM850vtx Antenna: Flywoo Circular RHCP 5.8Ghz Ant ( UFL-Length: 115mm \ Tube 45mm ) - Page 5 FLYWOO CineRace20 ANALOG PRO V1.0 Highly recommended battery Explorer 4S HV 300mah Battery (You will get good flight time and fly quite flexible) Explorer 4S HV 900mah Battery (You will get a super long flight time, and the flight will...
- Page 6 FLYWOO CineRace20 ANALOG PRO V1.0 PID and filter settings...
- Page 7 FLYWOO CineRace20 ANALOG PRO V1.0 Default serial port settings UART1: ELRS/TBS/R9M/XM+/DSMX/SBUS receiver UART2: Bluetooth module, the default baud rate is 115200 UART3: NULL UART4: VTX IRX TX UART5: NUL UART6: NUL 3/ Receiver binding TBS NANO 915: When the USB is connected, the green light of the receiver flashes, and then bind...
- Page 8 FLYWOO CineRace20 ANALOG PRO V1.0 according to the picture operation. https://www.youtube.com/watch?v=-iNkVcOLITM&ab_channel=Danimal3D ELRS 2.4G RX: Bind procedure: - Supply power to the EL24E/EL24P rx, wait until the LED on the RX is off, immediately turn off the power, and then repeat again the above steps. When the RX is powered on...
- Page 9 FLYWOO CineRace20 ANALOG PRO V1.0 2/ Insert the R9M TX module and write the firmware you need 3/ To write the firmware of the R9MM receiver, you need to remove the R9MM receiver, and then write the firmware by connecting to the S.PORT port.
- Page 10 FLYWOO CineRace20 ANALOG PRO V1.0 XM+ receiver: 1/ Press the XM+ receiver button, USB power supply, the red and green lights are always 2/ The remote control turns on the binding mode, the green light flashes to indicate successful binding, turn off and restart 3-1/ Then set the corresponding serial port and receiver protocol to ensure the normal output of each channel of the receiver.
- Page 11 FLYWOO CineRace20 ANALOG PRO V1.0 4/ Mode setting: Set the ARM switch and flight mode switch, AUX* corresponds to the remote control switch, and the yellow area mark is turned 5/ Motor test: Unload the propeller, test the rotation direction of the motor, turn on the safety switch, and test the rotation of the motors one by one.
- Page 12 FLYWOO CineRace20 ANALOG PRO V1.0 7/ Flight firmware upgrade and write default CLI 1/ Activate DFU mode...
- Page 13 FLYWOO CineRace20 ANALOG PRO V1.0 2/ BF Configurator will display to enter DFU mode. If it does not enter DFU mode, it may be that the driver is not installed. The driver can be installed using IMPULSE RC software Driver software: https://impulserc.blob.core.windows.net/utilities/ImpulseRC_Driver_Fixer.exe...
- Page 14 FLYWOO CineRace20 ANALOG PRO V1.0 4/ After the connection is entered, it is a blank interface, you need to write CLI commands, Factory CLI LINK: https://flywoo.net/pages/manual 5/ If the command is not restarted after writing the command, please write SAVE and...
- Page 15 FLYWOO CineRace20 ANALOG PRO V1.0 6/ Then all functions of FC return to normal.
- Page 16 FLYWOO CineRace20 ANALOG PRO V1.0 8/ Configuration table...
Need help?
Do you have a question about the CineRace20 ANALOG PRO and is the answer not in the manual?
Questions and answers