
Related Manuals for i-team i-mop XL Pro


Summary of Contents for i-team i-mop XL Pro
- Page 1 XL Pro Auto scrubber for floor surfaces User manual i-team Professional b.v. Hoppenkuil 27b, 5626 DD Eindhoven, The Netherlands Telephone: +31402662400 Email: hello@i-teamglobal.com Internet: www.i-teamglobal.com...
- Page 2 FASTER: Cleans 10 times faster than conventional wet mopping, backed-up by cleaning capacity of up to 1800 m per hour. CLEANER: Powerful twin counter-rotating 350 RPM brushes for soil removal validated by ATP test data, reflecting up to 90% cleaner surfaces. GREENER: Makes every ounce of chemical and every drop of water count.
-
Page 3: Preface
It also reduces the risk of slippery floors. The i-mop XL Pro is coated to withstand abrasive chemicals, this means it can be used at facilities like swimming pools and beach areas. -
Page 4: Purpose Of The User Manual
The purpose of the user manual is to provide the user with information in such a way that during the life of the i-mop XL Pro, the machine is used correctly, efficiently and safely, even in the event of reasonably foreseeable misuse, as described in section 1.2 of this manual. -
Page 5: Reading Guide
Reading guide The following symbols and terms are used throughout this manual to alert the reader to safety issues and important information: Symbol Term Explanation WARNING Indicates a hazardous situation which, if the safety instructions are not followed, can lead to injuries of the operator or bystanders and light or moderate damage to the product or the environment. -
Page 6: Table Of Contents
Content Preface ......................................3 Purpose of the user manual ..............................4 Target audience ..................................... 4 Operators of the i-mop XL Pro ..............................4 Reading guide ....................................5 Introduction ................................... 9 Intended use of the product ..........................9 Non-intended use of the product ........................10 Lifespan .................................. - Page 7 Assembly .................................. 20 5.2.1 Charging the batteries ..........................20 5.2.2 Attaching the brushes ..........................20 5.2.3 Attaching the squeegee ..........................21 5.2.4 Installing the recovery tank ........................21 5.2.5 Installing the cleaning solution tank ..................... 22 5.2.6 Attaching the recycle bin .......................... 22 5.2.7 Installing the drive support ........................
- Page 8 10.2 Specifications ................................43 10.3 The i-Story ................................44...
-
Page 9: Introduction
XL Pro. The batteries used in the i-mop XL Pro are the same as the ones in a variety of battery powered i-team products. The batteries must be fully charged before use. Please see the user manual of the class I battery charger for correct procedure. -
Page 10: Non-Intended Use Of The Product
• by trained adults only. 1.3 Lifespan Each i-mop XL Pro is guaranteed to operate for at least 2000 hours. The wear on brushes and squeegee heavily depends on the roughness of the surface. They need to be checked regularly. -
Page 11: Specifications
1.5 Specifications Figure 2 Product size: 120 x 48 x 46 cm Product size in store position: 120 x 48 x 36 cm Weight (including batteries): 22.5 kg Li-on battery: DC (25.2V, 14Ah, 353Wh) Battery capacity: 2 batteries Operation time of batteries: 90 min Brush pressure: 31.5 gr/cm... -
Page 12: Warranty
The i-mop XL Pro should be used as intended and described in this manual. Using the ® i-mop XL Pro outside will void the warranty on the product. 1.7 Identification The ID tag, containing a serial number and production number, can be found on the bar behind the wastewater tank. -
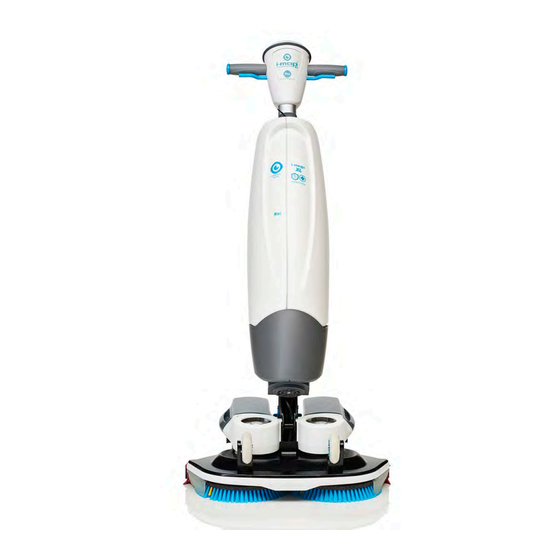
Page 13: Description
• triggers and control panel. The scrub deck that contains the brushes and squeegee. • The i-mop XL Pro can be folded into a store position; this is recommended for storage. The i-mop XL Pro consists of: Figure 4 Legend... -
Page 14: Safety
3 Safety Safety comes first. Therefore, please take your time to read and understand these safety instructions. Improper use can cause harm or void the manufacturer’s warranty. 3.1 General safety instructions 3.1.1 Sweep before scrub Remove objects from the floor that can be propelled by the rotating brushes. 3.1.2 Brush condition Make sure to check the condition of the brush before use. -
Page 15: Risks During Operation
3.2.3 Careful when parking Do not park the i-mop XL Pro on ramps or slopes. Always park the i-mop XL Pro on a level, hard surface. Do not park the i-mop XL Pro using the drive support ONLY, the device may fall sideways. -
Page 16: Transport And Storage
4.2 Store position CAUTION Do not put the i-mop XL Pro in store position while the drive support and the park support are active. First deactivate the drive support and the park support. The store position is the upright vertical position for storage and maintenance tasks. -
Page 17: Transport Outside
1. Put the i-mop XL Pro in store position, see section 4.2. ® 2. Carry the i-mop XL Pro with one hand while holding the handle with your other hand (Figure 6, pos. 1). CAUTION The transport wheels are not designed to roll over dirty surfaces, sand can cause the wheels to block. -
Page 18: Transport In A Vehicle
Please contact our sales department for more information. The i-mop XL Pro is a compact machine and fits in the trunk of your car. Before loading the i-mop XL Pro into your vehicle, make sure both tanks and battery packs are removed. -
Page 19: Assembly And Installation
® the brushes and squeegee. 5.1 Unboxing The i-mop XL Pro body is packed in a single box. The battery and charger are delivered in a separate box and can be ordered separately. Figure 8 1x i-mop XL Pro main body... -
Page 20: Assembly
5.2 Assembly 5.2.1 Charging the batteries Charge the batteries according to the instructions in the battery charger manual. Make sure the battery packs are charged regularly. 5.2.2 Attaching the brushes Figure 9 To attach the brushes: 1. Put the i-mop XL Pro in store position, see section 4.2. -
Page 21: Attaching The Squeegee
5.2.3 Attaching the squeegee Figure 10 To attach the squeegee: 1. Take the vacuum hose (Figure 10, pos. 1). 2. Insert the hose connector (Figure 10, pos. 2) in the squeegee (Figure 10, pos. 3). 3. Twist the hose connector ¼ turn for a firm fit (Figure 10, pos. 2). 4. -
Page 22: Installing The Cleaning Solution Tank
XL Pro in store position, ® see section 4.2. 2. Put the cleaning solution tank (Figure 12, pos. 1) on the i-mop XL Pro with the valve first. 3. Press the tank downward on the nipple to open the valve seal. -
Page 23: Installing The Drive Support
5.2.7 Installing the drive support 2. Place the i-mop XL Plus in the active ® position with the front of the main body leaning against a stable wall. 3. If present, remove the batteries. 4. Remove the nuts (Figure 14, pos. 1) from the bolts (Figure 14, pos. -
Page 24: Operation
6 Operation 6.1 Before you start Check the brushes and squeegee for wear and tear, see section 7 for maintenance. 6.1.1 Inserting the batteries CAUTION Only use i-power batteries specifically designed for use in i-mop devices. ® ® Figure 15 1. -
Page 25: Filling The Cleaning Solution Tank
6.1.2 Filling the cleaning solution tank 1. Remove the yellow cap (Figure 16, pos. 1). 2. Pour in a maximum of 1 gal / 4 L of water (Figure 16, pos. 2). 3. But back the yellow cap (Figure 16, pos. 1) and make sure it seals tightly. -
Page 26: Operation Procedure
2. Hold the handle with one hand (Figure 18, pos. 1). 3. Walk slowly and pay extra attention if you pull the i-mop XL Pro over obstacles. 4. To lift the i-mop XL Pro over obstacles, always use two hands. -
Page 27: At The Job Site
6.2.2 At the job site 1. Crouch down while holding the scrub deck firmly with one hand (Figure 19, pos. 2). 2. Push the handle forward with your other hand (Figure 19, pos. 1). 3. Bring the scrub deck slowly down to the floor. - Page 28 9. Steer by gently turning the handle left or right to move the scrub deck (Figure 20, pos. 10). 10. Releasing the trigger (Figure 20, pos. 9) will immediately stop the i-mop XL Pro. The vacuum motor will stop after 3 seconds.
- Page 29 To turn, stop walking and use your inside hand (the hand in the direction you want to go to) to turn the handle. The i-mop XL Pro can swivel 360 degrees making it possible to reverse direction.
-
Page 30: Drive Support
6.2.4 Park support WARNING Do not store the i-mop XL Pro in park position. To avoid wear on the brushes, an alarm will sound and lights will start blinking when the i-mop is in park position for over 10 minutes. -
Page 31: Lifter Kit
6.2.5 Lifter kit WARNING Walk slowly and pay extra attention when the lifter kit is activated. The floor remains wet. Make sure to mark the job site using a wet floor marker. Activating the lifter kit will lift the squeegee up, to give detergents some dwell time. 1. -
Page 32: Water Level Warning Indicator
6.2.8 Turning off the i-mop XL pro ® 1. Use the i-mop XL Pro main switch (Figure 27, pos. 1) and choose MODE 3 Brush + Dry vacuum (Figure 27, pos. 2). 2. Operate it about 15-20 feet / 4-6 meter farther to vacuum remaining cleaning solution up. -
Page 33: Cleaning And Storage
1. Refill the solution tank with 2 to 4 cups / 0.5 to 1 liter of clean water. 2. Use the i-mop XL Pro main switch (Figure 28, pos. 1) and choose MODE 4 Brush + Water/Cleaning solution + Dry vacuum (Figure 28, pos. -
Page 34: The Tanks
1. Put the i-mop XL Pro in store position, ® see section 4.2. 2. Hold the i-mop XL Pro by the scrub deck to stabilize. 3. While pressing both plastic pins inwards (Figure 29, pos. 1), pull each battery pack away (Figure 29, pos. -
Page 35: Store In An Upright Position
® stored in a place where nobody can bump into it. 2. Put the i-mop XL Pro in store position, see section 4.2. 3. Store the i-mop XL Pro close to a wall (Figure 30, pos. 1) with the handle pointing facing away from the wall and the brushes towards the wall. -
Page 36: Maintenance
5. Turn the right brush clockwise until you feel resistance or see the motor disk turning as well. 6. Pull the brush towards you, off the motor disk. 7. Visually inspect the motor disks. 8. Clean the i-mop XL Pro scrub deck with a clean, dry cloth before you install the brushes. -
Page 37: Squeegee Replacement
7.2 Squeegee replacement The squeegee blades come in pairs and wear out over time. When you notice the floor is no longer being dried properly, replace the squeegee blades. 7.2.1 Detaching the squeegee 1. Put the i-mop XL Pro in store position, ®... -
Page 38: Attaching The Squeegee
5. Now you can carefully pull the vacuum hose from the top of the machine. 6. Guide the new vacuum hose via the opening to the hose connector located at the i-mop XL Pro handle. 7. Connect the top to the hose connector by twisting it clockwise 1/4 turn until they have lined up. -
Page 39: Recommended Additional Cleaning
7.6 Accessories The i-mop XL Pro can be equipped with different brushes and polishing pads. The use of these accessories is only allowed by experienced and trained operators as some polishing pads can be abrasive and can cause damage to the floor surface when applied incorrectly. For more information please contact our sales department, or the partner who provided the i-mop XL Pro. -
Page 40: Troubleshooting
8 Troubleshooting Problem Cause Solution No power No batteries Insert batteries Empty batteries Charge batteries Batteries incorrectly placed Remove and reinstall batteries Insufficient/no water Wrong program Check the operating mode on the control panel flow Eco mode on Check the ECO mode light on the control panel Empty tank Fill the tank... -
Page 41: Decommissioning And Disposal
XL Pro owner to dispose of the product ® responsibly. After decommissioning, the i-mop XL Pro still contains valuable resources and needs to be disposed of according to your local laws and regulations regarding recycling of electrical equipment. Before disposal please: 1. -
Page 42: Attachments
10Attachments 10.1 CE Certificate... - Page 43 10.2 Specifications Product size: 120 x 48 x 46 cm Product size in store position: 120 x 48 x 36 cm Weight (including batteries): 22.5 kg Li-on battery: DC (25.2V, 14Ah, 353Wh) Battery capacity: 2 batteries Operation time of batteries: 90 min Brush pressure: 31.5 gr/cm...
- Page 44 Made Blue simultaneously ensures someone else on the planet gets access to clean water. For every liter that the i-mop uses in operations, the i-team and Made Blue mirror clean drinking water in a developing country. The planet is a beautiful place with over 7 billion people.
- Page 46 Professional b.v. Hoppenkuil 27b, 5626 DD Eindhoven, The Netherlands Telephone: +31402662400 Email: hello@i-teamglobal.com Internet: www.i-teamglobal.com...
Need help?
Do you have a question about the i-mop XL Pro and is the answer not in the manual?
Questions and answers