
Related Manuals for i-team co-botic 45


Summary of Contents for i-team co-botic 45
- Page 1 User manual i-team Professional b.v. Hoppenkuil 27b, 5626 DD Eindhoven, The Netherlands Telephone: +31402662400 Email: hello@i-teamglobal.com Internet: www.i-teamglobal.com...
- Page 2 You can use it in all kinds of hard floors rooms, glossy or rough floors. Also, if the path of the co-botic 45 is blocked it will come back later to clean the missed spot.
-
Page 3: Preface
The battery-operated co-botic 45 is equipped with a brush that provides a deep scrub and a great cleaning result. The co-botic 45 significantly reduces the amount of chemicals needed, which leads to a greener result. -
Page 4: Target Audience
Operators of the co-botic 45 The co-botic 45 may only be operated by a person who has correctly read and understood the instructions in this manual or is trained by an experienced operator who has read and understood the instructions in this manual. -
Page 5: Table Of Contents
Content Preface ......................................3 Purpose of the user manual ..............................3 Target audience ..................................... 4 Operators of the co-botic 45 ..............................4 Reading guide ....................................4 Content ......................................5 Introduction ................................... 8 Intended use of the product ..........................8 Non-intended use of the product ........................9 Lifespan .................................. - Page 6 Turning on and connecting the remote control..................23 6.2.4 Downloading the co-botic app ........................24 6.2.5 Selecting the co-botic 45 in the co-botic App ..................24 Remote cleaning ..............................25 Creating a map ............................... 25 6.4.1 Creating a map via the co-botic app (recommended) ................ 25 6.4.2...
- Page 7 Roller brush replacement ........................... 39 Recommended additional cleaning ........................ 40 Recommend service time ........................... 40 Accessories ................................40 Troubleshooting ................................41 Problems ................................... 41 Fault problems................................ 42 Report a problem via i-link ..........................45 ® Decommissioning and disposal ..........................46 10 Attachments ..................................
-
Page 8: Introduction
Figure 1 The solution can cause floors to become slippery; it is advised to mark the floor of the job site to warn people. (Please note: the wet floor sign is not part of the co-botic 45 system delivery). -
Page 9: Non-Intended Use Of The Product
1.3 Lifespan Each co-botic 45 is guaranteed to operate for at least 2000 hours. The wear on brushes and squeegee heavily depends on the roughness of the surface. These parts need to be checked regularly. -
Page 10: Modifications
1.4 Modifications It is not permitted to make modifications to the design of the co-botic 45 without consultation and permission from the manufacturer. Doing so affects the warranty, see section 1.6 of this manual. 1.5 Specifications Figure 2 Cleaning efficiency: Roller Scrubber/dryer ~ 1500 –... -
Page 11: Warranty
Downloadable cleaning reports (pdf file) Modular design on all parts 1.6 Warranty The co-botic 45™ should be used as intended and described in this manual. Using the co-botic 45 outdoors will void the warranty on the product. 1.7 Identification Each co-botic 45 has a unique serial number: •... -
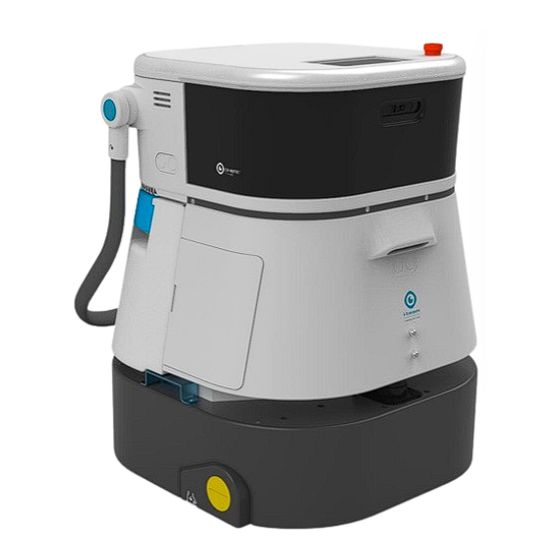
Page 12: Description
Figure 5 Legend Display Emergency stop Speaker Handle Ultrasonic wave radar Carrying handle Battery compartment Squeegee co-botic 45 main body Roller brush Remote control 2D laser radar Clean water tank Cliff detection sensor SIM-card slot 3D lidar sensor Recovery tank compartment... -
Page 13: Remote Control
2.1 Remote control The remote control consists of: 1. Antenna 2. Joystick 3. Power button 4. Connect button 5. On/Off indicator Figure 6 2.2 Main menu of the display The main menu of the display shows the following functions: 1. Cleaning task. Start cleaning tasks. -
Page 14: Main Menu Of The Co-Botic
2.3 Main menu of the co-botic 45 app Explanation of the main menu of the co-botic 45 app. 1. Displays the status of the selected co-botic 45. 2. Display, start, and create tasks. 3. Gives access to additional options, including settings. -
Page 15: Safety
3.2 Risks during operation 3.2.1 Radio interference The co-botic 45 is a Class A product which may cause radio interference. If this is the case, the operator may need to take practical steps against interference, such as planning another path or shutting down equipment. -
Page 16: Mark The Job Site
It is best practice to remove the battery after executing any cleaning or maintenance task. Be sure to take the battery out in case of long-term storage. 3.3.2 Careful when storing Do not store the co-botic 45 on ramps or slopes. Always store the co-botic 45 on a level, hard surface. -
Page 17: Transport And Storage
Lift the co-botic 45 while moving it from one building to another. CAUTION The co-botic 45 is heavy. Do not try to carry the unit by yourself. You should always use someone's help. When transporting the co-botic 45 inside: 1. -
Page 18: Transport In A Vehicle
1. Put the co-botic 45 in store position, see section 4.2. CAUTION The co-botic 45 is heavy. Do not try to carry the unit by yourself. You should always use someone's help. 2. Lift the co-botic 45 into your vehicle using the carrying handles (Figure 9, pos. 2). -
Page 19: Assembly And Installation
5.1 Unboxing The co-botic 45 is packed in a single box. The battery and the charger are optional. They can be ordered separately as they can also be used for other i-team products. When ordered with the co-botic 45, they are packed in the same box in a separate compartment. -
Page 20: Assembly
5.2 Assembly 5.2.1 Charging the battery Charge the battery according to the instructions in the battery charger manual. Make sure the battery is charged regularly. 5.2.2 Inserting the battery CAUTION Only use i-power batteries specifically designed for use in the co-botic™ 45. ®... -
Page 21: Operation
Before operating the co-botic 45, make sure that: • The battery of the co-botic 45 is installed, see section 5.2.2, and fully charged, see the manual of the battery charger; • The battery of the remote control is fully charged, see section 5.2.3;... -
Page 22: Setting Up The Co-Botic 45
6.2 Setting up the co-botic 45 6.2.1 Powering-on and unlocking the co-botic 45 1. Press the power button in front of the battery (Figure 11, pos. 3), the co-botic 45 will now power on. 2. Enter the 4-digit password on the display to unlock the co-botic 45. The default... -
Page 23: Connecting The Co-Botic 45 To The Network
1. Press the power button to turn on the remote control 2. Press the connect button to connect the remote control to the co-botic 45. The co-botic 45 ring will start “breathing” blue light, indicating that it is connected to the remote control. -
Page 24: Downloading The Co-Botic App
Login credentials for the co-botic app come provided with the co-botic 45. 1. Download the co-botic app from the Google Play store by performing a search in the store or by scanning the QR code. -
Page 25: Remote Cleaning
(recommended) or [Turn on App controller] to control the co-botic 45 via the app. 6. Map the space by moving the co-botic 45 around. 7. Select [Finish recording] when the space is sufficiently mapped. -
Page 26: Creating A Map Via The Display
[Turn on Remote Controller] and turn on the remote controller (recommended) or [Turn on App controller] to control the co-botic 45 via the app. 8. Map the space by moving the co-botic 45 around. 9. Select [✔] when the space is sufficiently mapped. -
Page 27: Expanding Or Re-Mapping A Map
6.4.4 Expanding or re-mapping a map When expanding or re-mapping an existing map, a new map will be generated and saved in the Maps menu. The newly generated map may take a few seconds to show up in the menu. Before expanding or re-mapping, do the following: Ensure the map you wish to edit is selected by selecting [Switch Map]... -
Page 28: Editing And Optimizing A Map
6.4.6 Editing and optimizing a map Editing and optimizing a map will tell the co-botic 45 where it is allowed to drive and/or clean. You do this by adding areas to the map which contain those specific rules. 1. Select the map you wish to edit. 2. -
Page 29: Creating A Cleaning Plan
(Figure 24, pos. 4) that the co-botic™ 45 will clean. 6. Create, if needed, a Virtual Wall (Figure 24, pos.2) and (Figure 24, pos. 3). Note that the co-botic 45 may drive over a virtual wall, but will not clean it. 7. Select [✔] to generate and save the plan. -
Page 30: Creating A Cleaning Plan Manually
45 will clean the area by moving from waypoint to waypoint. 6. Create, if needed, a Virtual Wall (Figure 24, pos.2) and (Figure 24, pos. 3) Note; the co-botic 45 may drive over a virtual wall, but will not clean it. 7. Select [✔] to generate and save the plan. -
Page 31: Creating A Cleaning Task
5. Select the map in which you wish to create the task (Figure 26, pos. 1). 6. Add the plans (Figure 26, pos. 4) that the co-botic 45 will include in the cleaning task and how many times (Figure 26, pos. 1) the plans are executed. -
Page 32: Starting A Cleaning Task
2. Find the cleaning task in the list of tasks and select [Start Now]. 6.7.1 Position localization When starting a cleaning task and the co-botic 45 is not at its starting position, select localization initiating. 1. Make sure the co-botic 45 is in the map that is currently selected (Figure 21, pos. -
Page 33: Cleaning
6.8 Cleaning CAUTION Remove the battery before executing any cleaning or maintenance task. 6.8.1 Removing the battery 1. Unlock and open the battery compartment lid (Figure 28, pos. 1) using the supplied key. 2. Power-off the co-botic™ 45 by pressing the on/off button (Figure 28, pos. -
Page 34: Cleaning The Recovery Tank, Float And Filter Bag
6.8.2 Cleaning the recovery tank, float and filter bag Clean the recovery tank after each cleaning task or on a daily basis. 1. Gently open the lid of the recovery tank compartment (Figure 30, pos. 3) on top of the co-botic™ 45. 2. - Page 35 To clean the filter bag, do the following: 9. Loosen the filter bag’s pull rope (Figure 32, pos. 3). 10. Remove the filter bag. 11. Clean the filter bag with clean water and dry it. (Or, alternatively, replace it with a new one.) 12.
-
Page 36: Cleaning The Roller Brush And Squeegee Blades
6.8.3 Cleaning the roller brush and squeegee blades Clean the roller brush and squeegee after each cleaning task or on a daily basis. 1. Open the lid of the roller brush and squeegee holder compartment (Figure 33, pos. 1). 2. Pull the roller brush and squeegee holder out of the compartment (Figure 33, pos. -
Page 37: Maintenance
7 Maintenance CAUTION Remove the battery before executing any cleaning or maintenance task. CAUTION Always keep the main body of the co-botic 45 in an upright position when taking out or inserting the roller brush and squeegee holder. 7.1 Daily maintenance The following components require daily maintenance: •... -
Page 38: Squeegee Replacement
7.5 Squeegee replacement The squeegee blades have two identical sides. When one of the sides is worn, the squeegee blades can be turned 180 degrees once. When both sides are worn, new squeegee blades must be mounted. To turn or replace the squeegee blades, follow the next steps. 1. -
Page 39: Roller Brush Replacement
7.6 Roller brush replacement If the roller brush needed thorough cleaning you can remove the roller brush from the roller brush and squeegee holder. When the roller brush is worn you must replace it with a new one. In both cases, follow the next steps. 1. -
Page 40: Recommended Additional Cleaning
800 hours. It is recommended to schedule a full service every 500 hours. 7.9 Accessories The co-botic 45 can be equipped with different squeegee blades for different floor surfaces. For more information please contact our sales department, or the partner who provided the... -
Page 41: Troubleshooting
If any issue might arise when using the co-botic™ 45, please read this chapter first. It consists of two sections: • Section 8.1 describing the most common problems when using the co-botic 45. • Section 0 describing the fault prompts on the display of the co-botic45. -
Page 42: Fault Problems
Co-botic is skidding Move the co-botic to a place with less water stains on the ground. Roller brush and squeegee do not Reboot the machine. If the lower problem persists, contact customer service (see section 8.3). Roller brush does not rotate Reboot the machine. - Page 43 Please check the 1. If the prompt does not appear frequently, it does not affect ultrasonic wave normal operation and can be ignored. radar surface for 2. If the prompt appears frequently, it may be caused by dirt on foreign matter the ultrasonic drive surface.
- Page 44 Please move the co- botic to a safe area There is a There is a software error. Restart the co-botic 45. communication error. Please restart the device There is an error The battery is not installed properly. Reinsert it tightly.
-
Page 45: Report A Problem Via I-Link
Ultrasonic wave 1. If the prompt does not appear frequently, it does not affect error normal operation and can be ignored. 2. If the prompt appears frequently, it may be caused by an ultrasonic drive error. Restart the co-botic. 8.3 Report a problem via i-link ®... -
Page 46: Decommissioning And Disposal
It is the responsibility of the co-botic™ 45 owner to dispose of the product responsibly. At the end-of-life the co-botic 45 still contains valuable resources and needs to be disposed of according to your local laws and regulations regarding recycling of electrical equipment. -
Page 47: Attachments
10 Attachments 10.1 CE Certificate... -
Page 48: Specifications
10.2 Specifications Figure 38 Cleaning efficiency: Roller Scrubber/dryer ~ 1500 – 2500 m² (Single Operation Cycle) Cleaning pressure: 2-6 kg Clean water tank capacity: 10 L Recovery tank: 10 L Battery Life: ~ 2 – 3 hours (1x i-power 20) Charging time: ~ 2 hours (i-charge 9c) Sensors:... -
Page 49: The I-Story
That's why Made Blue invests in projects in developing countries. We are a proud partner of Made Blue. Made Blue mirrors the water used by i-team to create clean water in developing countries. 1 liter for 1 liter. - Page 50 Professional b.v. Hoppenkuil 27b, 5626 DD Eindhoven, The Netherlands Telephone: +31402662400 Email: hello@i-teamglobal.com Internet: www.i-teamglobal.com...
Need help?
Do you have a question about the co-botic 45 and is the answer not in the manual?
Questions and answers