
Subscribe to Our Youtube Channel
Related Manuals for Wali GSMP002


Summary of Contents for Wali GSMP002
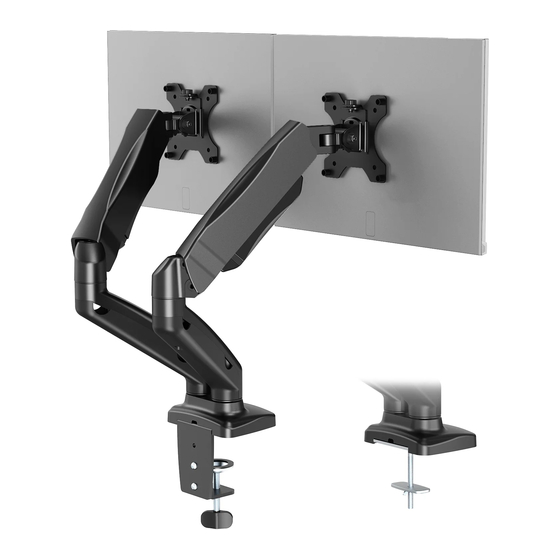
- Page 1 Dual Monitor Desk Mount GSMP002 32" 75x75/100x100 (2~9kg)x2 GSMP002W (4.4~19.8Ibs)x2 RATED support@walielectric.com...
- Page 3 Supplied Parts List VESA Plate C-Clamp Brace C-Clamp A (x1) B (x2) C (x1) D (x1) M6x10 Bolt M6x12 Bolt Metal Pad E (x2) F (x3) G (x1) H (x1) Bolt Support Plate Allen Key 4mm Allen Key 5mm I (x1) J (x1) K (x1) L (x1)
-
Page 4: Clamp Installation
Step 1 Step 2 Clamp Installation Option A 1. Connect Arm and C-Clamp Brace from the bottom using M6x12 Bolt and tighten with Allen Key 4mm... - Page 5 2. Select the preferred height firstly and connect C-Clamp to C-Clamp Brace using M6x10 Bolt and tighten with Allen Key 4mm 3.Tighten the C-Clamp to the desktop using the plastic knob.
- Page 6 Option B Grommet Base Installation 1. Attach Metal Pad & Bolt to the bottom of Arm using M6x12 Bolt , tighten up with Allen Key 4mm 2a Existing Grommet Hole Installation If the existing grommet hole comes with a plastic protector, remove it to ensure a flat surface before installing the desk mount.
- Page 7 2b Self-drilled Grommet Hole Installation Mark the position of the hole on your mounting surface. Drill a 3/8"(10mm) diameter hole at the marked position through the mounting surface. Insert the assembled Bolt through the desk hole, guide the Support Plate and Nut through the Bolt rotate the Nut...
- Page 8 Step 3.2 Detach the Top Screw by threading it counter clockwise. Step 3.3 Attach the VESA Plate to your TV/Monitor, and thread M4x12 Bolt or M5x12 Bolt into the mounting holes with D5 Washer , tighten with Allen Key 5mm...
- Page 9 Step 4 Put the assembled TV/Monitor onto the Arm and ensure the stability, tighten the VESA plate using Top Screw. Step 5 Press the Arm on horizontal level as image shown, adjust gas spring tension to your personal preference using Allen Key 5mm , adjust the tilt tension using Allen Key 5mm For Heavier Monitors...
- Page 10 Step 6 Screw out the bolts and take off the cable cases. Step 7 Guide the cables through and put the cable cases back.
- Page 11 Step 8 Manually swivel, tilt , and rotate the monitor for the best viewing angle. 90° +75° 180° - 45° 180° 125°...
- Page 12 We support the technology that brings your home to life. We offer high quality products, professional customer service, and extensive technical support. If you have any questions,please contact us. 1-844-SATTLER (18447288537) support@walielectric.com www.walielectric.com...
Need help?
Do you have a question about the GSMP002 and is the answer not in the manual?
Questions and answers