
Related Manuals for KLS Martin LIMAX 120


Summary of Contents for KLS Martin LIMAX 120
- Page 1 ® LIMAX SURGICAL Nd:YAG-LASER Service manual From MDP120 0100 10 0100 MDP120 0200 13 0157 Software version 1.XX-1.41 REF 90-561-62-10 • REV 1 • Release Date 2016-12...
-
Page 2: Table Of Contents
Service manual LIMAX Table of Contents Table of Contents ....................I Product Liability & Warranty ..............1 General information ................1 Hotline ....................1 Safety Instructions ................2 General Provisions ................2 Laser safety ..................4 Explosion and Fire Hazards ..............5 Safety Instructions Relating to the Pilot Laser .......... - Page 3 Service manual LIMAX Removal/ replace of the cooling unit ............. 39 5.8.1 Removal/ replace of the de-ionization cartridge ........40 Removal/ Replace of the particle filter ..........41 Filling the water cooling unit ............... 42 First water fill in ................42 De-ionized water ................
-
Page 4: Product Liability & Warranty
Service manual LIMAX 1 Product Liability & Warranty General information KLS Martin will accept no responsibility for the safety, reliability and proper functioning of the equipment unless: All readjustments, modifications or repairs that become necessary are carried out by •... -
Page 5: Safety Instructions
Service manual LIMAX 2 Safety Instructions General Provisions MPG (MDA) Medizinproduktegesetz (German Medical Devices Act) 93/42/EEC EC Directive 93/42/EEC concerning medical devices (MDD) DIN EN 60825-1: 2008-05 Safety of laser products – Part 1: Equipment classification, requirements and user’s guide DIN EN 60601-1: 2007-07 Medical electrical equipment: General requirements (basic standard) - Page 6 Service manual LIMAX Before putting the unit into operation, the following steps must have been carried out: • Acceptance of the unit by the purchasing department Formal appointment of a Laser Safety Officer by the operator of the unit (see § 6 BGV •...
-
Page 7: Laser Safety
Service manual LIMAX Laser safety ® The LIMAX 120 laser: is a Class IIb unit acc. to the Medical Devices Act (or MDD, respectively) • is a Class 4 laser unit (acc. to DIN EN 60825-1) • • carries the CE-mark in compliance with EU Directive 93/42/EEC (MDD). Caution! Danger of damage to eyes, skin or other organs! The unit emits radiation in the non-visible spectral range of 1318 nm. -
Page 8: Explosion And Fire Hazards
Service manual LIMAX Explosion and Fire Hazards Danger! Fire hazard! Class 4 lasers (DIN EN 60825-1) represent a potential ignition source due to heat building up in the tissue or at the fibre ends. When working ® with the LIMAX 120, the user therefore is required to observe the following measures in order to prevent laser-induced fires and explosions:... -
Page 9: Electrical Safety
Service manual LIMAX Electrical safety The unit is a Class 1 system (acc. to DIN EN 60601) and must therefore be connected to a duly grounded power supply system in accordance with the specifications contained herein. Only the power supply cables provided may be used. •... -
Page 10: Safety Devices
Service manual LIMAX Safety Devices In designing this laser unit, we strictly looked out for utmost safety for user and patient. As a result, the technical safety devices incorporated in the system (and described in the following) effectively prevent misuses: When laser device is switched on, or when the voltage comes back after a power •... -
Page 11: Rating Plates And Warning & Information Labels
Service manual LIMAX 2.6.1 Rating plates and warning & information labels Fig 2.1 warning label “Laser Star”, explanatory label “VISIBLE AND INVISIBLE LASER RADIATION…LASER CLASS 4”, and aperture label “LASER APERTURE…” according to IEC 60825-1 (DIN EN 60825-1) Fig 2.2 Radiation output and standards information –... -
Page 12: Hardware-Software Label After Service Update
Service manual LIMAX 2.6.2 Hardware-Software label after service update After servicing of the laser where hardware components are changed and/or software updates are carried out, the service technician has to adhere a label near by the type plate with a new hard-software index. -
Page 13: Transport And Packaging
Service manual LIMAX 3 Transport and packaging Transportation When preparing the LIMAX 120 for transport always drain the cooling unit. Depending on the transport conditions, different measures have to be taken referring to chapter 7. Laser must be transported in upright position. The laser cooling unit consists of a compressor cooler which is not allowed to be transported on the side. -
Page 14: Opening The Carrier Box
Service manual LIMAX Opening the carrier box ® The LIMAX 120 is transported in a carrier box. Size of the box is 130 cm height, 88 cm depth, and 73 cm width. The weight of the empty box is 78 kg. The Box can be transported in an upright position by using a forklift or a hand pallet truck. -
Page 15: Functional Description
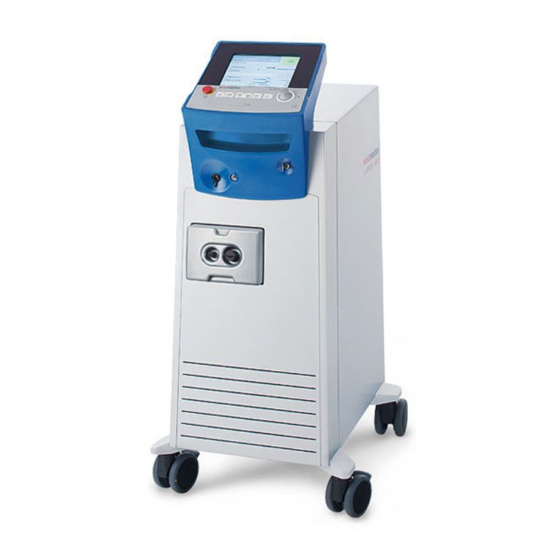
Service manual LIMAX 4 Functional description Front Fig. 4.1 Front 1 front panel 4 SMA-plus fibre connecting socket 2 keyswitch 5 VAC filter and connector 3 luer lock connector (AIR) Service manual version 1.00 page 12... -
Page 16: Backside
Service manual LIMAX Backside ® Fig. 4.2 LIMAX 120 backside 1 drawer 11 equipotential bonding pin 2 laser MCB connector 12 NIST connector 3 RS 232 connector 13 cable strap 4 service port 14 exhaust port VAC 5 accessory port 15 type plate with serial number 6 interlock connector 16 radiation label... -
Page 17: Opto-Mechanical Unit
Service manual LIMAX Opto-mechanical unit Fig 4.3 overview of the opto-mechanical unit outside Fig 4.3a overview of the opto-mechanical unit inside All components of the opto-mechanical unit are installed in a fully closed, dust protected, distortion-resistant metal housing. The lid consists of three elements: the front (fig. 4.3, 1) and the back lid (2) and the cooling plate of the pump chamber (3). - Page 18 Service manual LIMAX The laser power supply cables which connect the anode and cathode with the power supply unit are connected together when the laser is delivered to prevent damaging of the pump diodes (fig. 4.3, 7). The ribbon cable connects the opto-mechanical unit to the PCB stack (fig. 4.3, 8).
- Page 19 Service manual LIMAX The output mirror is arranged in the lense corpus and fixed with a clamping plate (fig. • 4.3f). Fig. 4.3f clamping plate The pilot beam (635nm) marks the spot where the laser beam hits the tissue. That’s •...
- Page 20 Service manual LIMAX Use the slotted screws at potentiometers (fig. 4.3k) to adjust the offset and amplifying parameters of the two photodiodes. Fig. 4.3k Potentiometer screws Adjustment of photodiodes pre-amplifier The 3-dimensional adjusting unit (between • pilot laser and applicator contact) helps focussing the laser beam onto the the fibre coupling point.
- Page 21 Service manual LIMAX The applicator contact is positioned at the front • of the resonator and contains the safety glass (fig. 4.3l). It is fixed with four hex-head screws in the following order (fig. 4.3l): top left, down left, locking plate, top right, down right.
-
Page 22: Gas Flow Controller
Service manual LIMAX Gas flow controller Do not switch positions of the 2-2 and proportional valve! This would cause a malfunction of the gas flow controller! The gas flow controller regulates the gas flow delivered at the luer lock connector. Two relief valves open if the applied pressure is greater than 7 bar (1,fig.4 ). -
Page 23: Pcb Stack
Service manual LIMAX PCB stack The PCB stack is composed of the basis board (7, Fig. 4.3), the CPU board (6) and the CFL converter board (12). The basis board is responsible for the conversion of signal towards the CPU board and other components. It hosts the rotary switch connectors (1, Fig. -
Page 24: Front Panel
Service manual LIMAX Front panel The front panel (3, Fig. 4.4) is mounted onto the front of the LIMAX 120. The TFT-display module (4), the emergency stop (2) and the rotary switch (1) are located on the front panel. Fig. -
Page 25: Power Supply Unit
Service manual LIMAX Power supply unit The power supply unit delivers electrical energy for all parts of the LIMAX 120. The anode (1, Fig. 4.5) and cathode (2) connectors are supplying the opto-mechanical unit. The keyswitch connectors (5), the front panel connectors (6 and 7), the cooling unit connectors X1, X2, X3 (10, 11 and 12), the chiller and DI-water cooling power supply cables (8, 9) are located on the front of the power supply unit. -
Page 26: Cooling Unit
Service manual LIMAX Cooling unit Do not operate the cooling unit without DI-water! Do not tilt the cooling unit or place it on its side! The cooling unit is composed of a chiller unit and a DI-water cooling system. The DI-water cooling allows evacuating generated heat from the opto-mechanical and the power supply unit. -
Page 27: Cooling Unit Connectors
Service manual LIMAX 4.8.1 Cooling unit connectors The connectors X1, X2 and X3 set ups are: Connector Number Voltage Description 24 V/DC PT100 outlet 24 V/DC PT100 outlet 24 V/DC PT100 chiller 24 V/DC PT100 chiller 24 V/DC Conductivity sensor 24 V/DC Conductivity sensor 24 V/DC... -
Page 28: Vac
Service manual LIMAX Do not block the cooling air inlet and outlet! Do not switch positions of the flow sensor tubes! The VAC is an integrated smoke evacuation system which allows evacuating surgical smoke. The filter housing (6, Fig. 4.7) connects the filter with the VAC. The line filter (5) eliminates electrical interferences. -
Page 29: Vac Filter
Service manual LIMAX The main controller PCB (1, Fig. 4.) and blower controller PCB (2) are located on top of the VAC. The high (3) and low pressure (4) flow sensor measure points are located on the air outlet tube (6). The connecting tubes should never be switched the other way round otherwise flow sensor measurements would be false. -
Page 30: Special Voltages
Service manual LIMAX 4.9.2 Special voltages Depending on nation different voltages are demand for devices. Therefore those versions are featured with a toroid transformer (fig. 4.9c) which changes the usual 220-240V into 100 V, 110 V, 120 V or 127V. Fig. -
Page 31: Footswitch Wiring Diagram
Service manual LIMAX Fig. 4.9 Inside of the footswitch 4.10.1 Footswitch wiring diagram The footswitch wiring diagram describes the electrical contacts shown in Fig. 4.9 . Fig. 4.10 Footswitch wiring diagram Service manual version 1.00 page 28... -
Page 32: Disassembly And Replacement
Service manual LIMAX 5 Disassembly and replacement Removal of the front cover ® Shut down the LIMAX 120 laser unit. Remove the VAC filter by pulling it out (1, Fig. 5.1). Then remove two M4x8 hex screws securing the front cover on the bottom side by using a 5.5 mm spanner wrench (2, Fig. -
Page 33: Removal Of The
Service manual LIMAX Removal of the back cover ® Shut down the LIMAX 120 laser unit. Remove the interlock plug (1, Fig. 5.2), the footswitch connector (2) and the VAC power supply cable (3). To remove the MCB connecting cable use a slotted screwdriver (4, Fig. - Page 34 Service manual LIMAX Remove four M4x8 hex-head screws (1, Fig. 5.4) using a 2.5 mm hex screwdriver and two M4x8 hex screws located at the bottom part using a 5.5 mm flat spanner (2, Fig. 5.4). Hold onto the hand grip and remove the backside cover by pulling backwards. Fig.
-
Page 35: Removal Of The Opto-Mechanical Unit
Service manual LIMAX Removal of the opto-mechanical unit For replacement or servicing the opto-mechanical unit can be removed and placed in a secured ® position. First shut down the LIMAX 120 laser unit and remove the backside cover (chapter 5.2). -
Page 36: Removal Of The Gas Flow Controller
Service manual LIMAX Removal of the gas flow controller ® Shut down the LIMAX 120 laser unit and remove the backside cover (chapter 5.2). Remove the air inlet and outlet connection tubes (2 and 3) from the gas flow controller and the valve connector cables (4) from the PCB stack. -
Page 37: Removal Of The Front Panel
Service manual LIMAX Removal of the front panel ® Shut down the LIMAX 120 laser unit and remove the backside cover (chapter 5.2). Remove two M6x27.5 socket head cap screws (1, Fig. 5.7) using a 5 mm hexagon screwdriver and then pull the locks (2) which secure the stay bolts (3). -
Page 38: Removal Of The Pcb Stack
Service manual LIMAX Removal of the PCB stack Remove all connectors from the PCB stack. Use a 2mm screwdriver to remove the five M2.5x8 socket head cap screws (1, Fig. 5.9). Remove carefully the PCB stacks. Fig. 5.9 Removing the PCB stack 1 M2.5x8 socket head cap screws 5.6.1 Replacing the CPU board battery ®... -
Page 39: Removal Of The Power Supply Unit
Service manual LIMAX Removal of the power supply unit When completely removing the power supply unit, always drain the water cooling system before unplugging tubes from the cooling system. ® Shut down the LIMAX 120 laser unit. Remove the backside cover (chapter 5.2) and the front cover (chapter 5.1). - Page 40 Service manual LIMAX Unplug the connectors X1, X2 and X3 (4, 5 and 3 Fig. 5.13) and the chiller power supply cables (2). Then unplug the water cooling connecting tube using the plastic wrench from the service tool kit (1, fig. 5.14). Fig.
- Page 41 Service manual LIMAX Pull the power supply unit carefully backwards until you can unplug the keyswitch cables (1, Fig. 5.14), the PCB power supply cable (2) and the PCB ribbon cable (3). Remove the power supply unit completely by pulling it backwards. Fig.
-
Page 42: Removal/ Replace Of The Cooling Unit
Service manual LIMAX Removal/ replace of the cooling unit When removing the cooling unit, always drain the water cooling system before unplugging tubes from the cooling system. ® Shut down the LIMAX 120 laser unit. Remove the backside cover (chapter 5.2) and the front cover (chapter 5.1). -
Page 43: Removal/ Replace Of The De-Ionization Cartridge
Service manual LIMAX 5.8.1 Removal/ replace of the de-ionization cartridge Always replace the water in the cooling system when replacing the de-ionization cartridge. ® Shut down the LIMAX 120 laser unit. Remove the front cover (chapter 5.1), the back cover (chapter 5.2) and drain the cooling water as described (chapter 7). -
Page 44: Removal/ Replace Of The Particle Filter
Service manual LIMAX Removal/ Replace of the particle filter Always replace the water in the cooling system when replacing the particle filter. ® Shut down the LIMAX 120 laser unit. Remove the front cover (chapter 5.1), the back cover (chapter 5.2) and drain the cooling water (chapter 7). -
Page 45: Filling The Water Cooling Unit
Service manual LIMAX 6 Filling the water cooling unit First water fill in Remove the front cover (chapter 5.1) and turn on the laser. Open the membrane element at the end of the air-vent tube by turning it counter clockwise by approximately 360°. Fig. -
Page 46: Ionized Water
Service manual LIMAX Connect the hopper to the tube and the tube to the filling tube by pressing the tube into the black fitting of fig. 6.2. Fig. 6.3 Hopper with tube for filling in de-ionized water. De-ionized water ®... -
Page 47: Second Step To Fill In The De-Ionized Water
Service manual LIMAX Second step to fill in the de-ionized water ® Start the LIMAX 120 laser unit. The water pump is running. Go into the service menu by pressing the rotary switch and select the menu item“> Setup” and “> Service”. Type in the service pin “2-0-2-0”... -
Page 48: Control Of Water Level
Service manual LIMAX Control of water level To control the level of cooling water go into service menu and check the “filling level” parameter. If parameter indicates WARN the laser device can still be used without any constriction, it’s just a sign to refill de-ionized water soon (chapter 6). 7 Draining the water cooling system Seasonal draining of cooling water Depending on the outside temperature while laser transport, the water of the cooling unit... -
Page 49: Draining For Temperature > 0 °C, Frost Free
Service manual LIMAX Draining for temperature > 0 °C, frost free ® Shut down the LIMAX 120 laser unit. Remove the front cover (chapter 5.1). Fig 7.1 1 and 2 draining tube 3 particle filter Draining tube 1 is for emptying the heat exchanger and tube 2 is for emptying the tank and pump. -
Page 50: Draining For Frost Transport ≤ 0 °C
Service manual LIMAX Draining for frost transport ≤ 0 °C It is not allowed to blow out the water with compressed air because the components are not compression proofed. ® Shut down the LIMAX 120 laser unit. Remove the front (chapter 5.1), the back cover (chapter 5.2), drain the cooling water (chapter 7.2), open the sealing plug at the top side of the laser resonator (fig 7.2) and remove the de-ionization cartridge. -
Page 51: Electrical Diagram
Service manual LIMAX 8 Electrical diagram Fig. 8.1 Functional description of LIMAX electrical components Service manual version 1.00 page 48... - Page 52 Service manual LIMAX Fig. 8.2 electrical signal structure of user front panel Service manual version 1.00 page 49...
- Page 53 Service manual LIMAX Fig. 8.3 electrical signal at compressor cooling unit Service manual version 1.00 page 50...
-
Page 54: Service Menu
Service manual LIMAX 9 Service Menu ® Switch on the LIMAX 120 and wait until the self-test has finished. Activate the user-interface by pushing the rotary switch. To enter the service menu select the menu item SETUP by turning the rotary switch till the menu item is highlighted and then push the rotary switch (fig 9). -
Page 55: Device Information
Service manual LIMAX You will then be asked to enter a 4 digits long service code (2-0-2-0) by using the rotary switch (fig. 9b). There is one more service code (6-4-7-1) which is used to delete/confirm specific error codes e.g. Fig. -
Page 56: Incident Log
Service manual LIMAX The device information menu item displays the software version (1, fig. 9.1a), the operating hours of the device (2) and the laser operating hours (3). Fig. 9.1a Device information menu 1 Software version 2 Operating hours 3 Laser operating hours Incident log Enter the menu item INCIDENT LOG by selecting the menu item, pushing down the rotary... -
Page 57: Calibrate
Service manual LIMAX The incident log displays the date, time and description of the occurred incidents (fig. 9.2a). Fig. 9.2a Incident log Calibrate Note! ® Connect an operational optic fibre to the LIMAX 120 before entering the CALIBRATE menu item. For external power measurements use a calibrated laser power meter! Enter the menu item CALIBRATE by selecting the menu item, push down the rotary switch (fig. - Page 58 Service manual LIMAX The current calibration table is displayed. If you want to enter the calibration menu select the menu item CONTINUE (fig. 9.3a). Fig. 9.3a Current calibration table ® The calibration menu allows you to adjust the power settings of the LIMAX 120.
-
Page 59: Cooling
Service manual LIMAX To start calibration select the menu item CONTINUE. The first calibration point will always start with a current of 30A and will increase in 5A steps. Turn the laser into LASER READY, activate the foot switch and note the measured laser power with a laser power meter. Then select the menu item CONTINUE. - Page 60 Service manual LIMAX The cooling menu allows you to monitor the water based laser diode cooling system (a, Fig. 9.) as well as the condenser block (b). Temperature of the laser diode cooling system (1) should not vary more than 1 °C from its reference temperature. If the conductance is higher than 15 µS/ cm (2) the de-ionization cartridge should be replaced (see chapter 5.8).
-
Page 61: Vac
Service manual LIMAX Enter the menu item VAC by selecting the menu item and push down the rotary switch. Fig. 9.5 Enter the VAC menu item In the VAC menu all important information and settings are listed. The versions give information about the state of hardware and software (1, fig. - Page 62 Service manual LIMAX Status codes VAC Status- Error description Since version Code Internal errors or logic errors Critical error: undefined error v0.87 Measure(s): contact support Warning: a coding error occurs v0.87 Measure(s): no error indication is effected on device; service/MCB master can read out the error memory and inform the support Critical error: maximum number of error definitions is...
- Page 63 Service manual LIMAX Critical error: watchdog-test failed v0.138 Measure(s): contact support Status- Error description Since version Code Flash/ROM errors Critical error: bootloader failed v0.307 Measure(s): contact support Critical error: integrity of the flash/Rom is v0.306 incorrect/checksum error Measure: reprogram firmware Critical error: checksum creation failed v0.306 Measure: reprogram firmware;...
- Page 64 Service manual LIMAX Severe error: Measure of blower current failed v0.205 Measure(s): Turn off device and return on, if the error occurs repeatedly: contact support Critical error: hardware error of the blower (unexpected v0.207 current consumption of deactivated device) Measure(s): Turn off device, contact support Critical error: electronic system of the blower doesn’t v0.207...
-
Page 65: Reset Log File
Service manual LIMAX Warning: EEPROM-memory is incorrect (power-off while V1.16 write access to shadow copy) Measure(s): error cleared up by itself, no measure necessary Warning: EEPROM-content not consistent (power-off V1.16 while write access) Measure(s): error cleared up by itself, no measure necessary Status- Error description Since version... -
Page 66: Reset All Settings
Service manual LIMAX You will then be asked to confirm the log file reset. Select YES to reset the log file and BACK or NO to abort the procedure (Fig. 9.). Fig. 9.6a Reset the logfile Reset all settings Enter the menu item RESET ALL SETTINGS by selecting the menu item and push down the rotary switch (Fig. -
Page 67: Activating The Testio-Display
Service manual LIMAX You will then be asked to confirm the reset of all settings. Select YES to reset everything and BACK or NO to abort the procedure (Fig. 9.) Fig. 9.7a Reset all settings Activating the TESTIO-display ® To monitor specific data of the LIMAX 120 while performing different tasks, the TESTIO- display can be activated by entering the service code: 2500 in the SERVICE menu item (Fig. - Page 68 Service manual LIMAX The TESTIO-display shows the current of the laser diode and the power output (1, fig. 9.), flow, conductance and temperature of the laser diode cooling system (2), heat sink temperature, chiller and Fan PWM of the condenser (3) and supply voltages of the power supply unit (4).
-
Page 69: Martin Flash Updater
Service manual LIMAX Martin flash updater Upon version 3.0 it is possible for the service technician to update a new firmware using the Martin Flash updater software. For this purpose a personal computer with a RS232 serial port, a RS232 cable and the latest version of the Martin Flash updater is necessary. Connect the PC ®... -
Page 70: Limax ® 120 Status Codes
Service manual LIMAX ® LIMAX 120 status codes The different status codes are classified in 5 groups: Severe error: The status code is displayed, the laser as well as the additional components is shut down and an entry is made into the service-log. Even after rebooting the LIMAX the laser can not be reactivated as long as a service technician did not log into the SERVICE menu item. - Page 71 Service manual LIMAX Status-Code Error First step done Second step Service description by user done by user operation done by technician 1009 Critical error: Test/ replace MOS field effect Power off and on call service power supply transistor failure unit 1011 Critical error:...
- Page 72 Service manual LIMAX Status-Code Error First step done Second step Service description by user done by user operation done by technician 1020 Critical error: Replace power Footswitch relay Power off and on call service supply unit error 1021 Test/ replace Critical error: cooling unit or Self-test: flow...
- Page 73 Service manual LIMAX Status-Code Error First step done Second step Service description by user done by user operation done by technician 1033 Critical error: Replace i2c to cooler Call service controller PCB or temp. error cooling unit Critical error: 1034 Replace i2c to cooler...
- Page 74 Service manual LIMAX Status-Code Error First step done Second step Service description by user done by user operation done by technician 1048 Critical error: Replace Atmel selftest Power off and on Call service controller PCB error 1049 Warning: high Test/Replace pressure in Call service...
- Page 75 Service manual LIMAX Status-Code Error First step done Second step Service description by user done by user operation done by technician 1058 Critical error: Replace laser Laser shutter did Power off and on Call service module or not close during controller PCB self-test 1059...
- Page 76 Service manual LIMAX Status-Code Error First step done Second step Service description by user done by user operation done by technician 1069 Warning: valid Replace service log controller PCB missing 1070 Warning: two Replace different service controller PCB logs found 1071 Warning: i2c Replace...
- Page 77 Service manual LIMAX Status-Code Error First step done Second step Service description by user done by user operation done by technician 2007 Replace Critical error: controller PCB or 5 V supply Power off and on Call service power supply voltage error unit 2008...
- Page 78 Service manual LIMAX Status-Code Error First step done Second step Service description by user done by user operation done by technician 2017 Critical error: controller system Replace Power off and on Call service error during self- controller PCB test 2018 Critical error: controller system...
- Page 79 Service manual LIMAX Status-Code Error First step done Second step Service description by user done by user operation done by technician Grave error: Replace 2055 CPLD pulse too Power off and on call service controller PCB long Grave error: Pulse interrupt Replace 2056...
- Page 80 Service manual LIMAX Status-Code Error First step done Second step Service description by user done by user operation done by technician 2075 Grave error: Photosensor 1 Press down Replace value high call service STANDBY controller PCB (pulsphase raise) 2076 Grave error: Photosensor 2 Press down...
- Page 81 Service manual LIMAX Status-Code Error First step done Second step Service description by user done by user operation done by technician 2084 Grave error: Photosensor 2 Press down Replace call service value low STANDBY controller PCB (pulsphase fall) 2085 Grave error: Photosensor 2 Press down...
- Page 82 Service manual LIMAX Status-Code Error First step done Second step Service description by user done by user operation done by technician 2103 Grave error: Controller Replace system activates Press down controller PCB or SWAP while Call service STANDBY power supply LASER READY unit without...
- Page 83 Service manual LIMAX Status-Code Error First step done Second step Service description by user done by user operation done by technician 9007 Critical error: System not Run new calibrated while Power off and on Call service software and calibrating chart calibrate is accessed 9012...
-
Page 84: Tools / Spare Parts And Accessories
Service manual LIMAX Tools / Spare parts and Accessories 12.1 Tools Name Description Dimension Hexagonal screwdriver, e.g. Wiha no. 01226 Straight screwdriver with SW 2.5 mm metric ball end hex key www.wiha.com or without ball end Hexagonal screwdriver e.g. Wiha no. 26304 Straight screwdriver with SW 2 mm or without ball end... -
Page 85: Spare Parts And Accessories
Service manual LIMAX 12.2 Spare parts and Accessories Note! When ordering spare parts or accessories from KLS Martin please indicate the Martin- Identify-Number Spare part SAP No. Blue control element FRONT PART LIMAX 08-507-00-41 CONTROL ELEMENT CPL. LIMAX 08-507-00-42... - Page 86 MARVAC SMOKE EVACUATOR LIMAX 100-127V 08-507-00-67 GAS CONTROL BLOCK AIR LIMAX 08-507-00-68 Optics OPTOMECHANICAL UNIT LIMAX 08-507-00-69 PILOT BEAM 635NM 08-507-00-70 PUMP UNIT LIMAX 120 08-507-00-71 RESONATOR SHUTTER LIMAX 08-507-00-72 APPLICATOR CONTACT LIMAX 08-507-00-73 INTERNAL PERFORMANCE MEASUREMENT LIMAX 08-507-00-74 SAFETY SHUTTER 08-507-00-75 HR-REFLECTOR Ø12,7 LIMAX 1320NM...
Need help?
Do you have a question about the LIMAX 120 and is the answer not in the manual?
Questions and answers