Table of Contents
Advertisement
Quick Links
Advertisement
Table of Contents

Subscribe to Our Youtube Channel
Related Manuals for EK EK-Quantum Vector2 Strix RTX 3070 Ti D-RGB


Summary of Contents for EK EK-Quantum Vector2 Strix RTX 3070 Ti D-RGB
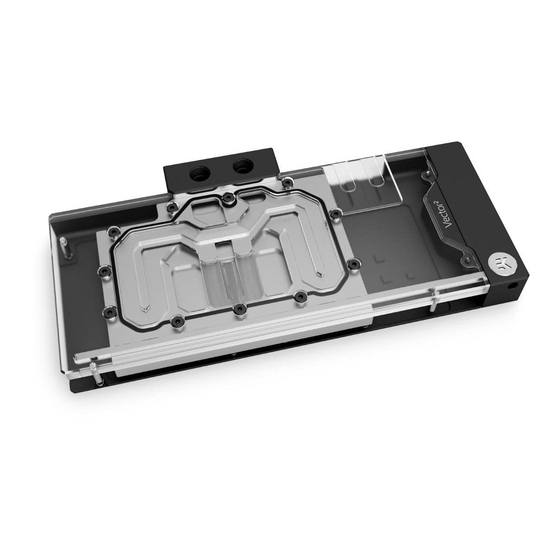
- Page 1 EK-Quantum Vector² Strix RTX 3070 Ti D-RGB GPU WATER BLOCK USER GUIDE...
- Page 2 GPU or its circuit board (PCB). The EK Fittings require only a small amount of force to screw them firmly in place since the liquid seal is ensured by the rubber O-ring gaskets.
-
Page 3: Table Of Contents
TABLE OF CONTENTS BOX CONTENTS WATER BLOCK DIMENSIONS TECHNICAL SPECIFICATIONS AND WATER BLOCK PARTS NICKEL PLEXI PREPARING THE GRAPHICS CARD REMOVING THE STOCK COOLER PREPARING THE WATER BLOCK FOR INSTALLATION CUTTING AND PLACING THERMAL PADS APPLYING THERMAL COMPOUND ATTACHING THE WATER BLOCK PREPARING THE BACKPLATE ATTACHING THE BACKPLATE INSERTING THE GRAPHICS CARD INTO THE CHASSIS... -
Page 4: Box Contents
EK-Quantum Vector Strix RTX 3070 Ti D-RGB Polyamid Washer M2.5 0.5mm (8 pcs) Standoff Ø4.5/2.5 (1 pc) EK-Loop Multi Allen Key (1 pc) Allen Key 2 mm (1 pc) Quantum Plug (2 pcs) Terminal OR - Vector 14x1 mm (2 pcs) Thermal Pad F 1.5 mm (2 pcs) -
Page 5: Water Block Dimensions
WATER BLOCK DIMENSIONS 307 mm 124 mm 96 mm 27 mm - 5 -... -
Page 6: Technical Specifications And Water Block Parts
Standoff M4-M2.5 x 3mm 104188 Standoff fi 4.5/2.5 104187 Screw M2.5 x 8 AX1 103971 Stand out (Acetal) 100663 EK - Badge 103964 Mylar sticker 8208 Screw M3 x 8 7991DIN 8311 Screw M4 x 20 DIN7984 104216 Disc magnet 3 x 3... -
Page 7: Preparing The Graphics Card
Place your graphics card on the flat surface and carefully remove the stock cooler. Do not forget to unplug all the LED and fan connectors. Pay attention to the following steps in order to install the EK-Quantum Vector Strix RTX 3070 Ti water block onto the graphics card. -
Page 8: Cutting And Placing Thermal Pads
Thermal Pad F – 1.0 mm (120 x 16 mm) with Thermal Pads that have to be cut into smaller pieces to cover all the VRM components. EK made sure to provide you with more than an adequate quantity of Thermal Pads to complete this Step. -
Page 9: Applying Thermal Compound
APPLYING THERMAL COMPOUND STEP 1 Apply the enclosed EK-TIM Ectotherm thermal grease (thermal compound) on the GPU heat spreader – IHS – as shown in the image. The layer of the thermal compound must be thin and even over the entire surface of the IHS. - Page 10 PCB on the water block. Tighten the screws evenly using the Phillips head screwdriver. M2.5 PVC WASHER EK recommends you start tightening the screws around the GPU core first, and then continuing outward to prevent damage to the GPU. For this step, you will need: Phillips Head Screwdriver Screws must be present in the places marked on the picture.
-
Page 11: Preparing The Backplate
After attaching the water block, a few more thermal pads need to be cut into smaller pieces to cover all the necessary components. EK made sure to provide you with more than an adequate quantity of 1 mm 120 mm thermal pads to complete this step. -
Page 12: Attaching The Backplate
ATTACHING THE BACKPLATE STEP 1 Place the backplate with six (6) M2.5 x 8 AX1 Screws and Standoffs onto the PCB. Make sure all the holes are aligned. BACKPLATE Tighten the screws evenly using the Phillips head screwdriver Before attaching the Backplate, make sure all the Thermal Pads are placed correctly! For this step, you will need: Phillips Head Screwdriver... -
Page 13: Fittings And Tubing
Do not forget to plug the remaining two openings using the enclosed EK-Plug G1/4 or its equivalent. EK- PLUG G1/4 EK recommends using EK fittings with all EK water blocks. CAUTION: When using connectors other than EK fittings, pay special attention to the length of the fittings’... -
Page 14: Connecting The D-Rgb Led Strip
STEP 1 TESTING THE LOOP To make sure the installation of EK components was successful, we recommend you perform a leak test for 24 hours. When your loop is complete and filled with coolant, connect the pump to a PSU outside of your system. -
Page 15: Warranty
This warranty is voided if the product comes in contact with aggressive UV additives or other improper liquids. EK water blocks are sealed with a warranty-voiding circular label, proving the water block has withstood a pressure leak test. -
Page 16: Support And Service
EAN number of each part you might need. Include the EAN number with quantity in your request. Mounting Mechanism EAN can be found under “BOX CONTENTS” Thermal pads are readily available in the EK shop SOCIAL MEDIA EKWaterBlocks @EKWaterBlocks...
Need help?
Do you have a question about the EK-Quantum Vector2 Strix RTX 3070 Ti D-RGB and is the answer not in the manual?
Questions and answers