
Subscribe to Our Youtube Channel
Related Manuals for Kaadas S100C


Summary of Contents for Kaadas S100C
- Page 1 S100C User Manual www.kaadasgroup.com Shenzhen Kaadas Intelligent Technology Co.; Ltd reserves all rights for the final interpretation to this user manual. All design and specifications are subject to change without notice.
-
Page 2: Table Of Contents
Cautions This section contains important information to ensure the user's safety and prevent potential damage to property. Please, read this section carefully and use the product accordingly. Content 1 How to install Delete card Package Content Opening Mode Setting Explosive View System Setting Before Installation System Query... -
Page 3: How To Install
1 How to install Package Content This described package content is for reference only, the real products should be considered as final. If some components lost, please check with the sellers. Outside escutcheon Inside escutcheon Installation Template Mortise Strike Plate Assembly Mechanical Key with rubber gasket with rubber gasket... -
Page 4: Explosive View
Explosive View 1. Battery Cover 2. Connecting mounting screw(3pcs) 3. Inside escutcheon assembly 4. Pressure spring (2pcs) 5. Mounting plate 6. Square shaft (2pcs) 7. Mortise 8. Screw bolt (3pcs) 9. Outside escutcheon assembly 10. Inside escutcheon cover 11. Fixed screw (4pcs)... - Page 5 •Do not short-circuit the two poles of the battery lead with metal objects in case of explosion. •Making sure replacement or maintenance are done by professional person authorized by Kaadas. •Your warranty may invalidate if you used accessories produced by other manufacturer or not recommended by Kaadas. Disposal of used battery and lock •Please understand the local electronic product classification and collection system.
-
Page 6: Before Installation
Before Installation Check Door Open Direction Right-out Right-in Left-out Left-in... - Page 7 Change latch bolt direction 1. Move the latch 2. Push the both switcher to latch bolt the other end as inside the the arrow shows mortise Directional screw 3. Turn around 180 degree 4. Let the latch bolt eject Caution: Make sure the position of 2 directional screws is faced to the indoor direction, then fasten them properly.
- Page 8 Change Handle Direction Change Outside escutcheon Handle Direction Screws Screws Screws Screws Positional Positional Component Component Shield Shield Sleeve Sleeve Cable Taking out screws, positional Rotating the handle to the other Put the cable into the right end, component and shield sleeve end.
- Page 9 Change Inside escutcheon Handle Direction Screws Screws Screws Screws Positional Positional Component Component Taking out screws and positional Rotating the handle to the other Place positional component component in proper order. end. and fasten the screws. Default screw pack is for door thickness 38-60mm, please contact our dealer if other screw pack required. Caution:...
-
Page 10: Installation Steps
Installation Steps screw bolt screw bolt square shaft Pressure spring (The big end is downward) Connecting cable screw bolt Cable Caution: Caution: Choose the square shaft and screw bolt in correct Make sure the mortise cable through the hole as the length according to your door thickness. - Page 11 Mounting screw Mortise cable Mortise cable Connecting cable Connecting cable Caution: According to door thickness, cut the mechanical key pick into proper length. The proper length of key pick is required to be more than half door thickness but not pass through the door.
- Page 12 Connecting mounting screw Square shaft Pressure spring Connecting mounting screw Caution: According to the door thickness, cut the night latch key pick in proper length. Caution: Place pressure spring and square shaft in the back panel Make sure the battery cover installed well. in proper order.
-
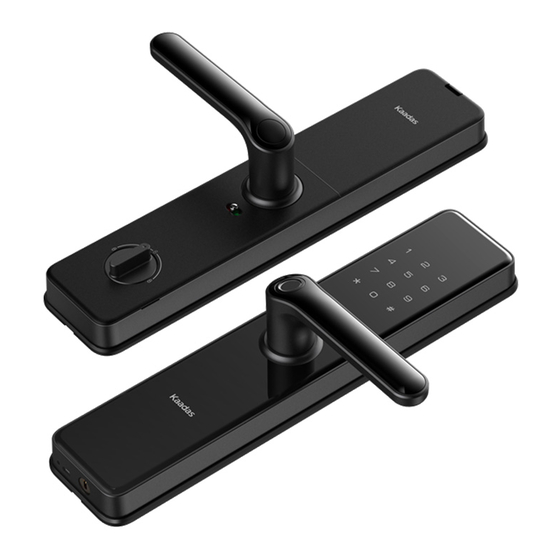
Page 13: Product Overview
2 Product Overview Outside escutcheon Inside escutcheon S100C-5 S100C-2 Touchpad Touchpad Battery cover Card reader area Card reader area Fingerprint sensor Safe handle switch Inside escutcheon Reset button cover Thumb turn Reboot button Mechanical key hole Emergency power USB port Pictures above are just for reference, please refer to the real product as final. -
Page 14: How To Set
Enter master PIN code Enter master PIN code Fingerprint capacity User number[00-99] User number[00-99] (only available for S100C-5) Card capacity User number[00-99] User number[00-99] Caution: Before setting to security mode, fingerprint, PIN code and Card, must be all enrolled or at least two different opening... - Page 15 User Number When you in security mode, you shall edit user number before enroll PIN code/fingerprint/card. When you need to delete one user, you can enter the user number to delete. You can fill your user information in below sheet for convenience Name PIN code Fingerprint...
-
Page 16: Access Into Master Mode
2. Press [*] twice, input master PIN code, and press [#] Voice prompt of "Enrollment succeed" to confirm. 3. Voice guide: Enter the Master Mode. Enroll Fingerprint (only available for S100C-5) Note: Change default master PIN code is required Access into master mode immediately for menu operation. -
Page 17: Delete Card
Access into master mode Voice prompt of "Deletion succeeded" Press [1] for user setting.Then press [7] for opening mode Delete User Fingerprint (only available for S100C-5) setting.Press [1] for normal mode (single verification) ,which Access into master mode means opening by PIN code or fingerprint or card. -
Page 18: System Setting
System Setting Extension Function (Optional) Volume Setting Access into master mode Access into master mode Press [4] for function extension. Press [1] to join network. Press [2] for system setting. Then press [1] for volume Press [2] to log off network. setting. -
Page 19: How To Use
4 How to use Open from outside 1. PIN code opening 2. Fingerprint opening 3. Card opening (only for S100C-5) Enter PIN code Card reader area Fingerprint sensor Press the Press the Press the handle to handle to handle to... -
Page 20: Open Door By Mechanical Key Override
Open door by mechanical key override In case of forgetting PIN code, battery run out or system error; Mechanical key is used to open door as backup mode. Insert the key into key hole and rotate it with proper angles; Mechanical key hole Then press the handle to open the door. -
Page 21: Other Features
Emergency power supply 5 Other Features When the battery voltage is too low to open the lock Restore to factory setting from outside, you can use 5V power bank to charge Double click [RES] button to make the door lock via Micro USB port. After the door is the lock restore to factory Reset button unlocked, please replace all batteries immediately. -
Page 22: Safe Handle Feature
Safe Handle Feature 1.Enable: move the safe handle switch to display ‘red’ mark. Once safe handle feature is enabled, the indoor handle will be locked. 2.Disable: move the safe handle switch to display ‘green’ mark. The indoor handle can be pressed and turn upward freely. Battery Replacement Battery cover 1. -
Page 23: Extension Function(Optional
Extension Function(Optional) Access into master mode, press [4] for function extension, which is reserved for Z-Wave and other smart home interface. Please contact Kaadas distributor for more details. Network Module Interface...
Need help?
Do you have a question about the S100C and is the answer not in the manual?
Questions and answers