Fleck 5600 Installation Manual
Hide thumbs
Also See for 5600:
- Service manual (31 pages) ,
- Installation instructions manual (19 pages) ,
- Owner's manual (9 pages)
Advertisement
Quick Links
Advertisement

Related Manuals for Fleck 5600


Summary of Contents for Fleck 5600
- Page 1 Fleck 5600 Metered Water SoF tener › I n s ta l l at I o n G u I d e v1.0...
- Page 2 › G e n e R a l R e F e R e n C e Please take a moment to review this page in order to familiarize yourself with these four ports on the valve and the programming values below. It is crucial not to mistake the inlet port with the outlet port.
- Page 3 › P R e FaC e Thank you for your purchase of a new water softener with Fleck 5600 Meter Control Valve from Qual- ityWaterForLess.com! We have put together these instructions as reference and to be used as gener- It is always recommended that a licensed plumber perform all installation al installation guidelines.
- Page 4 1 › CalCul atInG HaRdness, CaPaCIt y, and BRIne FIll Water test: Before start-up, it is crucial that you know your water’s hardneSS and Iron levels in order to set up your unit properly. If your unit is not programmed with your particular hardness level, it will either regenerate too early or too late.
- Page 5 UnIt caPacItY: The Unit Capacity equates to your system's rated capacity based on your tank size and section hardness level. In the first column, identify the containing your softener tank size and then within this hardness Unit capacity section, find the pertaining to your level.
- Page 6 › P R e - I n s ta l l at I o n Before assembly of your new system, be sure that the following conditions have been met for the place- ment of your system: • Level, firm surface, such as concrete, on which • Access to the water main coming into your to place the softener tank and salt tank (also home.
- Page 7 Fleck 5600 Meter Valve as shown in Figures riser tube fits into the central o-ring on the valve,...
- Page 8 3) Locate the plumbing adapter that was shipped 4) Using the included silicone lubricant packet, with your system and disassemble the plumbing lubricate the o-rings on the Fleck 5600 Meter adaptor clips as shown in Figure 8-A Valve as shown in Figure 8-B...
- Page 9 2) Next, connect this prepared end of the tubing to insert, and brine line screen to one end of the the Fleck 5600 Meter Valve as shown in Figure included brine tubing as shown in Figure 9-A. 9-B. Tighten the nut to the valve using a wrench Be sure to face the tapered side of the until snugly in place.
- Page 10 7) If you ever need to remove the tube, evenly press on 8) Finally, use ½” inner diameter (I.D.) tubing to connect both sides of the grey ring surrounding the tube and the drain barb fitting on the brine tank to a floor drain Be sure to recut pull out as shown in Figure 10-A.
-
Page 11: Initial Start-Up
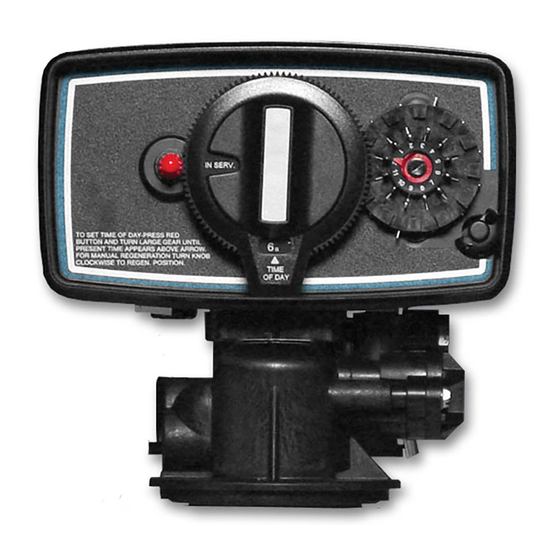
7 › I n I t I a l s ta R t- u P 1) Locate the center knob on the face of the Fleck 5600 Meter Valve and be sure that the notch in the knob says “In Serv.” If not, rotate the knob CLOCKWISE until “In Serv.” is visible (at about 9 O’Clock)
Need help?
Do you have a question about the 5600 and is the answer not in the manual?
Questions and answers