Advertisement
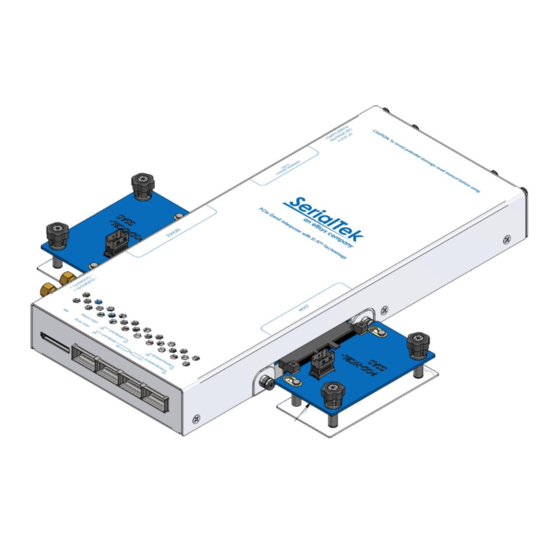
Gen5 POD MCIO Edition Assembly Reference
CAUTION :
Failure to do the following may DAMAGE the interposer and VOID the warranty.
•
Secure adapters as shown in this guide
•
Do NOT change adapters while powered
•
Do NOT hot plug
•
Turn on interposer power BEFORE host power
1
3
0004674 - R1.3
Page 1 of 5
2
Part
Part Description
Item
Number
1
4631
2
4679
3
4693
4
4694
4
Qty
1
2
1
1
2
Advertisement
Table of Contents

Subscribe to Our Youtube Channel
Related Manuals for Ellisys SerialTek Gen5 POD MCIO


Summary of Contents for Ellisys SerialTek Gen5 POD MCIO
- Page 1 Gen5 POD MCIO Edition Assembly Reference Part CAUTION : Part Description Item Number 4631 POD Main Unit Failure to do the following may DAMAGE the interposer and VOID the warranty. Host/Device Cable Adaptor Tray 4679 • Secure adapters as shown in this guide 4693 MCIO Device PCBA 4694...
- Page 2 Gen5 POD MCIO Edition Assembly Reference Slide the Host/Device Cable Adaptor Tray into the slot on the HOST side on the underside of the POD Main Unit at an angle of about 60 ~ . Rotate the Cable Adaptor Tray so it is horizontal and tighten the M3 Captive Panel Screws to the POD Main Unit, ensuring not to over tighten.
- Page 3 Gen5 POD MCIO Edition Assembly Reference Raise M3 Captive Screws till it resists and screw thread clears the underside of PCBA, then slide the MCIO Device PCBA into the connector on the DEVICE side of the POD Unit and secure in position on the Host/Device Cable Adaptor Tray with the M3 Captive Screws M3 Captive Screw POD Main Unit...
- Page 4 Gen5 POD MCIO Edition Assembly Reference Slide the Host/Device Cable Adaptor Tray into the slot on the HOST side on the underside of the POD Main Unit at an angle of about 60 ~ . Rotate the Cable Adaptor Tray so it is horizontal and tighten the M3 Captive Panel Screws to the POD Main Unit, ensuring not to over tighten.
- Page 5 Gen5 POD MCIO Edition Assembly Reference Raise M3 Captive Screws till it resists and screw thread clears the underside of PCBA, then slide the MCIO Host PCBA and connect to the HOST side of the POD Unit. Secure in position on the Host/Device Cable Adaptor Tray with the M3 Captive Screws POD Main Unit M3 Captive Screw...
Need help?
Do you have a question about the SerialTek Gen5 POD MCIO and is the answer not in the manual?
Questions and answers