Table of Contents
Advertisement
Quick Links
Advertisement
Table of Contents

Subscribe to Our Youtube Channel
Related Manuals for Kärcher G 3000


Summary of Contents for Kärcher G 3000
- Page 1 G 3000 G 3000 9.506-954.0...
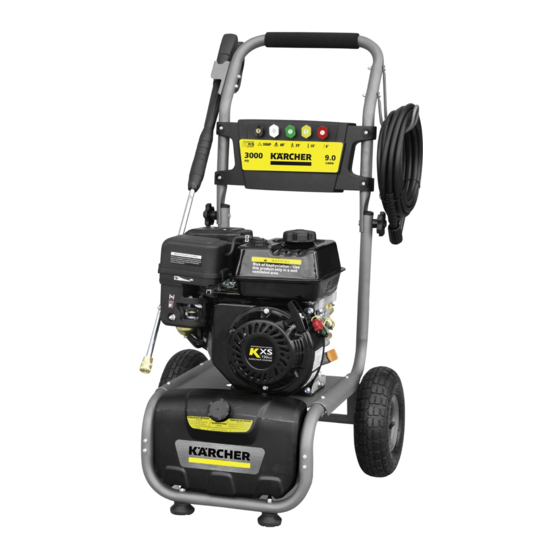
- Page 2 Machine Parts List 1. Spray Gun 2. Nozzles 3. Muffler 4. Air Filter 5. Throttle Lever 6. Choke Lever 7. Fuel Valve 8. Detergent Tank Cap 9. Detergent Tank 10. Petrol Tank Cap 11. Petrol Tank 12. Hand Cord 13. Engine Switch 14.
-
Page 4: Table Of Contents
Troubleshooting ....19 result in minor or moderate injury or in property damage incidents.” Specifications G 3000 Operating Pressure 3000 PSI Water Volume 9.0 L/min... -
Page 5: Safety Instructions
Safety Instructions When using this product, basic precautions should always be followed, including the following: ● Read the operating instructions of the Risk of injection or injury – Do not engine manufacturer before start-up direct discharge stream at persons. and follow the safety instructions carefully. - Page 6 accessories to contact hot surfaces. ● Do not leave machine running unat- tended. ● Avoid tipping machine on its side. Water Supply (Cold Water Only) Risk of asphyxiation – Use this product only in a well ventilated area. Running this product indoors can result in death due to Carbon When connecting to water supply Monoxide, a poisonous gas you...
-
Page 7: Assembly Instructions
Assembly Instructions Part List B - Handle C - Gun Hook & Hose Hook A - Main Frame D - Knobs & Bolts E - Pressure Hose Page 7... - Page 8 Assembling 1. Install the wheels to the main frame by pressing the spring loaded pin on wheel axle, then insert wheel axle into frame. Ensure that the spring pin is fixed in position. Repeat for the other wheel. F - Spray Gun & Wand G- Wheels Parts not shown: 1 - Manual...
-
Page 9: Preparation
1. Remove the filler cap/dipstick and 3. Attach the gun & hose hooks to the wipe it clean. handle. 2. Insert and remove the dipstick without screwing it into the filler neck. Check the oil level shown on the dipstick. 3. - Page 10 Fuel Level Air Filter The air filter should be checked Make sure there is enough fuel in after prolonged storage, the the fuel tank before operating. This following steps should be done is a 4-cycle engine and does not when checking the air filter. It is require a petrol/oil mixture.
-
Page 11: Operating Instructions
4. Inspect both air filter elements, and Operating Instructions replace them if they are damaged. Always replace the paper air filter element at the scheduled interval. Starting Procedure: 5. Clean the air filter elements if they 1. Connect garden hose. are to be reused. - Page 12 ► STEP 3: Turn the fuel valve to 3. Open water source. "ON" position. ► STEP 4: Put the throttle lever to the "FAST" position. ► STEP 5: Pull trigger on spray gun to release pressure. ► STEP 6: Locate recoil cord and pull slowly until resistance is felt.
-
Page 13: Using The Accessories
Using the Accessories High pressure in nozzle area. Risk The color-coded quick connect nozzles of injury caused by improperly provide a wide array of spray widths locked nozzle. from 0° to 40° and are easily accessible ● when placed in the convenient nozzle Make sure you hear the "click"... -
Page 14: Working With Detergents
Working with Detergents Detergents can only be applied with This unit has been designed for use the black detergent nozzle. with cleaning detergents recommended by the manufacturer. ● Install the black detergent nozzle for The use of other cleaning detergent detergent application at low pressure. -
Page 15: Taking A Break
● Turn engine switch to the OFF position. Taking a Break ● Disconnect all hoses..five minutes or more ● Unscrew cap from Pump Guard bottle. ● Move the engine stop switch to the ● Remove internal seal. OFF position. ●... -
Page 16: Maintenance Instructions
Rinse at high pressure in a long sweeping motion keeping the spray Maintenance Instructions nozzle approximately 8-15cm (3-6 inches) from the cleaning surface. Always clean from top to bottom and Pump from left to right. When moving on to a new section of the cleaning surface, Pump Inspection be sure to overlap the previous section... - Page 17 Cleaner , apply to surface at low pres- Barbecue Grills, Outdoor sure (for best results, limit your work area to sections of approximately Power Equipment 1.8M and always apply detergent from & Gardening Tools bottom to top). Allow detergent to remain on surface 1-3 minutes.
- Page 18 Recommendations ● Before cleaning any surface, an inconspicuous area should be cleaned to test spray pattern and distance for maximum cleaning results. ● If painted surfaces are peeling or chipping, use extreme caution as pressure washer may remove the loose paint from the surface.
-
Page 19: Troubleshooting
Troubleshooting Remove the spark plug cable to prevent accidental ignition of the engine before making any repair. Symptom Cause Solution Engine Will Not No Petrol. Fill Petrol Tank. Start Choke is not in the Slide lever out to closed position. correct position. - Page 20 Symptom Cause Solution Output Pump is sucking air. Check that hoses and fittings are air Pressure tight. Turn off machine and purge pump Varies Between by squeezing trigger gun until a steady flow of water emerges through the High And Low nozzle.
- Page 21 Symptom Cause Solution Spray Wand Spray wand not Turn the swivel nut of the gun clockwise Leaks properly attached. until connection is tight. Broken o-ring or Visit www.karcher.com.au or plastic insert. www.karcher.co.nz Pump Is Noisy Not enough petrol Check that hoses and fittings are air or engine oil.
- Page 22 High Pressure Washers Limited 24 month warranty Cold water petrol pressure washers This Kärcher product is warranted by Kärcher to be free of defects in workmanship and materials under normal use. Specific warranty applies to: • Kärcher KPS and KXS series engines are warranted for two (2) years on parts and labor.
- Page 23 • Damage caused by misuse, neglect, accident, abuse, improper handling, freezing, normal wear and tear or non-compliance with operator's manual. • Damage caused by water sediment, contaminated water supply or use of chemicals and detergents not approved by or recommended by Kärcher. •...
Need help?
Do you have a question about the G 3000 and is the answer not in the manual?
Questions and answers