Parkside PSSAP 20Li B2 Operation And Safety Notes Translation Of The Original Instructions
Cordless sabre saw 20 v
Hide thumbs
Also See for PSSAP 20Li B2:
- Operation and safety notes (139 pages) ,
- Operation and safety notes (82 pages)
Table of Contents
Advertisement
Available languages
Available languages
Quick Links
SIERRA DE SABLE RECARGABLE DE 20 V /
SEGHETTO ALTERNATIVO RICARICABILE 20 V
PSSAP 20‑Li B2
SIERRA DE SABLE
RECARGABLE DE 20 V
Instrucciones de utilización y de seguridad
Traducción del manual original
SEGHETTO ALTERNATIVO
RICARICABILE 20 V
Indicazioni per l'uso e per la sicurezza
Traduzione delle istruzioni originali
SERROTE ELÉTRICO COM
BATERIA 20 V
Instruções de utilização e de segurança
Tradução do manual original
IAN 322690_1901
CORDLESS SABRE SAW 20 V
Operation and safety notes
Translation of the original instructions
AKKU‑SÄBELSÄGE 20 V
Bedienungs- und Sicherheitshinweise
Originalbetriebsanleitung
Advertisement
Chapters
Table of Contents

Related Manuals for Parkside PSSAP 20Li B2


Summary of Contents for Parkside PSSAP 20Li B2
- Page 1 SIERRA DE SABLE RECARGABLE DE 20 V / SEGHETTO ALTERNATIVO RICARICABILE 20 V PSSAP 20‑Li B2 SIERRA DE SABLE CORDLESS SABRE SAW 20 V RECARGABLE DE 20 V Operation and safety notes Translation of the original instructions Instrucciones de utilización y de seguridad Traducción del manual original AKKU‑SÄBELSÄGE 20 V SEGHETTO ALTERNATIVO...
- Page 2 Instrucciones de utilización y de seguridad Página IT/MT Indicazioni per l’uso e per la sicurezza Pagina Instruções de utilização e de segurança Página GB/MT Operation and safety notes Page DE/AT/CH Bedienungs- und Sicherheitshinweise Seite...
- Page 4 BATERÍA COMPATIBLE CON CUALQUIER DISPOSITIVO DE LA SERIE “PARKSIDE X 20 V TEAM” BATTERIA COMPATIBILE CON TUTTI GLI APPARECCHI DELLA SERIE “PARKSIDE X 20 V TEAM” A PILHA É COMPATÍVEL COM TODOS OS APARELHOS DA SÉRIE “PARKSIDE X 20 V TEAM”...
-
Page 6: Table Of Contents
Indicaciones de advertencia y símbolos empleados . . . . . . . . . . . . . . . . Página Introducción . . . . . . . . . . . . . . . . . . . . . . . . . . . . . . . . . . . . . . . . . . . . . . . . . . . . . . . . . . Página Uso previsto . - Page 7 Indicaciones de advertencia y símbolos empleados En este manual de instrucciones, en el embalaje y en la página de características se emplean las indicaciones de advertencia siguientes: Apague el producto y retire el paquete de baterías antes de cambiar Lea el manual de instrucciones . accesorios, limpiar y si no se está...
-
Page 8: Uso Previsto
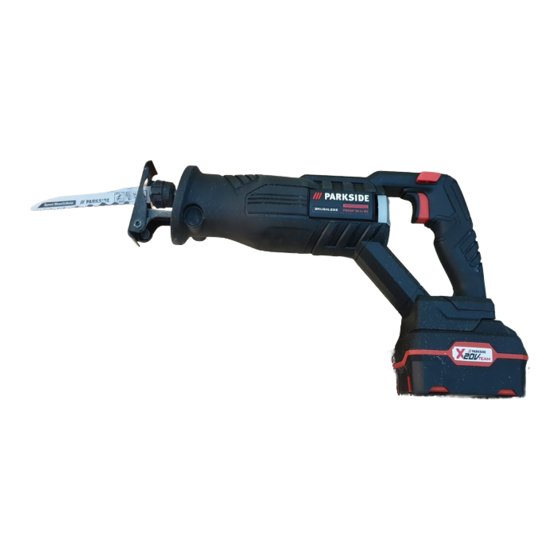
˜ Descripción de las piezas ¡Utilice siempre las sierras de sable conforme al uso previsto! Observe los requisitos técnicos del Figura A: producto al comprar y usar las hojas de sierra 1 Palanca de desbloqueo (véase "Datos técnicos") . 2 Anillo mandril de sujeción 3 Alojamiento de hoja de sierra La luz de trabajo LED 10 de este producto ha 4 Base de apoyo... - Page 9 Valores de emisión de vibraciones Paquete de baterías PAP 20 A3 Los valores de emisión de vibraciones (suma Tipo: Iones de litio vectorial de las tres direcciones) se calculan Tensión nominal: 20 V máx . conforme a la EN 62841: Capacidad: 4 Ah Valor energético:...
-
Page 10: Indicaciones De Seguridad
Guarde todas las indicaciones de ¡ADVERTENCIA! seguridad e instrucciones en un lugar Las emisiones de vibraciones y ruidos seguro para futuras referencias. pueden diferir durante el uso efectivo de la herramienta eléctrica de los valores La "herramienta eléctrica", concepto empleado indicados en función del modo, en que en las indicaciones de seguridad, hace referencia se utiliza la herramienta eléctrica, en... - Page 11 3) Mantenga alejada la herramienta 2) Use siempre gafas de protección y eléctrica de la lluvia o las el equipo de protección individual. humedades. La penetración de agua en El uso del equipo de protección individual la herramienta eléctrica aumenta el riesgo como máscara de polvo, calzado de de una descarga eléctrica .
- Page 12 7) Si se pueden montar dispositivos 4) Mantenga las herramientas de recogida y aspiración de eléctricas que no utilice fuera polvo, estos deberán conectarse y del alcance de los niños. No utilizarse correctamente. El uso de un deje que personas, que no estén familiarizadas con el uso de la dispositivo de aspiración de polvo puede herramienta o no hayan leído estas...
-
Page 13: Indicaciones De Seguridad Para Sierras De Sable
8) Mantenga los mangos y las 5) No utilice ninguna batería dañada superficies de agarre secos, limpios o modificada. Las baterías dañadas o y libres de aceite y grasa. Los mangos modificadas pueden comportarse de manera y las superficies de agarre resbaladizos imprevisible y provocar fuego, una explosión no permiten un manejo y control seguro o peligros de lesión . - Page 14 2) Fije y asegure la pieza de trabajo 9) Sujete el material firmemente. No con abrazaderas o de otro modo en sostenga la pieza de trabajo con una base estable. Si sujeta la pieza de la mano o el pie. No toque ningún objeto o el suelo con la sierra en trabajo únicamente con la mano o contra marcha.
-
Page 15: Reducción De Las Vibraciones Y Los Ruidos
˜ Reducción de las vibraciones Si se producen fallos de funcionamiento, ¾ apague el producto inmediatamente y retire y los ruidos el paquete de baterías . Haga revisar el Limite el tiempo de uso, utilice modos de baja producto por un especialista cualificado y, vibración y bajo ruido, y use equipos de si es necesario, repárelo antes de volver a protección individual para reducir los efectos de... -
Page 16: Indicaciones De Seguridad Del Cargador
. paquetes de baterías de los Las tareas de limpieza y siguientes tipos: mantenimiento no deben ser Parkside 20 V llevadas a cabo por niños sin Paquete de baterías supervisión . PAP 20 A1 2 Ah 5 celdas No cargue baterías que... -
Page 17: Comprobar El Estado De Carga Del Paquete De Baterías
NOTA adecuados Puede cargar el paquete de baterías 8 en cualquier momento sin acortar su vida Paquete de Parkside 20 V paquete útil . baterías: de baterías PAP 20 A1, La interrupción del proceso de carga no PAP 20 A2, PAP 20 A3 daña el paquete de baterías 8 . -
Page 18: Ajustar La Base De Apoyo
Conecte el cable de conexión con enchufe ¾ Introduzca o extraiga la base de apoyo 4 ¾ de red 15 del cargador 14 a la toma de para ajustar su posición deseada . corriente . Bloquear la base de apoyo 4 : Gire la ¾... -
Page 19: Insertar/Quitar La Hoja De Sierra
Quitar la hoja de sierra (Fig . I) Encendido: Suelte el bloqueo de (Fig . G) ¾ encendido 5 presionándolo hacia la Gire el anillo mandril de sujeción 2 en ¾ sentido antihorario . izquierda o derecha . Extraiga la hoja de sierra del alojamiento Apriete el interruptor de encendido/ ¾... -
Page 20: Prueba De Funcionamiento
˜ Prueba de funcionamiento ¡CUIDADO! ¡PELIGRO PARA PERSONAS Y DAÑOS MATERIALES! NOTA Colóquese siempre de lado con respecto Antes del primer trabajo y después de al producto mientras trabaje . cambiar las hojas de sierra, realice una Procure una ventilación suficiente del lugar prueba de funcionamiento sin carga . -
Page 21: Limpieza
Corte conciso NOTA (Fig . K) No utilice ningún producto de limpieza o Con las hojas de sierra bimetálicas elásticas ¾ desinfectante químico, alcalino, abrasivo o puede p . ej . separar tuberías de agua a ras agresivo para limpiar el producto, ya que de la pared . -
Page 22: Almacenamiento
˜ Almacenamiento ˜ Eliminación Limpie el producto como se describe arriba . El embalaje está compuesto por materiales no ¾ Almacene el producto y sus accesorios en un contaminantes que pueden ser desechados en el ¾ lugar oscuro, seco, libre de heladas y bien centro de reciclaje local . - Page 23 ˜ Garantía Tramitación de la garantía El producto ha sido fabricado cuidadosamente Para garantizar una rápida tramitación de siguiendo exigentes normas de calidad y ha sido su consulta, tenga en cuenta las siguientes probado antes de su entrega . En caso de defecto indicaciones: del producto, usted tiene derechos legales frente al vendedor del mismo .
- Page 24 ˜ Declaración CE de conformidad...
- Page 25 Avvertenze e simboli utilizzati . . . . . . . . . . . . . . . . . . . . . . . . . . . . . . . . . . . . . . Pagina Introduzione .
-
Page 26: Utilizzo Secondo La Destinazione D'uso
Avvertenze e simboli utilizzati Nel presente manuale, sull’imballaggio e sulla targhetta sono utilizzate le seguenti avvertenze: Spegnere il prodotto e rimuovere la Leggere il manuale d'uso . batteria prima di sostituire gli accessori, pulirlo o quando non viene utilizzato . Osservare le avvertenze e le istruzioni Proteggere la batteria da calore e luce di sicurezza! -
Page 27: Contenuto Della Confezione
˜ Descrizione dei componenti Utilizzare sempre le lame secondo l’uso previsto! Al momento dell'acquisto e dell'uso delle Figura A: lame, osservare i requisiti tecnici del prodotto 1 Leva di sblocco (vedere "Dati tecnici") . 2 Anello del mandrino 3 Supporto lama La luce da lavoro a LED 10 di questo prodotto ha 4 Piastra base lo scopo di illuminare l'area di lavoro diretta . - Page 28 Valori di emissione di vibrazioni Batteria PAP 20 A3 Valori totali delle vibrazioni (somma vettoriale Tipo: ioni di litio di tre direzioni) determinati secondo la norma Tensione nominale: 20 V max . EN 62841: Capacità: 4 Ah Valore energetico: 72 Wh Taglio di tavole Numero di celle della batteria: 10 (con lama Bosch S644D)
-
Page 29: Istruzioni Per La Sicurezza
Conservare le indicazioni di sicurezza AVVERTENZA! e le istruzioni per eventuali necessità Le emissioni di vibrazioni e rumore durante future. l'uso effettivo dell'elettroutensile possono differire dai valori dichiarati a seconda Il termine "elettroutensile" utilizzato nelle istruzioni del modo in cui l'elettroutensile viene di sicurezza si riferisce agli elettroutensili utilizzato, in particolare il tipo di pezzo da alimentati dalla rete (con cavo di alimentazione) - Page 30 3) Tenere gli elettroutensili lontano 2) Indossare sempre dispositivi di dalla pioggia o dall'umidità. La protezione individuale e occhiali protettivi. L'uso di dispositivi di protezione penetrazione dell'acqua in un elettroutensile aumenta il rischio di scosse elettriche . individuale, quali maschera antipolvere, scarpe di sicurezza antiscivolo, casco di 4) Non usare impropriamente sicurezza o protezione acustica, a seconda...
- Page 31 7) Se è possibile installare sistemi 4) Tenere gli elettroutensili non di aspirazione e raccolta della utilizzati fuori dalla portata dei polvere, questi vanno collegati e bambini. Non consentire l'uso utilizzati correttamente. L'uso di un dell'elettroutensile a persone che non lo conoscono o non hanno letto impianto di aspirazione della polvere può...
-
Page 32: Sicurezza Per I Seghetti Alternativi
8) Tenere le impugnature e le superfici 5) Non utilizzare batterie danneggiate di presa asciutte, pulite e prive o modificate. Batterie danneggiate o di olio e grasso. Le impugnature modificate possono comportarsi in modo e le superfici di presa scivolose non imprevedibile e causare incendi, esplosioni consentono un uso e un controllo sicuro o lesioni . - Page 33 2) Fissare e mettere in sicurezza il 9) Serrare bene il materiale. Non pezzo da lavorare ad una base sostenere il pezzo da lavorare stabile utilizzando morsetti o altri con la mano o con il piede. Non mezzi. Se si tiene il pezzo da lavorare toccare nessun oggetto o il suolo con la sega che gira.
-
Page 34: Riduzione Delle Vibrazioni E Del Rumore
˜ Riduzione delle vibrazioni e In caso di malfunzionamenti, spegnere ¾ immediatamente il prodotto e rimuovere la del rumore batteria . Prima di rimetterlo in funzione, far Limitare il tempo di utilizzo, utilizzare modalità a controllare e, se necessario, riparare da uno bassa vibrazione e bassa rumorosità... -
Page 35: Sicurezza Per I Caricabatterie
è adatto solo Non lasciare che i bambini per la ricarica di batterie dei giochino con l’apparecchio . seguenti tipi: La pulizia e la manutenzione Parkside 20 V utente non possono essere Batteria eseguite da bambini senza supervisione . PAP 20 A1... -
Page 36: Controllare Lo Stato Di Carica Della Batteria
(Fig . C) Batterie e caricabatterie adatti INDICAZIONE È possibile caricare la batteria 8 in Batteria: Batteria Parkside da 20 V qualsiasi momento senza accorciarne la PAP 20 A1, PAP 20 A2, durata . PAP 20 A3 L’interruzione del processo di carica non... -
Page 37: Regolazione Della Piastra Base
Collegare il cavo d'alimentazione con spina Regolare la posizione desiderata della ¾ ¾ 15 del caricabatterie 14 alla presa di piastra base 4 tirandola verso l'interno o corrente . l'esterno . Quando la batteria 8 è completamente Blocco della piastra base 4 : Ruotare la leva ¾... -
Page 38: Accendere E Spegnere
Rimozione della lama (Fig . I) Accensione: Sbloccare il blocco di (Fig . G) ¾ accensione 5 spingendolo a sinistra o a Ruotare l'anello del mandrino 2 in senso ¾ antiorario . destra . Estrarre la lama dal relativo supporto 3 . Premere l'interruttore ON/OFF 6 e tenerlo ¾... - Page 39 ˜ Prova CAUTELA! RISCHIO DI LESIONI PERSONALI E DANNI MATERIALI! INDICAZIONE Durante il lavoro, stare sempre a lato del Eseguire una prova senza carico prima prodotto . della prima lavorazione e dopo ogni Assicurarsi che il luogo di lavoro sia cambio lama .
-
Page 40: Pulizia
Taglio a filo INDICAZIONE (Fig . K) Non utilizzare detergenti o disinfettanti Con delle lame bimetalliche elastiche è ¾ chimici, alcalini, abrasivi o altri detergenti o possibile, ad esempio, separare i tubi disinfettanti aggressivi per pulire il prodotto dell'acqua a filo muro . in quanto potrebbero danneggiare le Assicurarsi che la lama sia sempre più... -
Page 41: Trasporto 18
˜ Conservazione ˜ Smaltimento Pulire il prodotto come sopra descritto . L’imballaggio è composto da materiali ecologici ¾ Conservare il prodotto e i suoi accessori in che possono essere smaltiti presso i siti di raccolta ¾ un luogo buio, asciutto, al riparo dal gelo e locali per il riciclo . - Page 42 ˜ Garanzia Gestione dei casi in garanzia Il prodotto è stato prodotto secondo severe Per garantire un rapido disbrigo delle proprie direttive di qualità e controllato con premura pratiche, seguire le istruzioni seguenti: prima della consegna . In caso di difetti del prodotto, l‘acquirente può...
- Page 43 ˜ Dichiarazione CE di conformità 42 IT/MT...
- Page 44 Indicações de segurança e símbolos utilizados . . . . . . . . . . . . . . . . . . . . . . Página Introdução .
- Page 45 Indicações de segurança e símbolos utilizados No presente manual de instruções na embalagem e na placa de identificação são utilizados os seguintes avisos: Desligue o produto e tire o pack de pilhas antes de substituir os acessórios, Leia o manual de instruções . da limpeza e quando o produto não é...
- Page 46 ˜ Descrição das peças Utilize sempre lâminas de serra conforme a utilização prevista! Ao adquirir as lâminas de Imagem A: serra verifique as condições técnicas do produto 1 Alavanca de bloqueio (consultar “Dados técnicos”) . 2 Anel de mandril 3 Encaixe de lâmina de serra A LED luz de trabalho 10 do produto foi 4 Placa de base concebida para iluminar diretamente a área de...
- Page 47 Valores de emissão da vibração Pack de pilhas PAP 20 A3 Valores total da vibração (soma vetorial das três Tipo: Íon de lítio direções) determinados conforme EN 62841: Tensão nominal: 20 V máx . Capacidade: 4 Ah Serrar tábuas Valor da energia: 72 Wh (com lâmina de serra Bosch S644D) Quantidade de células da...
- Page 48 Guarde todas as indicações de AVISO! segurança e conselhos num local seguro As emissões da vibração e do ruído para referência futura. podem variar dos valores indicados durante a utilização da ferramenta elétrica O termo “ferramenta elétrica” utilizado nas dependendo da forma como a ferramenta indicações de segurança refere-se às ferramentas elétrica é...
- Page 49 3) Mantenha as ferramentas elétricas 2) Utilize roupa de proteção pessoal afastadas da chuva e da humidade. e sempre uns óculos de proteção. A entrada de água para dentro de uma A utilização de roupa de proteção pessoal, ferramenta elétrica aumenta o risco de como máscara contra o pó, sapatos de choque elétrico .
- Page 50 7) Se montar os dispositivos de 4) Mantenha as ferramentas elétricas aspiração e de recolha, esse que não estão em uso fora do devem ser ligados e utilizados alcance de crianças. Não deixe que corretamente. A utilização de uma a ferramenta elétrica seja utilizada por pessoas que não sabem aspiração pode reduzir o perigo causado lidar com esse tipo de aparelho...
- Page 51 8) Mantenha as pegas e as áreas de 5) Não utilize pilhas danificadas agarrar secas, limpas, livre de óleo ou alteradas. As pilhas danificadas e de gordura. As pegas e as áreas ou alteradas podem funcionar de forma de agarrar que estão escorregadias não imprevisível e causar incêndio, explosão ou permitem nenhuma utilização e controlo da ferimentos .
- Page 52 2) Fixe e assegure a peça a trabalhar 9) Fixe bem o material. Não suporte através de clipes ou de outra forma a peça a trabalhar com a mão ou o em cima de uma superfície estável. pé. Não toque em objetos ou o solo com a serra quando essa estiver a Se segurar a peça a trabalhar apenas com trabalhar.
- Page 53 ˜ Redução da vibração e do Desligue o produto e tire o pack das pilhas ¾ em caso de uma falha na função . Solicite ruído uma pessoa qualificada para verificar ou Limite o tempo de utilização, utilize modos de fazer a manutenção do produto antes de funcionamento de vibração e ruídos reduzidos e voltar a utilizar o produto .
- Page 54 . packs de pilhas dos seguintes A limpeza e a manutenção por tipos: parte do utilizador não devem Parkside 20 V ser realizadas por crianças Pack de pilhas sem vigilância . PAP 20 A1 2 Ah 5 células...
- Page 55 8 . adequados Carregue o pack de pilhas 8 antes da ¾ Pack de Parkside 20 V pack de pilhas utilização no caso de esse encontrar-se em pilhas: PAP 20 A1, PAP 20 A2, estado de carregamento médio ou baixo .
- Page 56 Pode ajustar a posição desejada através de ¾ Ligue o cabo de ligação com ficha 15 do ¾ puxar a placa de base 4 para fora e para carregador 14 a uma tomada . dentro . Quando o pack de pilhas 8 está ¾...
- Page 57 Remover lâmina de serra (imag . I) Ligar: Solte o bloqueio de ligação 5 (imag . G) ¾ premindo para a esquerda ou direita . Gire o anel de mandril 2 em sentido ¾ contrário dos ponteiros do relógio . Prima o botão de ligar/desligar 6 e Puxe a lâmina de serra do encaixe de mantenha-o premido .
- Page 58 ˜ Teste CUIDADO! RISCO DE DANOS PESSOAIS E MATERIAIS! NOTA Esteja sempre em posição lateral ao Antes do primeiro trabalho e após cada produto quando estiver a trabalhar . substituição da lâmina de serra realize um Certifique-se de que haja ventilação no teste sem carga .
- Page 59 Corte nivelado NOTA (imag . K) Não utilize detergentes químicos, Com lâminas de serrar bimetálicas pode, ¾ substâncias alcalinas, abrasivas ou p .ex ., cortar tubos de água na parede de agressivas ou desinfetante para limpar forma nivelada . o produto, porque podem danificar a Certifique-se de que a lâmina de serrar é...
- Page 60 ˜ Armazenamento ˜ Eliminação Limpe o produto conforme descrito acima . A embalagem é feita de materiais não poluentes ¾ Guarde o produto e os respetivos acessórios que podem ser eliminados nos contentores de ¾ num local escuro, seco, livre de gelo e bem reciclagem locais .
- Page 61 ˜ Garantia Procedimento no caso de ativação da garantia O producto foi cuidadosamente fabricado segundo rigorosas directivas de qualidade De forma a garantir um rápido processamento do e meticulosamente testado antes da sua seu pedido, solicitamos as seguintes indicações: distribuição . Em caso de falhas deste producto, possui direitos legais relativamente ao vendedor Para qualquer questão, guarde o do producto .
- Page 62 ˜ Declaração CE de conformidade...
- Page 63 Warnings and symbols used . . . . . . . . . . . . . . . . . . . . . . . . . . . . . . . . . . . . . . . . . . Page Introduction .
-
Page 64: Warnings And Symbols Used
Warnings and symbols used The following warnings are used in this instruction manual, on the packaging and on the rating label: Switch the product off and remove the battery pack before replacing Read the instruction manual . attachments, cleaning and when not in use . -
Page 65: Scope Of Delivery
˜ Parts description Always use the correct saw blades according to the intended use! Observe the technical Figure A: requirements of this product (see “Technical 1 Locking lever data“) when purchasing and using saw blades! 2 Chuck ring 3 Saw blade holder The LED work light 10 on this product is intended 4 Base plate to illuminate the immediate work area . - Page 66 Vibration emission value Battery pack PAP 20 A3 Vibration total values (triaxial vector sum) Type: Lithium-Ion determined according to EN 62841: Rated voltage: 20 V max . Capacity: 4 Ah Cutting boards Energy value: 72 Wh (with saw blade Bosch S644D) Number of cells: Main handle: Hand/arm vibration a...
-
Page 67: Safety Instructions
Save all warnings and instructions for WARNING! future reference. The vibration and noise emissions during actual use of the power tool can differ The term “power tool” in the warnings refers to from the declared values depending on your mains-operated (corded) power tool or the manner in which the tool is used, battery-operated (cordless) power tool . - Page 68 3) Do not expose power tools to rain 2) Use personal protective or wet conditions. Water entering a equipment. Always wear eye protection. Protective equipment such as power tool will increase the risk of electric shock . dust mask, non-skid safety shoes, hard hat, or hearing protection used for appropriate 4) Do not abuse the cord.
- Page 69 7) If devices are provided for the 4) Store idle power tools out of the connection of dust extraction and reach of children and do not allow collection facilities, ensure these are persons unfamiliar with the power connected and properly used. Use tool or these instructions to operate the power tool.
- Page 70 8) Keep handles and grasping surfaces 5) Do not use a battery pack dry, clean and free from oil and for tool that is damaged or grease. Slippery handles and grasping modified. Damaged or modified batteries surfaces do not allow for safe handling and exhibit unpredictable behaviour resulting in control of the tool in unexpected situations .
- Page 71 2) Use clamps or another practical 9) Tighten the material firmly. Do not way to secure and support the support the workpiece by hand or workpiece to a stable platform. foot. Do not touch any objects or the ground with the saw running. There Holding the workpiece by hand or against your body leaves it unstable and may lead is a risk of kickback .
-
Page 72: Residual Risks
˜ Vibration and noise reduction Switch the product off and disconnect it from ¾ the mains if there are malfunctions . Have the To reduce the impact of noise and vibration product checked by a qualified professional emission, limit the time of operation, use low- and repaired, if necessary, before you vibration and low-noise operating modes as well operate it again . -
Page 73: Before First Use
¾ involved . only designed for charging the Children shall not play with the battery pack types: appliance . Parkside 20 V Cleaning and user battery pack maintenance shall not be made PAP 20 A1 2 Ah 5 cells by children without supervision . -
Page 74: Operation
PAP 20 A1, PAP 20 A2, PAP 20 A3 damage the battery pack 8 . Charger: Parkside 20 V charger PLG 20 A1, PLG 20 A2, PLG 20 B1, PLG 20 A3 Charge the battery pack 8 before ¾... - Page 75 Adjust the desired position of the base plate ¾ Connect the power cord with power plug 15 ¾ 4 by pushing it in or pulling it out . of the charger 14 to the socket . Lock the base plate 4 : Turn the locking ¾...
- Page 76 Removing the saw blade (Fig . I) Switching on: Release the switch lock 5 (Fig . G) ¾ by pushing it in on the left or right side . Turn the chuck ring 2 in a counter-clockwise ¾ direction . Press and hold the on/off switch 6 .
-
Page 77: Working Instructions
˜ Trial run CAUTION! RISK OF INJURY AND DAMAGE TO PROPERTY! NOTE Always stand to the side of the product Always carry out a no-load trial run when working . before starting work and after every saw Always make sure that the workplace is blade replacement . -
Page 78: Cleaning And Care
Flush cuts NOTE (Fig . K) Do not use chemical, alkaline, abrasive With elastic bi-metal saw blades you can ¾ or other aggressive detergents or separate water pipes, for example, flush to disinfectants to clean this product as they the wall . might be harmful to its surfaces . -
Page 79: Storage
˜ Storage ˜ Disposal Clean the product as described above . The packaging is made entirely of recyclable ¾ Store the product and its accessories in a materials, which you may dispose of at local ¾ dark, dry, frost-free, well-ventilated place . recycling facilities . -
Page 80: Warranty
˜ Warranty Warranty claim procedure The product has been manufactured to strict To ensure quick processing of your case, please quality guidelines and meticulously examined observe the following instructions: before delivery . In the event of product defects you have legal rights against the retailer of this Please have the till receipt and the item number product . -
Page 81: Ec Declaration Of Conformity
˜ EC declaration of conformity 80 GB/MT... - Page 82 Verwendete Warn hinweise und Symbole . . . . . . . . . . . . . . . . . . . . . . . . . . . . .Seite Einleitung .
-
Page 83: Bestimmungsgemäße Verwendung
Verwendete Warn hinweise und Symbole In dieser Bedienungsanleitung, auf der Verpackung und auf dem Typenschild werden die folgenden Warnhinweise verwendet: Schalten Sie das Produkt aus und entnehmen Sie den Akku-Pack vor dem Lesen Sie die Bedienungsanleitung . Auswechseln von Zubehör, Reinigung und bei Nichtgebrauch . -
Page 84: Lieferumfang
˜ Teilebeschreibung Verwenden Sie stets Sägeblätter entsprechend dem bestimmungsgemäßen Gebrauch! Beachten Abbildung A: Sie beim Kauf und Gebrauch von Sägeblättern 1 Entriegelungshebel die technischen Anforderungen des Produkts 2 Spannfutterring (siehe „Technische Daten“) . 3 Sägeblattaufnahme 4 Fußplatte Die LED-Arbeitsleuchte 10 dieses Produkts ist 5 Einschaltsperre dazu bestimmt, den direkten Arbeitsbereich zu 6 Ein-/Ausschalter/... - Page 85 Schwingungsemissionswerte Akku-Pack PAP 20 A3 Schwingungsgesamtwerte (Vektorsumme dreier Typ: Lithium-Ionen Richtungen), ermittelt entsprechend EN 62841: Nennspannung: 20 V max . Kapazität: 4 Ah Sägen von Brettern Energiewert: 72 Wh (mit Sägeblatt Bosch S644D) Anzahl der Batteriezellen: Haupthandgriff: Hand-/Armvibration a 21,26 m/s Schnellladegerät PLG 20 B1 Unsicherheit K:...
-
Page 86: Sicherheitshinweise
Bewahren Sie alle Sicherheitshinweise WARNUNG! und Anweisungen für die Zukunft auf. Die Schwingungs- und Geräuschemissionen können während Der in den Sicherheitshinweisen verwendete der tatsächlichen Benutzung des Begriff „Elektrowerkzeug“ bezieht sich Elektrowerkzeugs von den Angabewerten auf netzbetriebene Elektrowerkzeuge (mit abweichen, abhängig von der Art und Netzleitung) oder auf akkubetriebene Weise, in der das Elektrowerkzeug Elektrowerkzeuge (ohne Netzleitung) . - Page 87 3) Halten Sie Elektrowerkzeuge von 2) Tragen Sie persönliche Regen oder Nässe fern. Das Eindringen Schutzausrüstung und immer eine Schutzbrille. Das Tragen persönlicher von Wasser in ein Elektrowerkzeug erhöht das Risiko eines elektrischen Schlages . Schutzausrüstung, wie Staubmaske, rutschfeste Sicherheitsschuhe, Schutzhelm 4) Zweckentfremden Sie die oder Gehörschutz, je nach Art und Einsatz Anschlussleitung nicht, um das...
- Page 88 7) Wenn Staubabsaug- und 4) Bewahren Sie unbenutzte -auffangeinrichtungen montiert Elektrowerkzeuge außerhalb werden können, sind diese der Reichweite von Kindern auf. anzuschließen und richtig zu Lassen Sie keine Personen das verwenden. Verwendung einer Elektrowerkzeug benutzen, die mit diesem nicht vertraut sind oder Staubabsaugung kann Gefährdungen durch diese Anweisungen nicht gelesen Staub verringern .
- Page 89 8) Halten Sie Griffe und Griffflächen 5) Benutzen Sie keinen beschädigten trocken, sauber und frei von Öl und oder veränderten Akku. Beschädigte Fett. Rutschige Griffe und Griffflächen oder veränderte Akkus können sich erlauben keine sichere Bedienung unvorhersehbar verhalten und zu Feuer, und Kontrolle des Elektrowerkzeugs in Explosion oder Verletzungsgefahr führen .
- Page 90 2) Befestigen und sichern Sie das 9) Spannen Sie das Material gut Werkstück mittels Zwingen oder fest. Stützen Sie das Werkstück auf andere Art und Weise an einer nicht mit der Hand oder dem stabilen Unterlage. Wenn Sie das Fuß ab. Berühren Sie keine Gegenstände oder den Erdboden Werkstück nur mit der Hand oder gegen mit der laufenden Säge.
-
Page 91: Restrisiken
˜ Vibrations- und Schalten Sie das Produkt bei Fehlfunktionen ¾ umgehend aus und entnehmen Sie den Geräuschminderung Akku-Pack . Lassen Sie dieses von einer Begrenzen Sie die Benutzungszeit, verwenden qualifizierten Fachkraft überprüfen und Sie vibrations- und geräuscharme Betriebsarten gegebenenfalls instand setzen, bevor Sie es und tragen Sie persönliche Schutzausrüstung, wieder in Betrieb nehmen . -
Page 92: Zubehör
Ladegerät ist ausschließlich Kinder dürfen nicht mit dem zum Aufladen von Akku-Packs Gerät spielen . der folgenden Typen geeignet: Reinigung und Benutzer- Parkside 20 V Wartung dürfen nicht von Akku-Pack Kindern ohne Beaufsichtigung PAP 20 A1 2 Ah 5 Zellen durchgeführt werden . -
Page 93: Akku-Pack-Ladezustand Prüfen
Pack: PAP 20 A2, PAP 20 A3 schädigt den Akku-Pack 8 nicht . Lade- Parkside 20 V Lade gerät PLG 20 A1, gerät: PLG 20 A2, PLG 20 B1, PLG 20 A3 Laden Sie den Akku-Pack 8 vor dem ¾... -
Page 94: Fußplatte Einstellen
Verbinden Sie die Anschlussleitung mit Stellen Sie durch Ein- oder Ausziehen die ¾ ¾ Netzstecker 15 des Ladegeräts 14 mit der gewünschte Position der Fußplatte 4 ein . Steckdose . Fußplatte 4 verriegeln: Drehen Sie den ¾ Wenn der Akku-Pack 8 voll geladen ist: Entriegelungshebel 1 im Uhrzeigersinn . -
Page 95: Geschwindigkeitsregelung
Sägeblatt entfernen (Abb . I) Einschalten: Lösen Sie die Einschaltsperre (Abb . G) ¾ 5 , indem Sie sie links oder rechts Drehen Sie den Spannfutterring 2 entgegen ¾ dem Uhrzeigersinn . eindrücken . Ziehen Sie das Sägeblatt aus der Drücken Sie den Ein-/Ausschalter 6 und ¾... -
Page 96: Probelauf
˜ Probelauf VORSICHT! RISIKO VON PERSONEN- UND SACHSCHÄDEN! HINWEIS Stellen Sie sich beim Arbeiten immer Führen Sie vor dem ersten Arbeiten seitlich zum Produkt . und nach jedem Sägeblattwechsel Sorgen Sie für eine Belüftung des einen Probelauf ohne Belastung durch . Arbeitsplatzes . -
Page 97: Reinigung
Bündiges Abtrennen HINWEIS (Abb . K) Verwenden Sie keine chemischen, Mit elastischen Bimetall-Sägeblättern können ¾ alkalischen, schmirgelnde oder Sie z . B . Wasserrohre bündig an der Wand andere aggressive Reinigungs- oder abtrennen . Desinfektionsmittel, um das Produkt zu Achten Sie darauf, dass das Sägeblatt stets ¾... -
Page 98: Transport
˜ Lagerung ˜ Entsorgung Reinigen Sie das Produkt wie oben Die Verpackung besteht aus umweltfreundlichen ¾ beschrieben . Materialien, die Sie über die örtlichen Lagern Sie das Produkt und dessen Zubehör Recyclingstellen entsorgen können . ¾ an einem dunklen, trockenen, frostfreiem und Beachten Sie die Kennzeichnung gut belüftetem Ort . - Page 99 ˜ Garantie Abwicklung im Garantiefall Das Produkt wurde nach strengen Um eine schnelle Bearbeitung Ihres Anliegens Qualitätsrichtlinien sorgfältig produziert und vor zu gewährleisten, folgen Sie bitte den folgenden Anlieferung gewissenhaft geprüft . Im Falle von Hinweisen: Mängeln dieses Produkts stehen Ihnen gegen den Verkäufer des Produkts gesetzliche Rechte Bitte halten Sie für alle Anfragen den zu .
- Page 100 ˜ EG-Konformitätserklärung DE/AT/CH...
- Page 101 OWIM GmbH & Co. KG Stiftsbergstraße 1 DE-74167 Neckarsulm GERMANY Model-Nr.: HG05469 Version: 07/2019 IAN 322690_1901...
Need help?
Do you have a question about the PSSAP 20Li B2 and is the answer not in the manual?
Questions and answers