Table of Contents
Advertisement
Available languages
Available languages
Quick Links
Advertisement
Table of Contents

Related Manuals for HOMCOM 824-034V90


Summary of Contents for HOMCOM 824-034V90
-
Page 2: Operation
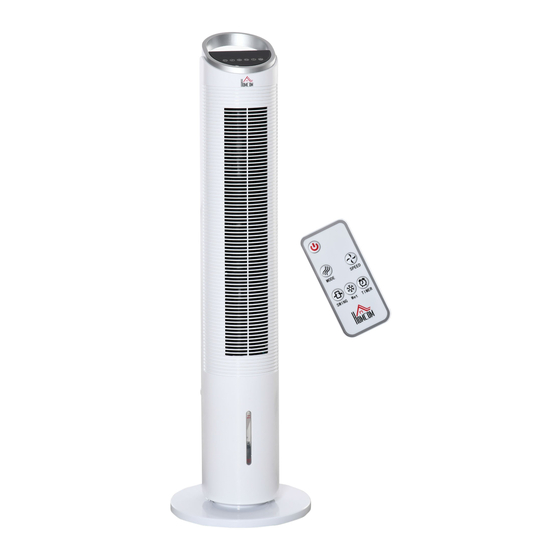
EN_Components Diagram Handle Display Back shell Fix screw Air oulet Back net Rotary Front shell Water tank Water level window Power cord base OPERATION Take out the product from gift box ASSEMBLING Step 1: First insert the snap of the base into the square hole. Step 2: Align the four fixing screw holes of the assembled base with the screw posts of the fusela ge, and lock the fuselage and the base with 4 self-tapping screws. - Page 3 Fill the water tank: 1. Pull out the water tank 2. Fill the water tank with cold and clean water. Make sure that water level is between “Min” minimum level and “Max” maximum level. 3. To increase the cool effect insert the ice box in the water tank.Before use ice box, they must be filled by water and put in the refrigerator until they are completely frozen.
-
Page 4: Remote Control
Remote control and panel display: REMOTE CONTROL The remote control uses on button cell battery, type CR2025(3V).To remove the battery carriage use your thumb to squeeze the release tab to the right and then pull the carriage out. Place the battery into the carriage and slide the carriage back into the remote. - Page 5 11. After adding water to the water tank, do not tilt or knock over the appliance when you put or move it .If you want to move, please drive it at side, in order to avoid spilling the water. 12. Do not turnover the appliance. If it is toppled over, and there have some water in the body, should unplug the power supply.
-
Page 6: Specifications
CLEANING & DRAINING THE WATER TANK If the cooler will not be used for a long period of time, please refer to the STORAGE & MAINTENANCEGUIDELINES located in the separate Safety & Maintenance Guide. WARNING: Before cleaning the unit, switch the unit OFF and disconnect from the electrical socket. unscrew the water pump knob, pull out the water tank, clean the water tank and put it back, and screw the water pump knob to the water pump. -
Page 7: Opération
_Sché ma des composants Poigné e Panneau Coque arriè re d’affichage Vis de fixation Sortie d’air Grille arriè re Rotatif Boî tier avant Réservoir d’eau Fenêtre de niveau d’eau Socle Cordon d’aliment ation OPÉRATION Retirez le produit de la boî te cadeau ASSEMBLAGE Étape 1 : Insérez l’enclenchement du socle dans le trou carré. - Page 8 Remplissez le réservoir d’eau : 5. Retirez le ré servoir 6. Remplissez le ré servoir d’eau froide et propre. Veillez à ce que le niveau d’eau se situe entre le niveau minimum (MIN) et le niveau maximum (MAX). 7. Pour augmenter l’effet de refroidissement, insé rez la glaciè re dans le ré servoir. Remplissez la glacière avec de l’eau et placez -la au congélateur jusqu’à...
- Page 9 Télécommande et panneau d’affichage: TÉLÉCOMMANDE retirer le porte- utilisez La té lé commande utilise sur pile bouton, type CR2025 (3V). Pour batterie, votre pouce pour presser la languette de dé verrouillage vers la droite, puis retirez la porte-batterie. Placez la batterie dans le porte-batterie et faites-la glisser ans la télécommande.
- Page 10 l’humidification, le niveau d’eau doit être à la limite « MIN » . 33. Une fois l'eau dans le ré servoir, n'inclinez pas l'appareil et ne le renversez pas. 34. Ne laissez pas tomber l'appareil. S'il est renversé avec de l'eau à l'inté rieur, dé branchez l'appareil et envoyez-le au service de ré...
-
Page 11: Spécifications
complè tement. Utilisez un chiffon humide pour enlever la saleté et la poussiè re de la surface. N’utilisez jamais d’éléments corrosifs ou de produits chimiques pour nettoyer ce produit. Lorsque vous ê tes é teint, conservez l’appareil dans un endroit sec à l’écart de la lumière directe du soleil. Tampon d’absorption d’eau Grille arriè... -
Page 12: Betrieb
DE_Bauteile-Diagramm Handgriff Rü ckwand Anzeige Befestigungsschraube Luftauslass Rü ckseitiges Netz Drehbare Vorderes Gehä use Wassertank Wasserstandsfenster Netzkabel Basis BETRIEB Nehmen Sie das Produkt aus dem Geschenkkarton heraus MONTAGE Schritt 1: Setzen Sie den Schnappverschluss des Sockels in das quadratische Loch ein. Schritt 2: Richten Sie die vier Lö... - Page 13 9. Ziehen Sie den Tank heraus 10. Fü llen Sie den Tank mit kaltem und sauberem Wasser. Vergewissern Sie sich, dass der Wasserstand zwischen dem minimalen (MIN) und dem maximalen (MAX) Fü llstand liegt. 11. Um die Kü hlwirkung zu erhö hen, setzen Sie den Eisbehä lter in den Tank ein. Fü llen Sie den Eisbehä...
- Page 14 FERNSTEUERUNG Die Fernbedienung wird mit einer Knopfzellenbatterie des Typs CR2025 (3 V) betrieben. Um das Batteriefach zu entfernen, drü cken Sie mit dem Daumen die Entriegelungslasche nach rechts und ziehen Sie das Fach dann heraus. Legen Sie die Batterie in das Fach ein und schieben Sie es zurü ck in die Fernbedienung. Wir empfehlen die Verwendung einer Lithium-Ionen-Batterie fü...
- Page 15 sonst ü berhitzen kö nnte. 58. Reinigen Sie die Oberflä che mit einem leicht feuchten Tuch. Verwenden Sie keine Reinigungsmittel oder Lö sungen. Nicht mit Wasser abspü len. 59. Verwenden Sie das Gerä t nicht in der Nä he von Wä nden oder Vorhä ngen. 60.
-
Page 16: Spezifikationen
ist. Wasserkissen Rü ckseitiges Netz Schraube Pumpe Kleines Drehrad Abbildung B Abbildung A SPEZIFIKATIONEN Stromzufuhr: AC 220-240 V ~ 50 Hz Stromverbrauch: 60 W • Klasse II...
Need help?
Do you have a question about the 824-034V90 and is the answer not in the manual?
Questions and answers