
Subscribe to Our Youtube Channel
Related Manuals for Fuji Electric NRF30


Summary of Contents for Fuji Electric NRF30
- Page 1 User’s Manual Electronic Personal Dosimeter (For Gamma(X)-ray) NRF30 Fuji Electric Co., Ltd. WTA528774 1/31...
- Page 2 Thank you for purchasing the Electronic Personal Dosimeter NRF30 (Hereinafter described as “the Dosimeter”) by FUJI ELECTRIC CO., LTD. The User’s Manual is organized to provide descriptions of parts, functions and operational instructions for optimal use. Please make sure that you read this manual carefully before operation.
- Page 3 HANDLING PRECAUTIONS Please read the following handling precautions to ensure that you use the Product safely and avoid injury/ damages. Please read this User’s Manual carefully to understand all the precautions before using the Product. Measures of Precaution ・ The Dosimeter is a precision instrument; do not drop it or subject it to impact.
-
Page 4: Table Of Contents
Contents Overview ............................5 Product Overview ..........................6 Product package ........................6 Product type code ........................6 Precautions ............................7 Operational conditions ........................ 7 Other requirements ........................7 Descriptions of Parts and Functions ....................8 Part names ..........................8 Display function ........................10 Buzzer function ........................ -
Page 5: Overview
Dosimeter NRF30 via communication with the device. If worn tight to the body, energy characteristic of the NRF30 series enables direct reading of dose equivalent at the depth of 1cm (unit: Sv or rem, 1Sv is equivalent to 100 rem). -
Page 6: Product Overview
Product Overview 2.1 Product package (1) The Dosimeter NRF30 1 (Clip included) (2) Option Battery (CR-123A) Plug-pin 2.2 Product type code - - Radiation measured Gamma(X)-ray Transmission Infrared Battery Primary cell Modification number Normal version Indication plate Japanese English Measurement... -
Page 7: Precautions
(3) Try to turn OFF & ON the dosimeter if you encounter technical problems. See the “Troubleshooting Table” if not recovered. (4) The dosimeter NRF30 cannot be reset by inserting the plug pin (*Option) if the reset-mode setting of dosimeter is “OFF”. In this case, please reset the Dosimeter through the Dosimeter Setting Device. -
Page 8: Descriptions Of Parts And Functions
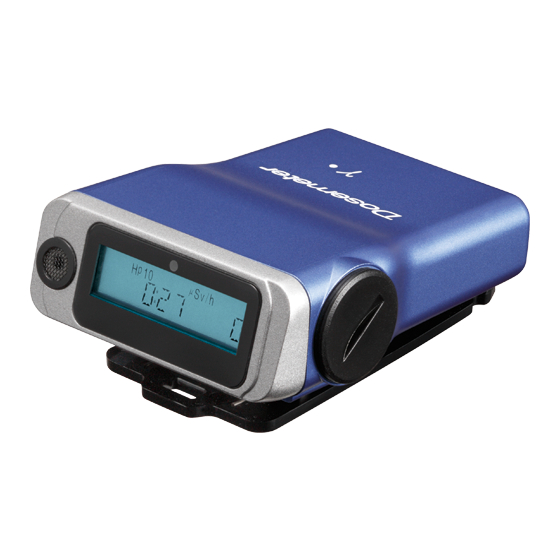
Descriptions of Parts and Functions 4.1 Part names 1. Buzzer 2. LED (RED) 3. LCD Top view 4. Battery cap 5. Mode switch 6. Point of Front view Rear view Side view Calibration 7. Clip 11. Label 9. Communication port 8. - Page 9 Functions 1. Buzzer: Sounds the alarm, buzzer sound check, low battery level. 2. LED: Red type Light Emitting Diode. 3. LCD: Liquid Crystal Display Indicator. Displays the dose, set dose value, operating time, etc. and can read directly as 1cm dose (unit: Sv or rem) 4.
-
Page 10: Display Function
4.2 Display function LCD Indications Normal mode Dose Type Unit of Accumulated Dose Or Dose Rate Accumulated Dose or Dose Rate Accumulation time mode: Operating Time Decreasing time mode: Remaining Time Alarm mode Dose Type Unit of accumulated Dose or Dose Rate Accumulated Dose or Dose Rate Alarm Indicators Accumulation time mode: Operating Time... -
Page 11: Buzzer Function
4.3 Buzzer function 4.3.1 Audible signal Audible signals sound under the following circumstances: Signal beep Starts when: Beep pattern ON/OFF The dosimeter is turned on. Beep 30 msec No sound The dosimeter is turned off. Contact to external The dosimeter is set at the setting device or No sound device a rack. -
Page 12: Audible Alarms
4.3.2 Audible alarms Alarm activations and beep patterns are as follows: Alarm activation Alarm cause Beep pattern Accumulated dose has reached Alarm sound generates 50-ms beeps at intervals Preset the preset dose threshold. of 150 ms for 3 times in one second.*1 accumulated This repeats until exit operation by communicating (Pre-ALarm) - Page 13 Dose rate has reached the Alarm sound generates 150-ms beeps at intervals Preset dose rate preset dose threshold. of 50 ms for 3 times in one second.*1 threshold is This repeats until decreasing to 50 % of preset (Pre-ALarm) dose rate, exit operation by communicating with reached Alarm Type (blink) external devices or turning the power off.
- Page 14 Alarm activation Alarm cause Beep pattern If this alarm and one of the above-mentioned When the battery voltage Low battery level alarms activate simultaneously, the alarm sound became lower than 2.2 V. for low battery voltage activates first. The low Alarm Type (blink) battery voltage alarm sounds 3 times with 2 Dose type...
- Page 15 E :06” will start blinking if an The alarm begins with a 1 min-long beep, followed Detector function error occurred with detection by a 1 sec mute. After that, a 1 sec beep and a 1 error circuit (e.g. an open circuit or sec mute are repeated.
- Page 16 Alarm activation Alarm cause Beep pattern Accumulate dose reaches ・Accumulate dose and dose rate (common) Overflow a 10 Sv or Dose rate reaches a 10 Sv/h. The alarm begins with a 1 min-long beep, followed by a 1 sec mute. After that, a 1 sec beep and a 1 sec mute are repeated.
-
Page 17: Battery Replacement
Battery Replacement 5.1 Battery replacement Follow these steps to replace the battery : (1) Insert the plug pin (*Option) to turn the dosimeter off. (2) Unscrew the battery cap using a coin. Battery Battery (CR123A) (3) Replace the battery. Insert a new battery in the compartment correctly. -
Page 18: Attaching And Removing A Clip
5.2 Attaching and removing a clip Follow these steps to replace the battery; ・Removing a clip Pull up a clip as shown fig.2 with pushing the hook arrow pointing toward as shown fig.1 Fig.1 Fig.2 ・Attaching a clip Attach the circled area of a clip as shown below to the rear side of a dosimeter. Make sure to insert a clip perfectly. -
Page 19: Operational Instructions
Operational Instructions 6.1 When start to use (1) Unscrew and remove the Plug pin (*Option). Confirm the power is ON (one beep) and LCD. Please entry a new battery (CR123A) into the dosimeter for the first time use. (To see Sec. 5.1 battery replacement) Check items Method of confirmation Audible signal (1 beep) - Page 20 (2) Select desired display mode with this switch--Accumulated Dose (Sv or rem) or Dose Rate (Sv/h or rem/h). Display mode may be changed at any time by using the mode switch. (3) Clip the dosimeter onto the chest pocket as shown below. Human Body Pocket WTA528774 20/31...
-
Page 21: During Use
6.2 During use To switch modes for LCD display: № Display Remarks Normal mode 1 Accumulated dose 3 sec press Normal Mode switch mode 2 short-press *5 10 sec inactivity User’s name 3 sec press Normal mode 2 Mode switch short-press Hp(10) 10 sec inactivity... - Page 22 Display Remarks Normal mode 2 Hp(10) Accumulated dose Mode switch 3 sec press short-press Normal mode 1 Hp(10) dose rate Mode switch 3 sec press short-press WTA528774 22/31...
- Page 23 Item Display Remarks Accumulated time (In case of the setting is 9:30 ) The time alarm will Operating time display be activated when the operating time Time count up reaches the preset time value. ● Blink TIME, Operating Time and LED are blinking. The time alarm is Remaining time display Decrease time (In case of the setting is 9:30 )
-
Page 24: After Use
6.3 After use Insert the dosimeter in the rack, or insert and screw the plug pin to turn off. (2 seconds is needed to turn off the dosimeter) Plug pin (*Option) Do not insert the plug pin again to dosimeter in 5 seconds Attention after pulling out the plug pin. -
Page 25: Care And Maintenance
Care and Maintenance Check the Dosimeter as specified below to ensure quality performance. 7.1 Check procedures № Check items Procedures Check point Joint line of the battery Visually check the joint line. The cases should be cap. tightened fixed When to check: Before use and after battery together. -
Page 26: Specification
Specification 8.1 General specification Type NRF30021-□□1YY , NRF30021-□□2YY Radiation type Gamma (X)-ray (35 keV to 6.0 MeV) Detector Silicon semi-conductor 0 µSv to 9.999 Sv Dose display range 0 µSv/h to 9.999 Sv/h Display ±10 % Calibration Cs, 1 mSv (10 mSv/h) <... -
Page 27: Photon Energy Response
8.2 Photon energy response Energy [keV] 8.3 Dose equivalent rate dependence Irradiation dose rate [mSv/h] Open square is experimental data, black circle is simulated data using electric pulses. WTA528774 27/31... -
Page 28: Angular Of Incidence
8.4 Angular of incidence 8.4.1 For Cs on phantom 8.4.2 For Am (X-ray 56.2 keV) on phantom WTA528774 28/31... -
Page 29: Angle Of Incidence For Cs In Free Air
8.4.3 Angle of incidence for Cs in Free air 8.5 Ambient temperature WTA528774 29/31... -
Page 30: Appendix
Appendix 9.1 Troubleshooting Table Error No. POSSIBLE CAUSE SUGGESTED SOLUTION (1) Communication distance is too (1) Set the distance between Communication error Communication port of the Dosimeter and (2) Communication port is dirty. the Setting Device within 5 cm. Also note (3) IC circuit parts malfunction that these windows are face to face. -
Page 31: Disposal
Dose error (1) LCD malfunction (1) and (2) Contact our agency. ・Dose accumulation (2) IC malfunction (3) Confirm calibration constant. Please ask us doesn’t work (3) Calibration constant trouble how to check the calibration constant. ・Displayed dose is high ・Displayed dose is low Audible signal doesn’t work (Assuming the indication display is (1) Clean up the mesh with soft brush.
Need help?
Do you have a question about the NRF30 and is the answer not in the manual?
Questions and answers