
Related Manuals for Stryker 6253


Summary of Contents for Stryker 6253
- Page 1 IMPORTANT Keep manual on file at all times. Model 6253 Evacuation Chair OPERATIONS/MAINTENANCE MANUAL For Parts or Technical Assistance 1−800−327−0770...
-
Page 2: Table Of Contents
Table of Contents Introduction Specifications ................Warning / Caution / Note Definition . - Page 3 Table of Contents Assembly Drawings and Parts Lists Chair Assembly ..............35−38 Flip−Up Handle Assembly .
-
Page 4: Introduction
Introduction INTRODUCTION This manual is designed to assist you with the operation and maintenance of the Stryker EMS model 6253 Evacuation Chair. Read it thoroughly before using the equipment or beginning any maintenance on it. SPECIFICATIONS Height 45” / 114 cm. -
Page 5: Warranty
Î Î Î Î Î Î Î Î Î Î Î Î Î Î Î Î Î Î Î Î Î Î Î Î Î Î Î Î Î Î Î Î Î Î One (1) year parts and labor. Under this option, Stryker EMS warrants to the original purchaser that its products should be free from manufacturing non−conformances that... - Page 6 Î Î Î Î Î Î Î Î Î Î Î Î Î Î Î Î Î Î Î Î Î Î Î Î Î Î Î Î Î Î Î Î Î Î CEIPT AT THE TIME OF RECEIPT. Upon prompt notification, Stryker will file a freight claim with the appropriate carrier for damages incurred.
-
Page 7: Summary Of Safety Precautions
Carefully read this list before using or servicing the unit. WARNING S Improper usage of the Stryker Evacuation Chair can cause injury to the passenger or operator. Operate the Evacuation Chair only as described in this manual. -
Page 8: Set−Up Procedures
Modifying the chair will also void its warranty. TRAINING Stryker EMS recommends training all potential users on the use of this device. Use this manual as a training tool and use the form on page 34 as a training record. -
Page 9: Component Identification
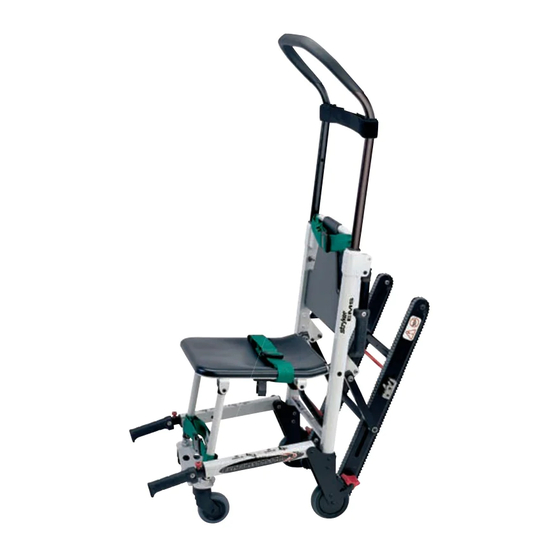
Control Handle Stair−TREADt (Seat components removed for clarity) Upper Control Handle Release Cable Chair Fold Lock Bar Stair−TREADt Lock Bar Wheel Lock Lift Handle Release Button Lift Handle Release Button Foot End Lift Handles Front Caster 6253 Evacuation Chair REV E... -
Page 10: Operating Guidelines
Chair Operation OPERATING GUIDELINES S Use the Stryker EMS Evacuation Chair only as described in this manual. S Read all labels and instructions on the chair before using the chair. S When a passenger weighing over 200 pounds is on the chair, use a minimum of two operators to manipu- late the chair on stairs. -
Page 11: Unfolding/Folding The Evacuation Chair
5. Fold the seat up to the backrest until the front legs lock in the clips on the bottom of the seat tube. NOTE Rotate the front casters so they don’t interfere with folding the chair. 6253 Evacuation Chair REV E... -
Page 12: Transferring The Passenger To The Evacuation Chair
6. Use all the restraints to secure the passenger on the chair (see page 12). 7. Disengage the wheel locks before transporting. WARNING The Stryker EMS Evacuation Chair is not recommended for use with suspected cervical, spinal, or fracture injuries. 6253 Evacuation Chair REV E... -
Page 13: Using Restraint Straps
To avoid damage to the buckles and straps, keep the restraint straps buckled when the chair is not being used with a passenger. When attaching the restraint straps to the chair, remember the attachment points must provide strong anchor- age and proper restraint position while not interfering with equipment and accessories. 6253 Evacuation Chair REV E... - Page 14 5. Repeat for the lap restraint and the ankle restraint. Figure 6 − Lengthen strap as necessary Figure 4 − Insert the end through the loop Figure 7 − Buckle strap Figure 8 − Tighten strap securely Figure 5 − Pull the strap tight 6253 Evacuation Chair REV E...
- Page 15 Pull until the “D” ring rests against the foot rest tube. 6. Attach the final “male” end clip on the strap. TOP VIEW Figures 9−17 − Attaching the leg strap 6253 Evacuation Chair REV E...
-
Page 16: Proper Lifting Techniques
1. Keep your hands close to your body. 2. Keep your back straight. 3. Coordinate your movements with your partner and lift with your legs. 4. Avoid twisting. 5. Always operate the Evacuation Chair as described in this manual. 6253 Evacuation Chair REV E... -
Page 17: Transporting The Passenger On Flat Surfaces
Release the cable to lock the handle in the fully extended position. Lift the chair over and around obstructions with the head end and foot end lift handles. CAUTION Casters are not suitable for all surfaces. Caution should be used at all times. 6253 Evacuation Chair REV E... -
Page 18: Transporting The Passenger Down Stairs
Stair−TREADt is locked by trying to fold it be- fore descending stairs. 5. Tilt the chair back just far enough to allow the Stair− TREADt to contact the floor. Figure 22 − Tilt the chair 6253 Evacuation Chair REV E... - Page 19 Figure 26 − Bottom of stairs Stair−TREADt. 6253 Evacuation Chair REV E...
-
Page 20: Transporting The Passenger Up Stairs
(see page 15). Carry the chair slowly up the stairs, avoiding any obstructions. Figure 29 − Transporting up the stairs Figure 30 − Transporting up the stairs 6253 Evacuation Chair REV E... -
Page 21: Operating The Wheel Locks
Wheel locks are only intended to help prevent the empty chair from rolling while unattended, and to aid in passenger transfer. A wheel lock may not provide sufficient resistance on all surfaces or under loads. 6253 Evacuation Chair REV E... -
Page 22: Adjusting The Wheel Locking Force
Insert the sleeve into the pedal. Reinstall the screw. 3. Test the pedal locking force and verify it holds properly before returning the chair to service. NOTE If, after adjustment, the pedal still doesn’t hold the wheel properly, replace the wheel. 6253 Evacuation Chair REV E... -
Page 23: Using The Head Support
Figure 33, 34 & 35 − Attaching and using the head support WARNING The Stryker EMS Evacuation Chair is not recommended for use with suspected cervical, spinal, or fracture injuries. Before using the head support, the upper control handle must be extended. First, pull the red upper control handle release cable with one hand. -
Page 24: Using Additional Assistance
Two Operators One Helper Operator OperatorHelper Helper Operator Operator Helper Operator Helper Operator Two Operators Two Helpers Operator Helper Operator Helper Helper Operator Helper Operator Helper Helper Two Operators Three Helpers Operator Helper Operator Helper 6253 Evacuation Chair REV E... -
Page 25: Installing The Optional Wall Storage Bracket
Consider the dimensions of the chair when selecting and marking the location. 2. Using fasteners (not supplied) appropriate for the wall type, install the bracket, using at least four of the mounting holes. 3. Hang the chair from the bracket using the upper control handle. 6253 Evacuation Chair REV E... -
Page 26: Installing And Removing The Optional Chair Cover
5. Attach the red handle strip to the Velcro on the front of the cover. To remove the optional vinyl cover: 1. Pull the red handle strip and allow the cover to drop off the chair. 6253 Evacuation Chair REV E... -
Page 27: Cleaning
Cleaning The Model 6253 Evacuation Chair is designed to be power−washable. The unit may show some signs of oxidation or discoloration from continuous washing, however, no degradation of the chair’s performance char- acteristics or functionality will occur due to power washing as long as the proper procedures are followed. - Page 28 100 parts water are not considered mild detergents. These products are corrosive in nature and may cause damage to your equipment if used improperly. If these types of products are used to clean Stryker equipment, measures must be taken to insure the units are rinsed with clean water and thoroughly dried fol- lowing cleaning.
-
Page 29: Preventative Maintenance Schedule & Checklist
For 201+ uses per month, inspect chair monthly. NOTE Keep up−to−date maintenance records using the form on page 33. Parts, Service or Technical Assistance: Contact Stryker Customer Service at 1−800−327−0770 or Stryker Medical 6300 S. Sprinkle Road Kalamazoo, MI 49001... -
Page 30: Service Information
2. Using a 5/8” wrench, remove one side of the cable. Figure 42 − Remove one side of the cable 3. Place the washer on the end of the new cable. Figure 43 − Place the washer on the new cable 6253 Evacuation Chair REV E... - Page 31 5. Repeat steps 2−4 for the other end of the cable. Figure 44 − Attach one side of the new cable 6253 Evacuation Chair REV E...
-
Page 32: Track Belt Reconditioning
New track belts must be installed if the inner cords are exposed on the wear surfaces. 4. For a start/end point reference while sanding, use a permanent marker to color a tooth on the belt. Figure 47 − Mark a belt tooth for reference 6253 Evacuation Chair REV E... - Page 33 The gap between the belt and the track frame should measure between 3/8” and 1” as shown in Figure 50. 10. Spin the belts to verify they roll freely. Figure 51 − Proper belt tension 6253 Evacuation Chair REV E...
-
Page 34: Maintenance Record
Maintenance Record Date Maintenance Operation Performed 6253 Evacuation Chair REV E... -
Page 35: Training Record
Training Record Training Date Training Method Trainee Name Basic Refresher Owner’s Manual, In−Service, Training Update Formal Class, Etc. 6253 Evacuation Chair REV E... - Page 36 Chair Assembly Assembly part number 6253−001−005 (reference only) 6253 Evacuation Chair REV E...
- Page 37 Chair Assembly DETAIL A See Detail A 6253 Evacuation Chair REV E...
- Page 38 Chair Assembly 6253 Evacuation Chair REV E...
- Page 39 Extension Handle, Right (page 51) Extension Handle, Left 6253−001−018 Restraint Strap Set (page 52) Foot Support Assembly 6253−001−099 Seat Support Bracket 6253−001−137 Specification Label 6253−001−154 Evacuation Chair Label 6253−001−156 Instruction Label 6252−001−139 “Do Not Lubricate” Label 6253 Evacuation Chair REV E...
- Page 40 6250−001−016 Flip−Up Handle Assembly Item Part No. Part Name Qty. 0025−132−000 Blind Rivet 6250−001−052 Handle Weldment 6250−001−089 Hand Grip 6253 Evacuation Chair REV E...
- Page 41 6250−001−017 Lock Mechanism Assembly Item Part No. Part Name Qty. 0004−515−000 Button Hd. Cap Screw 6250−001−094 Lock Mechanism Strut 6250−001−095 Cross Bar 6250−001−124 Flange Bearing 6253 Evacuation Chair REV E...
- Page 42 Main Frame Assembly Assembly part number 6253−001−011 (reference only) 6253 Evacuation Chair REV E...
- Page 43 Main Frame Assembly TOP VIEW FRONT VIEW 6253 Evacuation Chair REV E...
- Page 44 Track Spacer Sleeve (page 48) Upper Extension Handle 6253−001−055 Frame Weldment 6253−001−084 Track Belt Roller Spacer 6253−001−088 Track Support Strut 6253−001−124 Track Supt. Offset Bracket 6253−001−125 Track Supt. Offset Bracket 6253−001−150 Strut Spacer 6253−001−152 0025−079−000 Rivet 6253 Evacuation Chair REV E...
- Page 45 6252−001−103 Wheel Support 0016−028−000 Hex Nut 6252−001−105 Lock Mechanism Cross Bar 0016−078−000 Centerlock Hex Nut 6252−001−110 Latch 0025−172−000 Blind Rivet 6252−001−111 Latch 6080−200−030 Brake Pedal 6252−001−112 Brake Spring 6080−200−041 Hex Sleeve 6252−001−121 Support Track Cross Bar 6253 Evacuation Chair REV E...
- Page 46 6252−001−014 Internal Latch Assembly Item Part No. Part Name Qty. 0014−098−000 Washer 0038−506−000 Compression Spring 6252−001−097 Latch Retainer Block 6252−001−098 Latch Slide Release 6252−001−099 Track Latch Lock 6252−001−101 Spring 6253 Evacuation Chair REV E...
- Page 47 6252−001−015 Internal Latch Assembly Item Part No. Part Name Qty. 0014−098−000 Washer 0038−506−000 Compression Spring 6252−001−097 Latch Retainer Block 6252−001−098 Latch Release Slide 6252−001−099 Track Latch Lock 6252−001−100 Spring 6253 Evacuation Chair REV E...
- Page 48 6252−001−016 Cable and Pin Assembly Item Part No. Part Name Qty. 0038−507−000 Compression Spring 6252−001−115 Pull Pin 6252−001−116 Pull Pin Bolt 6252−001−119 Cable 6253 Evacuation Chair REV E...
- Page 49 6253−001−012 Upper Control Handle Assembly Item Part No. Part Name Qty. 0025−079−000 Blind Rivet 6250−001−085 Internal Slide Bushing 6250−001−087 Outer Ext. Handle Bushing 6253−001−090 Upper Internal Handle 6253 Evacuation Chair REV E...
- Page 50 6253−001−013 Seat Section Assembly Item Part No. Part Name Qty. 0025−120−000 Rivet 6080−110−035 Clip 6253−001−056 Seat Frame 6250−001−096 Foot/Seat Section End Cap 6253 Evacuation Chair REV E...
- Page 51 6253−001−014 Right Extension Handle Assembly Item Part No. Part Name Qty. 0001−138−000 Flat Head Socket Screw 0004−136−000 But. Hd. Cap Screw 0004−468−000 Button Head Cap Screw 0015−016−000 Square Nut 0025−079−000 Blind Rivet 0025−132−000 Blind Rivet 0026−323−000 Coiled Spring Pin 0038−462−000 Compression Spring 0056−019−000...
- Page 52 6253−001−015 Left Extension Handle Assembly Item Part No. Part Name Qty. 0001−138−000 Flat Hd. Socket Screw 0004−136−000 Button Hd. Cap Screw 0004−468−000 Button Hd. Cap Screw 0015−016−000 Square Nut 0025−079−000 Blind Rivet 0025−132−000 Blind Rivet 0026−323−000 Coiled Spring Pin 0038−462−000 Compression Spring 0056−019−000...
- Page 53 6253−001−025 Foot Support Assembly Item Part No. Part Name Qty. 0016−064−000 Nylock Hex Nut 6250−001−090 Foot Section End Cap 6250−001−096 Foot/Seat Section End Cap 6253−001−050 Foot Support 6251−001−083 Caster 6253 Evacuation Chair REV E...
- Page 54 ........... . 6080−200−030 6253 Evacuation Chair REV E...
- Page 55 European Representative Stryker EMEA RA/QA Director Stryker France ZAC Satolas Green Pusignan Av. De Satolas Green 69881 MEYZIEU Cedex France 6300 S. Sprinkle Road, Kalamazoo, MI 49001−9799 (800) 327−0770 www.strykermedical.com SS 3/05 6253−001−157 REV E...
Need help?
Do you have a question about the 6253 and is the answer not in the manual?
Questions and answers