Table of Contents
Advertisement
Quick Links
Advertisement
Table of Contents

Related Manuals for Z3 Technology MVE-20


Summary of Contents for Z3 Technology MVE-20
- Page 1 User Instructions Dual Channel H.264 HD Encoder Z3-MVE-20 Digital Media Encoder & Streamer Z3-MVE-20 Model Name: DOC-USR-0034-01 Manual Version 1.6.4a October 10, 2013 Before attempting to connect or operate this product, please read these instructions carefully and save the manual for future use.
- Page 2 Firmware Upgrade, Edited Images 1.6.4 02/13/12 Associated version number with software release version. Added Troubleshooting section. 1.6.4a 10/10/13 Modified various explanations to add more detail. _______________________________________________________________________________________ Z3 Technology, LLC ♦ 100 N. 8th St. STE 250 ♦ Lincoln, NE 68508-1369 USA ♦ +1.402.323.0702...
-
Page 3: Table Of Contents
Updating Firmware From Web GUI ................24 9.2.2 Updating Firmware From an SD Card ............... 26 APPENDIX A: SERIAL CONTROL .................. 27 APPENDIX B: TROUBLESHOOTING ................30 _______________________________________________________________________________________ Z3 Technology, LLC ♦ 100 N. 8th St. STE 250 ♦ Lincoln, NE 68508-1369 USA ♦ +1.402.323.0702... - Page 4 Figure 21 TeraTerm Serial Port Setup Screen ............... 27 Figure 22 Serial Port Main Menu ................28 Figure 23 Serial Port Decode Options ................. 29 _______________________________________________________________________________________ Z3 Technology, LLC ♦ 100 N. 8th St. STE 250 ♦ Lincoln, NE 68508-1369 USA ♦ +1.402.323.0702...
-
Page 5: General Information
1.0 GENERAL INFORMATION Preface The Z3-MVE-20 is a 1 RU rack-mount system capable of processing two channels, multi-format HD video and integrated system peripherals. This system supports H.264 High Profile encode up to 1080p at 30 frames per second. The Z3-MVE-20 can be configured as a single-channel or dual-channel encoder, where the latter offers the advantage of low power consumption and lower cost per channel, compared to a PC system. -
Page 6: Included Parts List
BNC to BNC Cable x 3 DB9 Serial Cable x 2 RCA to RCA Cable x 2 Figure 1 Parts Included with Z3-MVE-20 _______________________________________________________________________________________ Z3 Technology, LLC ♦ 100 N. 8th St. STE 250 ♦ Lincoln, NE 68508-1369 USA ♦ +1.402.323.0702... -
Page 7: Features
§ Web-based configuration software for user-friendly configuration and control § RS232 serial port for configuration and control § Measurements: 454mm x 200mm x 44mm § Weight: 2.7783kg _______________________________________________________________________________________ Z3 Technology, LLC ♦ 100 N. 8th St. STE 250 ♦ Lincoln, NE 68508-1369 USA ♦ +1.402.323.0702... -
Page 8: Operating Controls
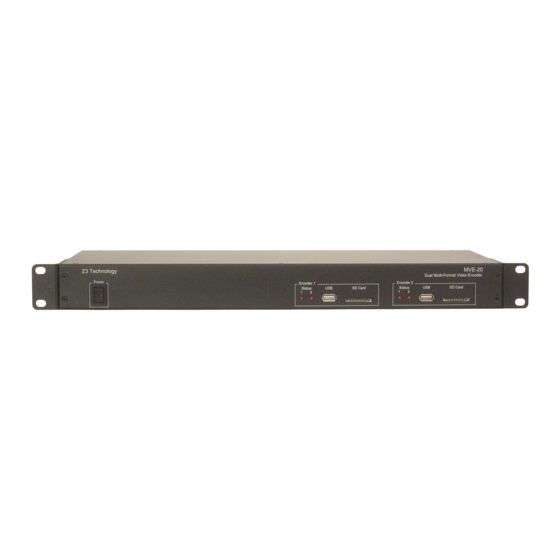
Z3-MVE-20 V1.06.04a 4.0 OPERATING CONTROLS Front View Figure 2 Z3-MVE-20 Front View _______________________________________________________________________________________ Z3 Technology, LLC ♦ 100 N. 8th St. STE 250 ♦ Lincoln, NE 68508-1369 USA ♦ +1.402.323.0702... -
Page 9: Rear View
Z3-MVE-20 V1.06.04a Rear View Figure 3 Rear View of Z3-MVE-20 _______________________________________________________________________________________ Z3 Technology, LLC ♦ 100 N. 8th St. STE 250 ♦ Lincoln, NE 68508-1369 USA ♦ +1.402.323.0702... -
Page 10: Getting Started And Running The Z3-Mve-20
3) Connect an Ethernet cable to “Ethernet” on the Z3-MVE-20 (see Figure 4). Connect the other end of the Ethernet cable directly to a PC. You will use this PC to control the Z3-MVE-20 and to decode the output stream. -
Page 11: Setting Up The Control Pc
(5) Set the PC IP address to one that can communicate with the Z3-MVE-20 (a) Find the IP address of the Z3-MVE-20. This can be found on the sticker on the bottom of the Z3-MVE-20. (It should be 192.168.0.65 for Encoder #1 and 192.168.0.66 for Encoder #2). -
Page 12: Figure 6 Windows Pc Ip Address - Local Area Connection Properties Window
(e) If you are using Linux, you can set up an alias network address to match what you need. An example of a command doing this would be: sudo ifconfig eth0:0 192.168.0.6 netmask 255.255.0.0 _______________________________________________________________________________________ Z3 Technology, LLC ♦ 100 N. 8th St. STE 250 ♦ Lincoln, NE 68508-1369 USA ♦ +1.402.323.0702... -
Page 13: Figure 7 Windows Pc Ip Address - Internet Protocol Window
192.168.x.xx and does not equal 192.168.0.65 or 192.168.0.66) Make sure the netmask is set to “255.255.0.0” Figure 7 Windows PC IP Address – Internet Protocol Window _______________________________________________________________________________________ Z3 Technology, LLC ♦ 100 N. 8th St. STE 250 ♦ Lincoln, NE 68508-1369 USA ♦ +1.402.323.0702... -
Page 14: Configuring The Z3-Mve-20
(8) Open a web browser (Firefox or Chrome is recommended). Type in http://192.168.0.65 or http://192.168.0.66 (depending on which Encoder you are working on). You should then see the Z3-MVE-20 Main Menu (If you don’t see this, please see the Troubleshooting section on page 29). (2) Make sure “Output Interface”... -
Page 15: Figure 10 Z3-Mve-20 Web Menu - Start/Stop/Status Selection
(1) If necessary, click “Stop Encoder” (2) Status changes to 3) Click “Start “Stopped” Encoder” Figure 10 Z3-MVE-20 Web Menu - Start/Stop/Status Selection _______________________________________________________________________________________ Z3 Technology, LLC ♦ 100 N. 8th St. STE 250 ♦ Lincoln, NE 68508-1369 USA ♦ +1.402.323.0702... -
Page 16: Opening A Vlc Client To Receive The Encoded Stream
(14) Press “Enter”. (15) You should now see video streaming from VLC. Figure 12 Example of Z3 Video Streaming to VLC (UDP/TS) _______________________________________________________________________________________ Z3 Technology, LLC ♦ 100 N. 8th St. STE 250 ♦ Lincoln, NE 68508-1369 USA ♦ +1.402.323.0702... -
Page 17: Streaming Rtp
(21) Open VLC. Open “z3_dm368.sdp”. (22) You should then see RTP video streaming on VLC: Figure 13 Example of Z3 Video Streaming to VLC (RTP) _______________________________________________________________________________________ Z3 Technology, LLC ♦ 100 N. 8th St. STE 250 ♦ Lincoln, NE 68508-1369 USA ♦ +1.402.323.0702... -
Page 18: Encoding Options
# of ms to buffer. The higher the value, the smoother the encode, but also the higher the latency. Video Codec H.264, MPEG-2 The codec to use for video encoding. _______________________________________________________________________________________ Z3 Technology, LLC ♦ 100 N. 8th St. STE 250 ♦ Lincoln, NE 68508-1369 USA ♦ +1.402.323.0702... - Page 19 Use to set name for the Z3-MVE-20. Set Name ----- Use to assign a password to the Z3-MVE-20. Set Pass ----- Update firmware. UPDATE [Button] _______________________________________________________________________________________ Z3 Technology, LLC ♦ 100 N. 8th St. STE 250 ♦ Lincoln, NE 68508-1369 USA ♦ +1.402.323.0702...
-
Page 20: Changing Parameters
The web page will respond with the following message: Status: Changed rate The video stream will then continue interrupted with the new parameter. _______________________________________________________________________________________ Z3 Technology, LLC ♦ 100 N. 8th St. STE 250 ♦ Lincoln, NE 68508-1369 USA ♦ +1.402.323.0702... -
Page 21: Running Decode On The Z3-Mve-20
Figure 14 Z3-MVE-20 Connections for Decode (3) Connect “ASI/SDI Output” of the Z3-MVE-20 with a coaxial cable to “SDI In” of the SDI to HDMI converter (Figure 14). (4) Connect the “HDMI Out” of the SDI to HDMI converter with an HDMI cable to “HDMI In” of a monitor. -
Page 22: Figure 15 Z3-Mve-20 Operating Mode Selector
(9) Make sure “Input Format” and “IP: Port” matches what the source is streaming to. (10) Make sure “Output Interface” is set to “SDI.” (11) Click “Start Decoder” (12) You should see video on the monitor. _______________________________________________________________________________________ Z3 Technology, LLC ♦ 100 N. 8th St. STE 250 ♦ Lincoln, NE 68508-1369 USA ♦ +1.402.323.0702... -
Page 23: Decoding Options
----- Settings [Button] Load User Settings ----- Load user settings previously saved. Save User Settings ----- Save current settings for later use. _______________________________________________________________________________________ Z3 Technology, LLC ♦ 100 N. 8th St. STE 250 ♦ Lincoln, NE 68508-1369 USA ♦ +1.402.323.0702... -
Page 24: Performing Other Operations With The Z3-Mve-20
Saving Current Settings If you have a specific configuration you’d like to preserve, you can save it so that when the Z3- MVE-20 is powered off and back on, it automatically uses those settings. This can be done with the following steps: (1) Once you make a change you want to save, click on “Save”... -
Page 25: Figure 18 The "Update" Button
(6) You will see screens stating that the image is being uploaded and that the flash is being updated. After about one minute, you should see the main menu again. (7) Your Z3-MVE-20 is now updated! _______________________________________________________________________________________ Z3 Technology, LLC ♦ 100 N. 8th St. STE 250 ♦ Lincoln, NE 68508-1369 USA ♦ +1.402.323.0702... -
Page 26: Updating Firmware From An Sd Card
(This is important – otherwise another update will occur …) (12) Turn the system back on. The update should then be finished. _______________________________________________________________________________________ Z3 Technology, LLC ♦ 100 N. 8th St. STE 250 ♦ Lincoln, NE 68508-1369 USA ♦ +1.402.323.0702... -
Page 27: Appendix A: Serial Control
Figure 21 TeraTerm Serial Port Setup Screen § Power on the Z3-MVE-20. § After approximately 30 to 45 seconds, the following menu will be displayed: _______________________________________________________________________________________ Z3 Technology, LLC ♦ 100 N. 8th St. STE 250 ♦ Lincoln, NE 68508-1369 USA ♦ +1.402.323.0702... -
Page 28: Figure 22 Serial Port Main Menu
§ Through the menu you can set encode parameters in a way similar to using the GUI. Select “S” to start the encoding session once the parameters are set to the desired values. _______________________________________________________________________________________ Z3 Technology, LLC ♦ 100 N. 8th St. STE 250 ♦ Lincoln, NE 68508-1369 USA ♦ +1.402.323.0702... -
Page 29: Figure 23 Serial Port Decode Options
§ By selecting “0” you can change the operating mode. If you change it to “Decoder”, the menu options become: Figure 23 Serial Port Decode Options § Operation of the Decoder is the same as through the Web GUI. _______________________________________________________________________________________ Z3 Technology, LLC ♦ 100 N. 8th St. STE 250 ♦ Lincoln, NE 68508-1369 USA ♦ +1.402.323.0702... -
Page 30: Appendix B: Troubleshooting
-Is the Ethernet cable plugged into the Z3-MVE-20 solidly (do you see the link light on the Ethernet cable which indicates data is being transmitted)? -Does the Z3-MVE-20 IP address and PC IP address have the same first 2 values (or, if netmask is set to 255.255.255.0, the same first 3 values)? -Do the Z3-MVE-20 and the PC running VLC have the same netmask? (Default value in the Z3- MVE-20 is 255.255.0.0)
Need help?
Do you have a question about the MVE-20 and is the answer not in the manual?
Questions and answers