Table of Contents
Advertisement
Quick Links
User Instructions
H.264 HD Multimedia System
Digital Media Encoder and Streamer
Z3-DME-03
Model Name:
DOC-USR-0061-03
Manual Version 2.16
Software Version 2.16
June 10, 2015
Before attempting to connect or operate this product, please read these instructions carefully and save the manual for future use.
© Copyright Z3 Technology, LLC. All rights reserved. This document contains proprietary and confidential information of Z3 Technology, LLC
("Z3"). This document may not be used, reproduced, disclosed, or disseminated to anyone without the prior written approval of an authorized
representative of Z3.
Z3 Technology, LLC incorporates HDMI® technology. The terms of HDMI and HDMI High-Definition Multimedia Interface, and
the HDMI Logo are trademarks or registered trademarks of HDMI Licensing LLC in the United States and other countries.
Advertisement
Table of Contents

Related Manuals for Z3 Technology Z3-DME-03


Summary of Contents for Z3 Technology Z3-DME-03
- Page 1 Before attempting to connect or operate this product, please read these instructions carefully and save the manual for future use. © Copyright Z3 Technology, LLC. All rights reserved. This document contains proprietary and confidential information of Z3 Technology, LLC ("Z3"). This document may not be used, reproduced, disclosed, or disseminated to anyone without the prior written approval of an authorized representative of Z3.
- Page 2 REVISION HISTORY Version Date Change Note Author 2.01.55 11/18/14 Original Document Added description of DNS support, “max PTS-PCR”, “Audio Format”, “Jumbo PES”, “PMT ID”, “Frame Align” and “TS Lowlat” parameters. Added description of “Refresh” and “Auto Refresh” in status tab. 2.02 03/25/15 Added note on VLC decode latency.
-
Page 3: Table Of Contents
5.0 OPERATING CONTROLS ....................10 6.0 RUNNING THE ENCODER ..................... 11 6.1 Set up the HD Source ....................11 6.2 Connect and Power Up the Z3-DME-03 ................. 11 6.3 Find the Z3-DME-03 using ZFinder ................12 6.4 Configure CH1 and Encode ..................13 6.5 Run VLC to View Stream .................. - Page 4 Figure 3 Z3-DME-03 Front View ..................10 Figure 4 Z3-DME-03 Rear View ..................10 Figure 5 Connecting SDI In and Turning on the Z3-DME-03 ............11 Figure 6 Connecting the Ethernet and Power on the Z3-DME-03 ..........11 Figure 7 ZFinder with Z3-DME-03 Listed ................12 Figure 8 ZFinder with Z3-DME-03 Selected ................
- Page 5 Figure 29 Reboot Reminder for Changing IP Settings ..............26 Figure 30 ZFinder with Z3-DME-03 DHCP Address ..............26 Figure 31 Selecting Z3-DME-03 w/ DHCP Address in ZFinder ............27 Figure 32 Web GUI Using DHCP Address ................27 Figure 33 Clicking on / Creating the CH2 Tab ................ 28 Figure 34 Configuring HDMI Input on CH2 ................
-
Page 6: General Description
1.0 GENERAL DESCRIPTION The Z3-DME-03 is a cost-optimized, compact 118 x 121 mm system that allows encode of HD video (up to 1080p60) through SDI or HDMI input, and encode of SD video through a composite input. It allows users to quickly take video from any of those three sources and stream them to the web or internal clients / PCs via UDP, RTP, or RTMP . -
Page 7: Quick Start Guide
You can update the firmware via the web GUI interface by following the instructions in Section 8.2 “Making a Firmware Update” on page 39. ___________________________________________________________________________________________ Z3 Technology, LLC ♦ 100 N 8 ST, STE 250 ♦ Lincoln, NE 68508-1369 USA ♦ +1.402.323.0702... -
Page 8: Included Parts List
BNC to BNC Cable DB-9 Serial Cable 1 x Composite Adapter Cable Figure 2 Parts Included with the Z3-DME-03 Note: The serial cable and gender changer are included for debugging purposes and are not needed by the typical Z3-DME-03 user. -
Page 9: Features
576i25, 480p60, 480i30, and 480i29.97 SDI: 1080p60, 1080p50, 1080i30, 1080i29.97, 1080i25, 720p60, 720p59.94, 720p50, 576p50, 576i25, 480p60, 480i30, and 480i29.97 Composite: 576i25, 480i29.97 ___________________________________________________________________________________________ Z3 Technology, LLC ♦ 100 N 8 ST, STE 250 ♦ Lincoln, NE 68508-1369 USA ♦ +1.402.323.0702... -
Page 10: Operating Controls
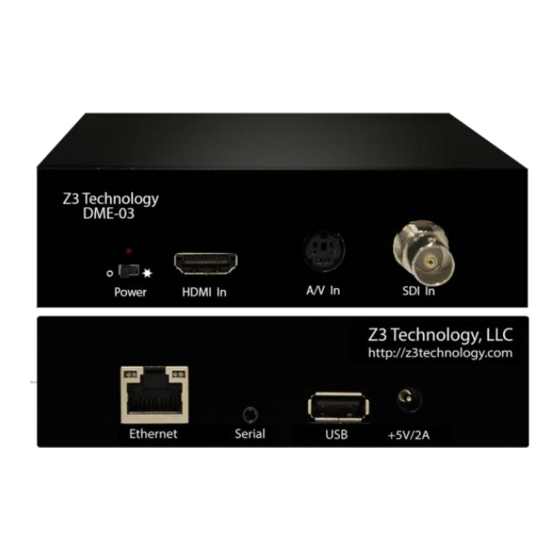
DOC-USR-0061-03 5.0 OPERATING CONTROLS HDMI Power Composite Switch Figure 3 Z3-DME-03 Front View Serial Ethernet Port Power Figure 4 Z3-DME-03 Rear View ___________________________________________________________________________________________ Z3 Technology, LLC ♦ 100 N 8 ST, STE 250 ♦ Lincoln, NE 68508-1369 USA ♦ +1.402.323.0702... -
Page 11: Running The Encoder
This section gives step-by-step instructions on taking the Z3-DME-03 and using it to stream 1080p or 1080i video to VLC running on your PC. In addition to the Z3-DME-03, an HD source with SDI output and a PC are required. Encoding with an HDMI or a composite source is described later in Section 6.11 on page 28. -
Page 12: Find The Z3-Dme-03 Using Zfinder
Z3 systems connected to the network. In this case, the Z3-DME-03 appears: Figure 7 ZFinder with Z3-DME-03 Listed Click on the Z3-DME-03 entry in the window to select it. This will cause the “Edit Device”, “Open Device” and “Flash LEDs” boxes to activate: Figure 8 ZFinder with Z3-DME-03 Selected Note: Since there are no LEDs on the Z3-DME-03, clicking “Flash LEDs”... -
Page 13: Configure Ch1 And Encode
Click on “Open Device.” An Internet browser window is opened (default browser used is Firefox) and the Web GUI appears at the System Setup tab: Figure 9 Z3-DME-03 Web GUI (System Setup Page) Click on the “CH1” tab. 6.4 Configure CH1 and Encode At the CH1 tab, change Video Resolution to “1920x1080”, set “Output Format”... -
Page 14: Figure 10 Channel 1 Configuration Screen - Udp
“Encode Interlaced/Progressive” to “Encode Single CH No Scale.” Note that, in “Encode Single CH No Scale” mode, only CH1 can be used. ___________________________________________________________________________________________ Z3 Technology, LLC ♦ 100 N 8 ST, STE 250 ♦ Lincoln, NE 68508-1369 USA ♦ +1.402.323.0702... -
Page 15: Figure 11 Starting Encode
“start” and observe the status change: (3) Click “start” (1) If necessary, click “stop” (2) Status will change to “STOPPED” Figure 11 Starting Encode ___________________________________________________________________________________________ Z3 Technology, LLC ♦ 100 N 8 ST, STE 250 ♦ Lincoln, NE 68508-1369 USA ♦ +1.402.323.0702... -
Page 16: Run Vlc To View Stream
Figure 12 VLC Open Network Screen for UDP Press “Enter.” You should now see video streaming to VLC: Figure 13 Example of Z3 Video Streaming to VLC (UDP) ___________________________________________________________________________________________ Z3 Technology, LLC ♦ 100 N 8 ST, STE 250 ♦ Lincoln, NE 68508-1369 USA ♦ +1.402.323.0702... -
Page 17: Streaming Rtp
Click on “start” to start the RTP encoding session. At this point your settings should look like the following: (1) Change to “RTP” Figure 14 Channel 1 Configuration Screen – RTP ___________________________________________________________________________________________ Z3 Technology, LLC ♦ 100 N 8 ST, STE 250 ♦ Lincoln, NE 68508-1369 USA ♦ +1.402.323.0702... -
Page 18: Figure 15 Vlc Open Network Stream Screen For Rtp
In the “Open Media” box, type “rtsp://{IP Address}/z3-{ch #}{m}.mp4”, where {IP Address} is the IP address of the Z3-DME-03, {ch #} is 1 for CH1, 2 for CH2, and 3 for CH3, and {m} is added if a multicast address is being streamed. For example, if the IP address of the Z3-DME-03 is the default value of 192.168.81.7, encode is being done from CH1, and unicast streaming is being... -
Page 19: Changing The Bitrate Dynamically
DOC-USR-0061-03 6.7 Changing the Bitrate Dynamically The Z3-DME-03 includes an “Update” button which allows you to change the bitrate without stopping and restarting the encoder. To use this feature, complete the following steps: In VLC, click on “Tools” and select “Codec Information.” This brings up a window with four tabs. -
Page 20: Figure 19 Drop In Bitrate After Dynamic Bitrate Change
The parameter “Frame Rate Divider” can also be updated dynamically using the “update” button. All other parameters require a stop and then start to change. ___________________________________________________________________________________________ Z3 Technology, LLC ♦ 100 N 8 ST, STE 250 ♦ Lincoln, NE 68508-1369 USA ♦ +1.402.323.0702... -
Page 21: Adjusting The Udp Ts Rate
DOC-USR-0061-03 6.8 Adjusting the UDP TS Rate The Z3-DME-03 includes a parameter to adjust the TS rate independent of the video bitrate. This can be found just below “PMT PID” when “UDP” is selected as the output format. Normally, this value is set to 25% to 33% above the sum of the video and audio bit rate. For example, the default value out of the factory is a value of 10Mbps, corresponding to 8Mbps for the video. -
Page 22: Figure 22 Ts Rate And Lower Bitrate Reflected In Vlc
The value of TS Rate must be higher than (video bitrate + audio bitrate) * 1.25. If an attempt is made to input a value less than this, the error message “TS rate too small to carry elementary streams” will appear. ___________________________________________________________________________________________ Z3 Technology, LLC ♦ 100 N 8 ST, STE 250 ♦ Lincoln, NE 68508-1369 USA ♦ +1.402.323.0702... -
Page 23: Tuning For Latency
By default, this is set to 1000ms. You can lower this to as low as 200ms. To do this, go to the following: VLC → Tools → Preferences → Show Settings (ALL) → Input / Codecs → Network caching (ms) ___________________________________________________________________________________________ Z3 Technology, LLC ♦ 100 N 8 ST, STE 250 ♦ Lincoln, NE 68508-1369 USA ♦ +1.402.323.0702... -
Page 24: Running Dhcp
DOC-USR-0061-03 6.10 Running DHCP DHCP is also supported. When enabled, the Z3-DME-03 dynamically receives an IP address to use at startup. The IP address that is assigned can be seen through the ZFinder tool running on a PC. To view... -
Page 25: Figure 26 Selecting "Z3_Config1" Within The System Setup Tab
Now that DHCP is set in z3_config1, save the configuration by clicking on the “Save” button: Click “Save” Figure 28 Saving a User Preset ___________________________________________________________________________________________ Z3 Technology, LLC ♦ 100 N 8 ST, STE 250 ♦ Lincoln, NE 68508-1369 USA ♦ +1.402.323.0702... -
Page 26: Figure 29 Reboot Reminder For Changing Ip Settings
Now that you’ve set DHCP , saved it to the configuration “z3_config1”, and specified that “z3_config1” will be used when the system restarts, you can go ahead and reboot the Z3-DME-03. Run the “ZFinder” PC Utility on your Windows PC. The ZFinder window appears. ZFinder does a scan of the network and lists the location of all Z3 systems connected to the network. -
Page 27: Figure 31 Selecting Z3-Dme-03 W/ Dhcp Address In Zfinder
(2) Click “Open Device” Figure 31 Selecting Z3-DME-03 w/ DHCP Address in ZFinder A web browser will then open at the IP address of the Z3-DME-03 and you will see the Web GUI: New IP address Figure 32 Web GUI Using DHCP Address You can go back to Static IP by unchecking “Use DHCP”... -
Page 28: Encoding From Hdmi Or Composite In
6.11 Encoding from HDMI or Composite In The Z3-DME-03 also supports encode via HDMI or Composite In. The HDMI or Composite In can be used in parallel with the SDI In. A special cable, provided with the Z3-DME-03, is needed for the Composite In. -
Page 29: Figure 34 Configuring Hdmi Input On Ch2
If SDI encode is also being done at the same time, the IP address / port set for HDMI / Composite encode needs to be different from the IP address used for SDI encode. Click on “start.” ___________________________________________________________________________________________ Z3 Technology, LLC ♦ 100 N 8 ST, STE 250 ♦ Lincoln, NE 68508-1369 USA ♦ +1.402.323.0702... -
Page 30: Figure 35 Vlc Settings For Viewing The Multicast Stream
Figure 36 Composite Cable ___________________________________________________________________________________________ Z3 Technology, LLC ♦ 100 N 8 ST, STE 250 ♦ Lincoln, NE 68508-1369 USA ♦ +1.402.323.0702... -
Page 31: Encoding Closed Caption Data
DOC-USR-0061-03 6.12 Encoding Closed Caption Data The Z3-DME-03 supports extraction of closed caption data from composite or SDI input. This automatically occurs any time composite or SDI input with closed caption data included is used. Encoding and subsequently extracting closed caption data from composite is shown below: Connect a composite input with closed caption data to the composite connector. -
Page 32: Figure 39 Setting Vlc To Use The Extracted Closed Caption Data
Figure 39 Setting VLC to use the Extracted Closed Caption Data Extraction of closed caption through SDI input is also possible. In that case, SDI In of the Z3-DME-03 is used. The procedure for seeing the closed caption data through VLC is the same as shown above. -
Page 33: Streaming Rtmp In Three Different Resolutions
7.0 STREAMING RTMP IN THREE DIFFERENT RESOLUTIONS This section shows how to use the Z3-DME-03 to take 1 video input and stream it over RTMP into 3 different resolutions (720p, D1, and CIF). The Wowza server is used as an example RTMP server to stream to. -
Page 34: Configure Ch1 For Rtmp Streaming
If necessary, set “Authentication” to “Enable” and enter the User name and Password. After you’re finished, your settings should look something like the following: Figure 42 3-Channel RTMP Encode – Channel 1 Settings ___________________________________________________________________________________________ Z3 Technology, LLC ♦ 100 N 8 ST, STE 250 ♦ Lincoln, NE 68508-1369 USA ♦ +1.402.323.0702... -
Page 35: Configure Ch2 For Rtmp Streaming
Set encode to D1, 2Mbps. Use the same RTMP format and Dest Address, replacing “720” with “d1”: Figure 43 3-Channel RTMP Encode – Channel 2 Settings ___________________________________________________________________________________________ Z3 Technology, LLC ♦ 100 N 8 ST, STE 250 ♦ Lincoln, NE 68508-1369 USA ♦ +1.402.323.0702... -
Page 36: Configure Ch3 For Rtmp Streaming
Set encode to 352x240, 1Mbps. Use the same RTMP format and Dest Address, replacing “d1” with “cif”: Figure 44 3-Channel RTMP Encode – Channel 3 Settings ___________________________________________________________________________________________ Z3 Technology, LLC ♦ 100 N 8 ST, STE 250 ♦ Lincoln, NE 68508-1369 USA ♦ +1.402.323.0702... -
Page 37: Set Up The Wowza Server
(1) Use IP address of Wowza server + “:8088” (2) Select “Applications” (3) Select “live” (4) Select “Test Players” Figure 45 Getting to the Wowza Test Player ___________________________________________________________________________________________ Z3 Technology, LLC ♦ 100 N 8 ST, STE 250 ♦ Lincoln, NE 68508-1369 USA ♦ +1.402.323.0702... -
Page 38: Figure 46 Viewing Dme-03 Content On Wowza
You should see the “Test Players” popup screen. Select the “Adobe RTMP” tab, change the Stream name to “720” (should match one of the directories you are streaming to in the Z3-DME-03), and click “Start”. You should then see the content streamed from the Z3-DME-03: (1) Select “Adobe RTMP”... -
Page 39: Performing Other Operations With The Z3-Dme-03
8.1 Saving Current Settings If you have a specific configuration you’d like to preserve, you can save it so that when the Z3-DME-03 is powered off and back on, it automatically uses those settings. For an example of doing this, please see the description in Section 6.10, “... -
Page 40: Figure 48 Updater Screen
You will see screens stating that the image is being uploaded and that the flash is being updated. After about one minute, you should see the main menu again. Your Z3-DME-03 is now updated! ___________________________________________________________________________________________ Z3 Technology, LLC ♦ 100 N 8 ST, STE 250 ♦ Lincoln, NE 68508-1369 USA ♦ +1.402.323.0702... -
Page 41: Using The Password Feature
Enter new password twice Click “change” Figure 51 Changing the Password Wait for the password options to disappear. This indicates that the password has changed. ___________________________________________________________________________________________ Z3 Technology, LLC ♦ 100 N 8 ST, STE 250 ♦ Lincoln, NE 68508-1369 USA ♦ +1.402.323.0702... -
Page 42: Figure 52 Password Entry Screen
Use “admin” for the user name and the value you had entered before for the password: Figure 52 Password Entry Screen You should now be able to access the web GUI. ___________________________________________________________________________________________ Z3 Technology, LLC ♦ 100 N 8 ST, STE 250 ♦ Lincoln, NE 68508-1369 USA ♦ +1.402.323.0702... -
Page 43: Summary Of Options
Options (default in bold) Notes Local IP Address 192.168.x.y (192.168.81.07) Sets the IP address of the Z3-DME-03. Note that a “save” of these settings and a reboot is needed for changes to this value to take effect. Local Netmask 255.255.z.w (255.255.0.0) Sets the netmask of the Z3-DME-03. -
Page 44: The User Presets Tab
The channel number (1, 2, or 3) Subchannel Always 1 in this release Codec The codec being used to encode audio for that channel Stream Status ___________________________________________________________________________________________ Z3 Technology, LLC ♦ 100 N 8 ST, STE 250 ♦ Lincoln, NE 68508-1369 USA ♦ +1.402.323.0702... -
Page 45: The Mpts Tab
If checked, causes the values in the status tab to be refreshed automatically once every five seconds. 9.4 The MPTS Tab *Note: Upcoming release- Combine multiple streams into 1 TS stream. ___________________________________________________________________________________________ Z3 Technology, LLC ♦ 100 N 8 ST, STE 250 ♦ Lincoln, NE 68508-1369 USA ♦ +1.402.323.0702... -
Page 46: The Ch1/Ch2/Ch3 Tab
# of ms to buffer. The higher the value, the smoother the encode, but also the higher the latency (see Section 6.9, “ Tuning for Latency” on page 23). ___________________________________________________________________________________________ Z3 Technology, LLC ♦ 100 N 8 ST, STE 250 ♦ Lincoln, NE 68508-1369 USA ♦ +1.402.323.0702... - Page 47 If an issue is encountered with a specific decoder, please try setting this value to the same value as video delay. ___________________________________________________________________________________________ Z3 Technology, LLC ♦ 100 N 8 ST, STE 250 ♦ Lincoln, NE 68508-1369 USA ♦ +1.402.323.0702...
- Page 48 If audio is enabled, a companion .aac file is then created (for example, for “example.h264” a companion file “example_0.aac” is created). MPTS will be supported in an upcoming release. ___________________________________________________________________________________________ Z3 Technology, LLC ♦ 100 N 8 ST, STE 250 ♦ Lincoln, NE 68508-1369 USA ♦ +1.402.323.0702...
- Page 49 Not supported in this release. Frame Align True False (Enc 1 to 3 Mode only) stop Stop current encode session. ___________________________________________________________________________________________ Z3 Technology, LLC ♦ 100 N 8 ST, STE 250 ♦ Lincoln, NE 68508-1369 USA ♦ +1.402.323.0702...
- Page 50 1080i 1080p 1080p 1080p Note 3: GOP Sizes Supported: 10, 12, 15, 25, 30, 50, 60, 100, 120, 200, 240 frames ___________________________________________________________________________________________ Z3 Technology, LLC ♦ 100 N 8 ST, STE 250 ♦ Lincoln, NE 68508-1369 USA ♦ +1.402.323.0702...
-
Page 51: Values Appearing At The Bottom Of All Tabs
Click on this to save preset value to what was selected. Operating Mode Encoder Interlaced/Progressive This selects how the Z3-DME-03 is being used. Encode Single Ch No Scale “Encoder Interlaced/Progressive” is the default Encode 1 to 3 Ch mode of operation – it can be used to encode up Decoder to two channels. -
Page 52: Appendix A: Configuring The Wowza Server For Rtmp
APPENDIX A: Configuring the Wowza Server for RTMP In this section, configuring Wowza® version 4.0.1 is described. To configure Wowza to work with the Z3-DME-03 RTMP streaming, the following steps are needed: Log in to the Wowza Streaming Engine Manager Home page by typing http://localhost:8088, where “localhost”... -
Page 53: Figure 54 Wowza Security Settings
“Open” and “Client Restrictions” is set to “No client restrictions.” Then click “Save”: Figure 54 Wowza Security Settings The Wowza server is now configured to work with the Z3-DME-03. *Note: You can also specify “Require password authentication” for “RTMP Publishing.” In this case, “Authentication”... -
Page 54: Appendix B: Troubleshooting
-Is the Ethernet cable plugged in to the Z3-DME-03 solidly (do you see the link light)? -Do the Z3-DME-03 IP address and the PC IP address have the same first two values (or, if netmask is set to 255.255.255.0, the same first three values)? -Do the Z3-DME-03 and the PC have the same netmask? (Default value is 255.255.0.0)
Need help?
Do you have a question about the Z3-DME-03 and is the answer not in the manual?
Questions and answers