Table of Contents
Advertisement
Quick Links
Advertisement
Table of Contents

Subscribe to Our Youtube Channel
Related Manuals for CAS RW-2000Z


Summary of Contents for CAS RW-2000Z
- Page 1 그럼ㄷ...
-
Page 2: Table Of Contents
Table of Contents Caution ..............1. Introduction .............. 2. Features and Key Functions ........3. Technical Specifications ......... 4. Explanation of Frontal Aspect........ 5. Menu ................ 6. Method of Weighing Truck........7. Method of Searching Truck Data ......8. RW10Z/15Z Utilization Method......9. -
Page 3: Caution
Caution ⊙ Safety Caution Make sure to comply with the safety cautions as they are designed to prevent dangers in advance by using the products safely and properly. Cautions are categorized into 2 types and the significances of ‘Warning’ and ‘Caution’... -
Page 4: Introduction
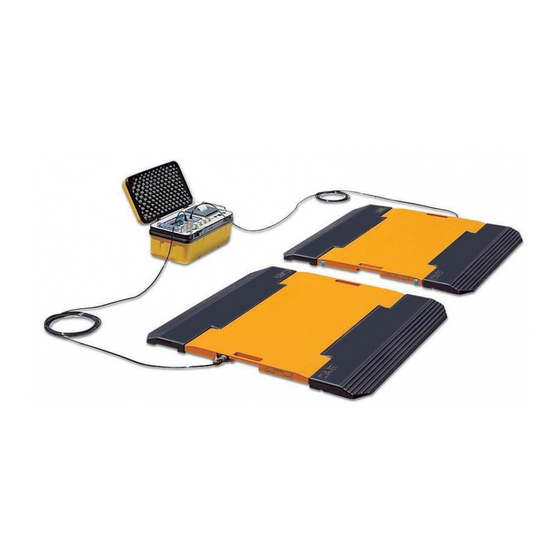
Indicator will be turned off. 1. Introduction Thank you very much for purchasing our CAS RW-2000Z (hereinafter referred to as RWZ) Vehicle Weighing System. This product was manufactured with strictest quality control with meticulous attention... -
Page 5: Features And Key Functions
2. Features and Key Functions Features It is small in size, making it easy to carry. Easy manipulation With built-in high capacity battery, it can be operated without separate power supply It can be recharged with AC power supply as well as through cigar jack in vehicles With BACK LIGHT function, it can be used even in dark place Built-in printer 3. - Page 6 Accessory Items Quantity Specifications User manual RW-2000Z DC 12V Adaptor 12V 1.5A Indicator Box 414*302.8*140 Indicator Box Belt 1.5m Cigar jack wirer ass’y for 3m(Option) connection to vehicle RW10Z/15Z Model RW-10Z RW-15Z Max Capa 10,000kg 15,000kg Division 20kg 20kg Electrical Specifications...
-
Page 8: Explanation Of Frontal Aspect
4. Explanation of the Frontal Aspect Status Type Explanations Indicates that the measure weight is in stable Stabilization lamp state Zero lamp Displayed when the current weight is 0 kg Displayed when the current mode is summation Summation lamp mode Indicator battery alarm Indicates alarm for low batter of RW2000Z lamp... - Page 9 Printer lamp Status Type Explanations Power source lamp of the Indicates the state of application of power Red lamp of PRINTER printer to printer Green lamp of SELF-TEST lamp of the Indicates presence of abnormality after PRINTER printer self-testing of the printer Indicates external power Indicates connection with external power POWER lamp...
- Page 10 Keyboard ZERO Turns the weight indication around Zero Point to 0. Short (Operates up to 2% of the maximum weight) When the PAD is pressed and desired PAD No. pressed, then it will display only the weight on the corresponding PAD only. Support display will indicate the No.
- Page 11 FIND Finds the saved data of truck. After having inputted the vehicle number to be searched and SET key pressed, all the results of search will be displayed. If there is vehicle Short number that has been searched, press SET key to print all the data, and once the CLR key is pressed, it moves onto the measurement mode once again.
- Page 12 ▼ Short Used in moving to the items in the lower level in the menu. Main Sub- Detailed Menu Menu Menu General dAtE Date setting time Time setting Day setting Unit Unit setting bLight BackLight setting diSPEd Display indication speed setting SEtPAd Pad’s ID setting ChKPAd...
-
Page 13: Menu
5. Menu It is possible to perform setting without the manual by using the LEVEL1, LEVEL2, LEVEL3 keys and direction key. Turn the power on for the Indicator. Press the LEVEL1 key for more than 1 second to move to the Main Menu. Main Menu is composed of TEST mode, SET mode and CAL mode. CAL mode will not be activated. - Page 14 TEST – DISPLAY Press the LEVEL2 key until diSPLy is displayed while TEST is displayed. In order to enter the DISPLAY mode, press the LEVEL3 key to display all the LCDs and have numbers indicated on the LED sequentially. You can exit the mode by pressing the SET key.
- Page 15 When you press the LEVEL2 key under the SET state of the Main Menu, you can move to the Sub-Menu of SET. SET is composed of Sub-Menus including GENERAL, PAD, PRINT, DB and OPTION. Every time the LEVEL2 key is pressed while SET is displayed, the Sub-Menu of the SET changes, and you can enter the Detailed Menu by pressing the LEVEL3 key while in the Sub-Menu.
- Page 16 SET – GENERAL – TIME: Setting time Same as the method of setting the SET-GENERAL-DATE. The time is displayed with hour, minute and second with 2-digit number for each. SET – GENERAL – DAY: Setting day of the week You can set the day of the week by pressing ▲ key and ▼ key while Detailed MenuDAY is displayed.
- Page 17 Perform PAD related settings SET – PAD – SETPAD: Setting the No. of PAD Prior to performing this setting, turn on the power for one of the PAD. Normal setting is impossible if several PADs are turned on. ID message will be displayed when ▲ key or ▼ key is pressed while Detailed MenuSETPAD is displayed.
- Page 18 SET – PAD – STATIC: Usage of static weighing mode It is used when changing from the current status of PAD, which is in dynamic weighing state, to static weighing mode. Only the PAD for which the status will be changed needs to be turned on.
- Page 19 PRINT SET – PRINT – AUTO PRINT: Setting whether to use automatic printing Determine whether to print automatically or not by using ▲ key and ▼ key while Detailed Menu ATOPRT is displayed. Save the setting and exit by using LEVEL3 key. MANUAL: Use manual printing AUTO: Use automatic printing Automatic printing will operate only when weight has been applied to all set PADs.
- Page 20 ZIGBEE You can set the communication channel, ID and ADDRESS of the ZIGBEE module of Indicator and PAD. The default value at the time of shipment are as follows: Indicator Setting range Channel 15 (0xFF) 15 (0xFF) 11~26 PanID 65535 (0xFFFF) 65535(0xFFFF) 0~65536 Source Address...
-
Page 21: Method Of Weighing Truck
* When you are not using the default setting, then the relationship between Source Address and Destination Address of Indicator and Pad will be set in the following relationship. EX) 1 Indicator Source Address Destination Address EX) 1 Indicator Source Address 1234 5678 Destination Address... - Page 22 OPTION Dummy Plate : It is used to reduce errors, when the vehicle which has 3-axiles is measured. Categories Measurement Measurement Measurement Measurement 1) Weigh the 1 the 2 axle in this order (2 PLATE). 2) Weighing will be more accurate if weighed by suing dummy plate (2 PLATE + 2...
-
Page 23: Method Of Searching Truck Data
7. Method of Searching Truck Data 1. When the FIND key is pressed for about 1 second, it will move to FIND mode. When CAR NO message is displayed, enter the number of the vehicle you wish to search prior to pressing the SET key. 2. - Page 24 Print Format 1) When printing following measurement ==========CAS RW SYSTEM=========== DATE: 08.11.26.10:11:30 Measurement date Truck NO: 1234 Measured vehicle number Weight Count: 9 Weight count until now --------------AXLE1---------- Measured axle number Pad1: 1000kg No. of pad that corresponds to the axle...
-
Page 25: Rw10Z/15Z Utilization Method
8. RW10Z/15Z Utilization Method CAUTIONS Keep it in dry. Measure out on the place that an inclination is under the 45 degrees. Don't use in wet weather. Avoid the place where mud or sends are existing. Restrain measurement from the uneven place. It may cause error or deteriorating performance of a product. -
Page 26: How To Change Printer Roll
9. How to Change Print Roll ① At the time of printing, if the printer outputs printing paper with red line on the back, it is the sign that the paper needs to be replace. Please replace with new roll of printing paper. - Page 27 ⑤ Properly install the paper and verify that the paper outputs properly by pressing the FEED button.
-
Page 28: Error Message And Measure To Be Taken
10. Error Messages and Measures to be Taken Error messages are displayed by using the LCD and support display. LCD will display the types of error while the support display will indicated the No. of PAD. ⑴ Errors that can occur in the weight measuring mode Err Cm ▣... - Page 29 ⑵ Errors that can occur in the weight setting mode Err RS ▣ Reasons for occurrence of error setting exceeded the allowable limit of 1/1,000. Resolution ☞ Measures to be taken Decrease the . Since = maxium weight / value of 1 scale, Resolution Resolution adjust the...
- Page 30 MEMO...
- Page 31 MEMO...
- Page 32 MEMO...
Need help?
Do you have a question about the RW-2000Z and is the answer not in the manual?
Questions and answers