Table of Contents
Advertisement
Quick Links
CODE 080000-5
Digital Dust Indicator
LD-5D
Operation Manual
Thank you for purchasing this product.
Be sure to read this operation manual before use.
Handle this product in accordance with the explanations described in this manual.
After reading this operation manual, keep it with the warranty in a safe place.
If you find any unclear points in this manual, please contact your Sibata distributor.
Advertisement
Table of Contents

Related Manuals for Sibata LD-5D


Summary of Contents for Sibata LD-5D
- Page 1 Handle this product in accordance with the explanations described in this manual. After reading this operation manual, keep it with the warranty in a safe place. If you find any unclear points in this manual, please contact your Sibata distributor.
-
Page 2: Table Of Contents
3.1 Description of Parts ....................7 3.2 Description of the Modes ..................13 4 Preparation for Measurement ................14 4.1 Inspection of the LD-5D ..................14 4.2 Power ON ......................14 4.2.1 When Using Dry Cell Batteries ························································ 14 4.2.2 When Using an AC Adapter ···························································· 15 4.3 Setting Up the Current Time ................ -
Page 3: Safety Precautions
1 Safety Precautions The precautionary information in this operation manual is provided to ensure the safe use of the product and to prevent property damage and injury to you and other people. All of the precautionary information is important for ensuring safety. Therefore, be sure to read and understand the information thoroughly before using the product and observe it during use. - Page 4 apply pressure or force to the liquid crystal display. Please be aware that in the unlikely event of a product failure, Sibata bears no responsibility to compensate for data not acquired or recorded, and is not responsible for loss of data or for other direct or indirect damages incurred from such loss.
- Page 5 This product is a measuring device for dust. Regular maintenance may not be enough to maintain sensitivity when measuring particles that contain water such as mist. When measuring such particles, request regular maintenance including an overhaul, depending on frequency of use.
-
Page 6: Overview
(Below 100 mg/m 2.1 Features • The LD-5D can easily convert mass concentration of the measured value and display it by pre-setting a conversion factor for mass concentration. • Equipped with a recording function (logging function) of the measured value. -
Page 7: Construction
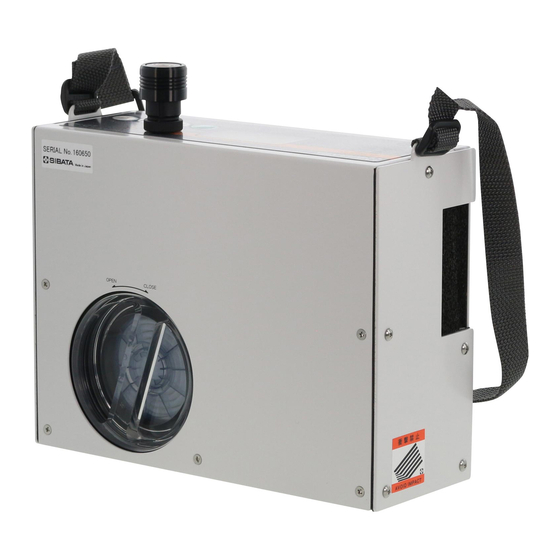
3 Construction 3.1 Description of Parts Top panel Left side Front Right side - 7 -... - Page 8 (10) Side panel With the front panel open (13) (12) (11) (14) (15) Left side Front - 8 -...
- Page 9 (1) Power switch This switch is used to turn the power on and off. When this switch is pressed once, the LD-5D will turn on, a fan will rotate and the LCD will display the initial screen. When the switch is pressed again, the LD-5D turns off.
- Page 10 When the voltage of the battery (power source) is approximately 8 V the remaining battery display will become zero, and the entire liquid crystal display will start to flash. After this the LD-5D will function only for approximately 30 minutes with alkaline batteries.
- Page 11 (6) Air sampling port This is the sampling port for the air to be measured. This air sampling port is structurally built so that air can be sampled from all directions, and shuts light disturbance out. (sunlight, illuminating lights) Pull down the cap as shown in the figure below when measuring dust particles. The side with the socket is where the sheath mechanism has been designed in, be careful not to apply impact to it or scratch it.
- Page 12 Will operate with 8 pcs of size C batteries. (→ see 4.2.1) Minute amounts of electricity are consumed even if the power switch is turned OFF. Take the batteries out if the LD-5D is not used. (15) Inspection report The scattering plate value is recorded.
-
Page 13: Description Of The Modes
3.2 Description of the Modes Press the time setting switch (▼) to switch between measuring time and mode. (1) Down timer mode Set up the measuring time and measure in this mode. Measurement will automatically end when the measuring time that has been set up has passed. -
Page 14: Preparation For Measurement
(5) When the power switch is pressed, a display will come up on the liquid crystal display. Please use the alkaline dry cell battery to operate the LD-5D. The manganese battery and the alkaline battery are the 2 types of 1.5V size C dry cell batteries on the market. -
Page 15: When Using An Ac Adapter
(3) When the power switch is pressed, a display will come up on the liquid crystal display. ● Please use the special AC adapter suitable in your area. Otherwise, it will damage the LD-5D. 4.3 Setting Up the Current Time This instrument has a built in clock function. - Page 16 (1) Press the time setting switch (▼) to change the lower left display of the liquid crystal display to time/mode setup [EX_MENU]. ■ (2) When [EX_MENU] is displayed, press the start/stop switch ( / ) to display 1/2 of the setup menu.
- Page 17 (6) Use the mass conversion switch (▲) and time setting switch (▼) to increase or decrease the numerical value being set. ■ (7) Use the start/stop switch ( / ) to confirm your selection (and move to the next item). (8) Press the time setting switch (▼) to change to [TIME SET] (Time setting).
- Page 18 (9) To end [RTCSET] use the time setting switch (▼) or the mass concentration switch ■ (▲) and move the cursor ( ) in front of [QUIT] and press the start/stop switch ( / Furthermore, press the time setting switch (▼) 4 times and press the start/stop switch ■...
-
Page 19: Measuring The Background (Bg)
BG value has been measured with the air sampling port left open, close the port and measure the value again. (3) Leave the LD-5D for 1minute. (This procedure is necessary to fill the detector with purged air.) (4) Press the time setting switch (▼) to set the time/mode setup to [BG]. -
Page 20: Automatic Sensitivity Adjustment (Span Check)
The automatic sensitivity adjustment has been performed by the procedures mentioned above. The LD-5D will compare the measured value of the light scattering plate with the value of the standard light scattering plate, and automatically calculate the difference between the two and store it in memory as the corrected value. -
Page 21: Procedures For Measurement
It may cause malfunction. Confirm that the measurement/sensitivity adjusting knob (see page 11) is [MEASURE] position. When the LD-5D is turned on, the set time displayed at the bottom left of the liquid crystal display is [01 min]. ■... -
Page 22: Mass Concentration Display
5.1.3 Mass Concentration Display If the K factor is entered and recorded in the LD-5D, measured data can be converted into mass concentration by pressing the mass concentration switch (▲). When the mass concentration switch (▲) is pressed again, the display will return to count. - Page 23 Example calculation Measuring time: 10 min. Calculated value by the LD-5D: 1260 (count) Mass concentration by the filtration assisting collection device: 1.5 (mg/m With the measurement results above, the resulting formula is R=1260 count /10 min. =126CPM, With the formula above, K = 1.5/126=0.012 (mg/m /CPM) ●...
-
Page 24: Manual Measurement
Press the start/stop switch ( / ) to confirm the setup. In the example calculation in chapter (3) Obtaining K factor, K=0.012 (mg/m /CPM) was obtained, but the LD-5D has a predetermined value of 1 CPM=0.01mg/m to a calibrated particle so K=0.012/0.01=1.2 will be entered. -
Page 25: Graph Display
5.2.2 Graph Display When the mass concentration switch (▲) is pressed during measurement, the display will change from count to graph display. When the mass concentration switch (▲) is pressed again, the display will switch back to count. ● The bar graph display starts at 32 CPM. Anything under 31 CPM will not be displayed. ●... - Page 26 ( ) numerical value setup will disappear. The LD-5D will automatically distinguish between earlier and later dates. However, it can not automatically fix dates that have been previously entered. For example, when 02 (February) is entered when 01-31 (January 31) had already been set, the date 31 (31st) will remain the same.
- Page 27 ・SET MEASURE TIME Set the length of logging function. Setup with hour : minute. Remaining memory capacity and LOG CYCLE (logging cycle) will display the maximum set value (MAX=xxxxx:xx). hours minutes Use the time setting switch (▼) or the mass concentration switch (▲) to enter values to setup.
- Page 28 Please be aware that in the unlikely event of a product failure, Sibata bears no responsibility to compensate for data not acquired or recorded, and is not responsible for loss of data or for other direct or indirect damages incurred from such loss.
-
Page 29: Displaying Logging Data
5.3.2 Displaying Logging Data It is possible to confirm logging data on the display of the main unit. Press the time setting switch (▼) and change the time/mode setup display in the lower left of the liquid crystal display to [LOG]. ■... -
Page 30: Retrieving Logging Data
5.3.3 Retrieving Logging Data Using the communication cable with software S-USB (included) enables transferring or updating LD-5D settings on the PC, and transferring log data acquired using the LD-5D to the PC, saving that data on the PC. Log data transferred to the PC is saved in CSV file format. -
Page 31: Procedures For Set Up
Move the cursor ( ) to [AUTO RUN] and press the start/stop switch ( / ) to setup AUTO RUN. [AUTO RUN] is a function that automatically starts manual measurement (MANUAL) when the power of the LD-5D is turned ON. ■ When the start/stop switch ( / ) is pressed and measurement is stopped manually, normal operation is possible after the measurement has ended. -
Page 32: Rtcset
The LD-5D does not have an external power ON/OFF function. Use the time setting switch (▼) or the mass concentration switch (▲) to change the set values. Every time the switch is pressed, a toggle function will change the set value to ON → OFF →... - Page 33 ■ When the start/stop switch ( / ) is pressed with the cursor ( ) on [DATE SET], the screen will change to [DATE SET]. Use the mass concentration switch (▲) and the time setting switch (▼) to increase or decrease setup values.
- Page 34 ■ Move the cursor ( ) to [TIME SET] and press the start/stop switch ( / ) to change to [TIME SET]. Setup procedures are the same as [DATE SET], please refer to [DATE SET]. ● Logging data will be kept by a built in battery. This battery will be automatically charged when the power of the main unit is turned ON.
-
Page 35: Lcd Adjust
6.4 LCD ADJUST Move the cursor ( ) to [LCD ADJUST]. ■ When the start/stop switch ( / ) is pressed, the [LCD ADJUST] menu will be displayed. 6.4.1 LCD CONTRAST ■ If the start/stop switch ( / ) is pressed with the cursor ( ) in front of [LCD ADJUST], the screen will change to [LCD CONTRAST] (contrast adjustment). -
Page 36: Lcd Backlight
6.4.2 LCD BACKLIGHT ■ When the start/stop switch ( / ) is pressed with the cursor ( ) on [LCD BACKLIGHT], the screen will change to [LCD BACKLIGHT] (liquid crystal display backlight setup). There are 3 options to choose from in setup. OFF: The backlight will not light. - Page 37 ■ Use the start/stop switch ( / ) to confirm setup. If the timer function is setup, setup for the light is also necessary. ■ Select TIMER and press the start/stop switch ( / ) to set the time for lighting. Use the time setting switch (▼) or the mass concentration switch (▲) to change time setup.
-
Page 38: Range
6.5 RANGE Set the range of analog output. ■ Move the cursor ( ) in front of [RANGE] and press the start/stop switch ( / ) to setup the range of analog output. There are 3 options in setup. AUTO: Output of 0 to 1000 cpm in 0 to 1 V. Output of 1000 to 10000 cpm in 0.1V to 1V. -
Page 39: Analog/Pulse Output
7 Analog/Pulse Output 7.1 Analog Output This specifies the output range settings (see 6.5 Range.). Connect the analog-pulse cable (optional) to the analog output connector. The red wire (pin 1) is for positive voltage output and the white wire (pin 2) is for negative voltage output. -
Page 40: Precautions For Maintenance, Storage, And Transport
Under the given conditions, Sibata will repair broken/malfunctioning products under warranty, but Sibata does not warrant any loss or damage to data recorded in memory. Please back up all required data. If the customer ignores the precautions in this manual or fails to create a backup, Sibata shall not be responsible for any damages resulting from such lost or damaged data. - Page 41 (3) Wipe the interior clean with a dust cloth. (Clean the rubber packing also.) (4) Install a new filter and finally screw the 4 screws back in place to close the cover. ● Air Sampling Port When high concentration measurement is performed or when measurement is taken for long periods of time, you may notice the pipe interior of the sheath air mechanism becoming dirty due to sampling air.
- Page 42 < How to Insert the Air Sampling Port > (1) Insert the air sampling port perpendicular to the hole in the main unit. (It may be tight, but do not force the inlet in.) (2) When the air sampling port is inserted to the height shown in the picture to the left, it will stop.
-
Page 43: Troubleshooting
9 Troubleshooting Promptly stop using the product if a problem occurs during use. If the problem was caused by a product failure, please request repairs and do not operate the product. In some cases, problems can result from causes other than product failures. Before requesting service, verify the following. Condition Cause Remedy... -
Page 44: Specifications
3. LOG (Logging) Set date to start measurement and measurement length. Measured data will be stored in memory of the LD-5D while measurement is taking place. 4. Span check The value of the scattering plate may be measured and the adjusted value recorded by inserting the scattering plate for sensitivity calibration. -
Page 45: Warranty
11 Warranty If a Sibata product fails within one year from date of purchase, it will be repaired free of charge. To request repairs, contact the distributor where you purchased the product. Be sure to provide the item code, product name, model number, serial number, a description of the problem, and other relevant information. - Page 46 Note) Shape, dimensions, specifications, and other product information are subject to change without notice in the interest of product improvement to the extent that product functions and applications will not be impaired. 22.06.24 K (12)
Need help?
Do you have a question about the LD-5D and is the answer not in the manual?
Questions and answers