Table of Contents
Advertisement
Quick Links
Viscometer Bath
Instruction Manual
Thank you for purchasing this product.
This instruction manual describes precautions that are important for preventing accidents as well as the
procedures used to handle the product.
To ensure safety, read this instruction manual and the attached warranty thoroughly before use, and use
the product correctly.
After reading this instruction manual and the warranty, keep them in a safe place where they can be
referred to at any time.
CODE
VB-3T
051260-0311
Advertisement
Table of Contents

Related Manuals for Sibata VB-3T


Summary of Contents for Sibata VB-3T
- Page 1 CODE 051260-0311 VB-3T Viscometer Bath Instruction Manual Thank you for purchasing this product. This instruction manual describes precautions that are important for preventing accidents as well as the procedures used to handle the product. To ensure safety, read this instruction manual and the attached warranty thoroughly before use, and use the product correctly.
-
Page 3: Table Of Contents
Contents Before Use ......................4 About This Instruction manual ....................... 4 Checking the Package Contents ....................5 Safety Precautions ....................6 About the User (Important) ......................6 Warning Labels ..........................6 Precautionary Information ......................7 About This Product .................... -
Page 4: Before Use
Every effort has been made to ensure that the information contained in this instruction manual is correct. If you discover any errors or omissions, however, please contact your Sibata representative. The copyright of this instruction manual belongs to Sibata Scientific Technology Ltd. -
Page 5: Checking The Package Contents
When actually measuring viscosity, use a thermometer stipulated by JIS. Viscometer holder for VB-3/VB-3T ... 6 pcs • The viscometer holder is adjusted to be used with an Ubbelohde viscometer before shipment from the factory. When using a... -
Page 6: Safety Precautions
Safety Precautions The precautionary information that appears in this instruction manual is for ensuring that the product is used safely and for preventing injury to you and other people and damage to equipment. It is all important for ensuring safety and so be sure to read it thoroughly before using the product and observe it during use. -
Page 7: Precautionary Information
Precautionary Information Do not run the power Do not insert or cord near thermal remove the power appliances or other plug into or out of the objects that reach power outlet when high temperatures. your hands are wet. Prohibited Prohibited Doing so may result in fire, a short circuit, Doing so may result in electric shock. - Page 8 Do not install the Do not install the product on an inclined product near objects or unstable surface. that reach high temperatures. Prohibited Prohibited Doing so may result in injury, Doing so may result in fire or equipment damage, or an accident. equipment damage.
- Page 9 If you hear the sound Remove the power of thunder, do not plug from the power approach the outlet when not using equipment, the power the product for long Do Not cord, or the power periods. Disconnect Touch outlet. Power Plug Doing so may result in injury or electric Not doing so may result in fire, a short shock.
- Page 10 Do not, under any Do not move the circumstances, attempt product with water still to disassemble, repair, inside the bath. or modify the product Do Not yourself. Prohibited Disassemble Doing so may result in fire, a short Doing so may result in water leakage or circuit, electric shock, equipment equipment damage.
- Page 11 Do not install the Do not turn the product in locations product on its side or that are subject to upside down. direct sunlight or that reach high Prohibited Prohibited temperatures. Doing so may result in equipment Doing so may result in equipment damage.
-
Page 12: About This Product
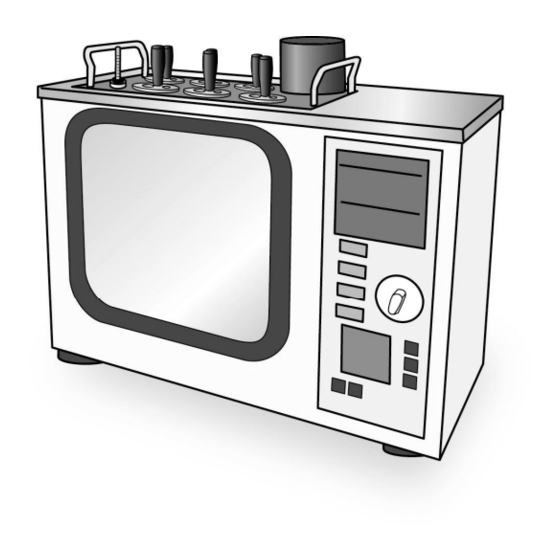
About This Product This product is a constant-temperature bath for measuring viscosity using Cannon-Fenske, Cannon-Fenske reverse-flow type, Ubbelohde, and Ostwald viscometers. The propeller pump efficiently stirs water inside the bath, and the high-resolution digital temperature controller stably controls temperature to high precision. It also has three sets of built-in stop watches that are highly functional. - Page 13 (1) Viscometer holder mounting plate This plate is for setting the viscometer holders in place. The plate can hold six viscometer holders. (2) Stirrer motor This motor is for stirring water inside the bath. The propeller for stirring is attached to the tip of the motor shaft.
-
Page 14: Control Panel
Control Panel (1) Main heater temperature setup panel (For details, see page 15.) This panel is for setting up the temperature of the main heaters. (For details on method of operation, see page 23.) (2) Main heater switch This is the switch for the main heaters. The main heater temperature setup panel lights when this switch is turned ON. -
Page 15: Main Heater Temperature Setup Panel
Main Heater Temperature Setup Panel The CH, A/M, F2, and F3 keys are not used. • For details on how to set temperature, see page 23. (1) Current temperature display This displays the current temperature inside the bath. (2) Preset temperature display This displays the preset temperature. -
Page 16: Stop Watches
Stop Watches • For details on how to operate the stop watches, see page 28.) (1) CH.1 start/stop key This key is for starting/stopping the CH.1 stop watch. (2) CH.2 start/stop key This key is for starting/stopping the CH.2 stop watch. (3) CH.3 start/stop key This key is for starting/stopping the CH.3 stop watch. -
Page 17: Method Of Use
Method of Use Installation When installing this product, be sure to observe the following installation conditions. Installation Conditions • Make sure that the main unit is carried by at least two workers. • Do not install this product in locations subject to splashing with water or lots of humidity, locations that might ignite or explode, or locations where corrosive gas is generated. -
Page 18: Preparations
Preparations IMPORTANT! Be sure to observe the following. Before pouring the specified amount of water into the bath, do not connect the power plug to the power outlet and turn each of the switches ON. Doing so may cause the heater to heat without water inside, resulting in equipment damage or fire. - Page 19 During use, keep the water at a level so that it comes into contact with the bottom of the viscometer holder mounting plate. Not doing so may cause the heater to heat without water inside, resulting in equipment damage or fire. Periodically replace the water inside the bath.
- Page 20 Setting the Thermometer in Place Setting the Thermometer in Place Set the thermometer holder in place at the position shown in the figure, and insert the thermometer into the hole on the thermometer holder. If O-ring Thermometer necessary, adjust the position of the O-ring on the Thermometer holder thermometer.
- Page 21 • When installing the viscometer on the viscometer holder, pay attention to prevent the glass from being subjected to unnecessary force. • Do not use viscometers whose glass is broken, cracked, or scratched. • Be sure to attach viscometers to their exclusive viscometer holders. (2) Set the viscometer holder in place on the viscometer holder mounting plate.
-
Page 22: Operation
Operation About Heaters Two types of heaters, each with different purposes, are mounted on this product. • Main heaters: 300 W × 2 These heaters control the temperature of water in the bath. One heater is located in the pump under the stirrer motor and the other is located at the top inside the bath. - Page 23 (4) Operate the main heater temperature setup panel to enter the preset temperature. How to Enter the Preset Temperature 1) Press the digit selection key. The 0.1's digit in the preset temperature display starts blinking. Pressing the key again moves the position of the blinking digit.
- Page 24 About Auto-tuning Auto-Tuning Perform auto-tuning when using this product for the first time after it is purchased. Also, perform auto-tuning if the temperature cannot be stably controlled when the preset temperature, ambient temperature, or other operating conditions have changed. To start auto-tuning, press the F1 key. The indication on the preset temperature display alternates between those shown in the figure, and Displayed...
- Page 25 Precautions During Temperature Control Precautions During Temperature Control • The stirrer motor becomes hot even if the water temperature is low. So, take care not to touch the motor with your hands during or immediately after use. • The metal parts of the viscosity holder and the viscometer holder mounting plate become hot when the water temperature is high.
- Page 26 Over-temperature Prevention Safety Interlock Over-temperature Prevention Safety Interlock This product is equipped with an over-temperature prevention safety interlock that sounds a buzzer and stops the supply of electricity to the heaters when the water temperature reaches or exceeds a temperature 5 °C higher than the preset Green →...
- Page 27 To ensure stable temperature control, set the preset temperature of the cool water circulator to at least 5 °C lower than that of the VB-3T main unit. • Use the cool water circulator with the sub-heater switch turned OFF.
- Page 28 Stop Watch Operations Stop Watch Operations This product has three sets of built-in stop watches, each of which can be started and stopped separately. They can also be used in the following two modes. MODE 1: In this mode, one time segment can be measured just like a regular stop watch.
- Page 29 MODE 1 – Method of Operation (1) When turning the power ON or after pressing the RESET key (that is, when the display is as shown in the figure on the right), press the CH.1 start/stop key. MODE 1 is selected. ("0000.0"...
- Page 30 MODE 2 – Method of Operation (1) When turning the power ON or after pressing the RESET key (that is, when the display is as shown in the figure on the right), press the CH.2 start/stop key. MODE 2 is selected. ("0000.0"...
-
Page 31: Troubleshooting
Troubleshooting If a problem occurs during use, promptly stop using the product. If the error has been caused by a product failure, please request repair. In some cases, errors may be caused by something other than a malfunction. Before requesting repair, verify the following. If an abnormality occurs during use, immediately stop using the product, turn the circuit breaker OFF and disconnect the power plug from the power outlet. - Page 32 Error Indications and Malfunctions Indication Status Corrective Measures Abnormal sensor Please request repair. Abnormal memory Please request repair. Abnormal internal part Please request repair. Use a cool water circulator Abnormal auto-tuning (see page 33) to circulate (Auto-tuning does not finish cooling water from the cooling even after 3 hours.) water supply ports.
-
Page 33: Spare Parts And Related Products
Spare Parts and Related Products Product Name Product Code Remarks Spare part. For Ubbelohde Viscometers, Viscometer Holder for VB-3/VB-3T 051260-0303 Cannon-Fenske Viscometers, and Ostwald Viscometers. This circulator is used for circulating cooling water. Cool Water Circulator, 051140-307 COOLMAN PAL C-307 Use this when controlling the temperature near room temperature. -
Page 34: Inspections And Maintenance
Inspections and Maintenance To ensure safe use and prolonged performance, perform inspections and maintenance periodically or before use. Before inspections and maintenance, be sure to turn the circuit breaker OFF and disconnect the power plug from the power outlet. Not doing so may result in electric shock or injury due to erroneous operation. -
Page 35: Main Specifications
Main Specifications Product Code 051260-031 Model VB-3T Number of Suspended Viscometers Room temperature to 85 °C *1 Temperature Setting Range +5 °C to +35 °C Operating Ambient Temperature ±0.1 °C (use in constant-temperature room) Temperature Adjustment Precision ±0.1 °C (use in constant-temperature room) -
Page 36: Warranty And Repairs
Faults or damage occurring after purchase due to relocation, movement, falling, or vibration Faults or damage resulting from the use of consumable items not specified by Sibata Any case in which the date of purchase has not been entered on the warranty, the warranty has not been stamped, or the warranty items have been corrected ...
Need help?
Do you have a question about the VB-3T and is the answer not in the manual?
Questions and answers