LawnMaster VBRM16 Instruction Manual
16cm mx 24v lithium-ion cordless robotic lawnmower
Hide thumbs
Also See for VBRM16:
- Original instructions manual (184 pages) ,
- Instruction manual (182 pages) ,
- Instruction manual (147 pages)
Advertisement
Instruction Manual
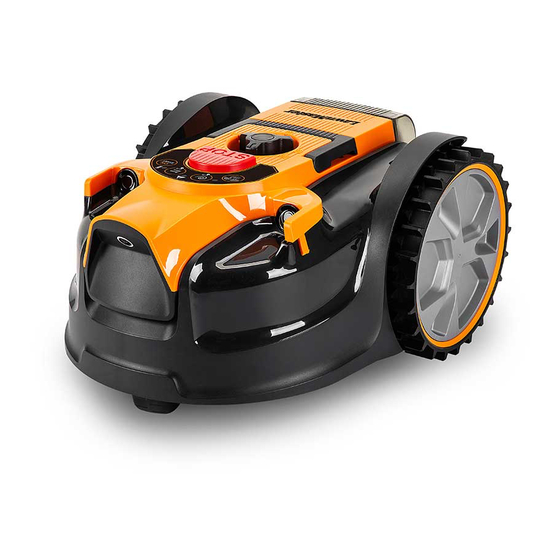
16cm MX 24V Lithium-Ion Cordless Robotic Lawnmower VBRM16
Original Instructions
WARNING:
Read all safety instructions carefully before assembling and operating
this machine. Ensure the machine has been assembled correctly and safely. Keep the
instructions safe and pass them on to any subsequent user so that the information is always
available.
Advertisement
Table of Contents

Related Manuals for LawnMaster VBRM16


Summary of Contents for LawnMaster VBRM16
- Page 1 Instruction Manual 16cm MX 24V Lithium-Ion Cordless Robotic Lawnmower VBRM16 Original Instructions WARNING: Read all safety instructions carefully before assembling and operating this machine. Ensure the machine has been assembled correctly and safely. Keep the instructions safe and pass them on to any subsequent user so that the information is always...
- Page 3 Fig. 1 Fig. 2 >6 cm >6 cm >6 cm Fig. 3 Fig. 4 Fig. 5 Fig. 6...
-
Page 4: Table Of Contents
First Operation The VBRM16 is designed to detect grass and move into areas it identifies as grass. If it cannot see a clear boundary it will continue to move into areas off the lawn and into plants that it may identify as grass. -
Page 5: Symbols
SYMBOLS The following warning symbols appear throughout this manual and indicate the appropriate safety measures you should take when operating and maintaining the appliance. SYMBOL DESIGNATION/EXPLANATION WARNING - The robotic lawnmower can be dangerous if used incorrectly. Read instruction manual before operating the machine. Keep bystanders away. - Page 6 SYMBOLS SYMBOL DESIGNATION/EXPLANATION Only recharge battery packs with the supplied charger indoors. T/3.15A Fuse Electrical appliances must not be disposed of with the domestic waste. Batteries contain Lithium-ion. Do not dispose of batteries in household waste. Li-ion Do not dispose of battery packs in rivers or immerse in water. Do not dispose of battery packs in fire.
-
Page 7: Safety Information
SAFETY INFORMATION IMPORTANT! READ CAREFULLY BEFORE USE. KEEP FOR FUTURE REFERENCE Training ■ Read the instructions carefully. Be familiar with the controls and the proper use of the machine. ■ Never allow people unfamiliar with these instructions or children to use the machine. Local regulations may restrict the age of the operator. - Page 8 SAFETY INFORMATION WARNING Never use the robotic lawnmower when people, especially children or pets, are in the cutting area. Preparation ■ Ensure that the lawn area is defined as described in the section Prepare the Mowing Area and Define the Mowing Area.
- Page 9 SAFETY INFORMATION - Before checking, cleaning or working on the machine. ■ It is not permitted to modify the original design of the mower. All modifications are made at your own risk. ■ Avoid using the mower and its peripherals in bad weather conditions especially when there is a risk of lightning.
- Page 10 SAFETY INFORMATION ■ Always be sure of your footing on slopes. ■ Always switch on the motor according to instructions with feet well away from the blade(s). Maintenance and storage ■ Keep all nuts, bolts, and screws tight to be sure the machine is in safe working condition.
- Page 11 SAFETY INFORMATION Transportation Within the working area: ■ Press the STOP button to stop the mower. Use both hands to carry the mower at the front and rear sections under the mower. Carry the mower with the blade disc away from the body.
- Page 12 SAFETY INFORMATION ■ Batteries can explode in the presence of a source of ignition, such as a pilot light. ■ To reduce the risk of serious personal injury, never use any cordless product in the presence of an open flame. An exploded battery can propel debris and chemicals.
- Page 13 SAFETY INFORMATION ■ Keep battery pack dry, clean, and free from oil and grease. Always use a dry cloth when cleaning. Never use brake fluids, gasoline, petroleum-based products, or any solvents to clean battery pack. Charger Safety Information ■ Ensure the battery pack is charged indoors only, in a dry, cool and well-ventilated environment.
- Page 14 SAFETY INFORMATION ■ Keep the cord away from heat, oil, sharp edges or moving parts. Damaged or entangled cords increase the risk of electric shock. ■ Do not use a charger that has been dropped or received a sharp blow. ■...
-
Page 15: In The Box
IN THE BOX (Refer to Page 2) 1. Carry Handle 11. Front wheel 2. Cutting Height Adjustment Knob 12. USB Port (Covered by Rubber Cap) 3. STOP Button 13. Blade Disc 4. Control Panel 14. Blade and Screw (x6, 3 Pre-installed 5. -
Page 16: Assembly
ASSEMBLY Preparation ■ The lawnmower is supplied fully assembled. ■ Carefully remove all contents from the product packaging. ■ The battery is supplied in a partially charged state. Place the battery on the supplied charger and allow the battery to fully charge before first use. Prepare the Mowing Area (See Figs. - Page 17 ASSEMBLY When the robotic mower detects that there is no grass or encounters an obstacle, it changes route in a random manner and starts mowing again in a new direction. To allow the robotic mower to move freely inside the lawn, the lawn must be properly checked and adjusted so that the robotic mower has enough space for recognizing when there is no grass.
- Page 18 ASSEMBLY case, garden canes are particularly effective and do not detract from the look of the lawn. In spring, you can protect flower bulbs in the lawn from the mower by sinking short canes vertically into the lawn around the area spaced at 20 cm. The mower will be physically prevented from entering any protected areas.
- Page 19 ASSEMBLY Install/Remove the Battery Pack (See Figs. 13-15) WARNING If any parts are broken or missing, do not attempt to attach the battery pack to the robotic mower or operate the robotic mower until the broken or missing parts are replaced. Failure to do so could result in serious injury.
-
Page 20: Operation
OPERATION Control Panel (See Fig. 16) START/ON Long press for 3 seconds to power on the mower. Press after selecting the Auto Mow or the Spot Cutting Button to start mowing. Battery Indicator Battery Indicator Status Green, Continuous Sufficient power for mowing/ ready for mowing. Red, Continuous Recharge required. - Page 21 OPERATION Switching On/Off ■ To switch on, press the START/ON Button for 3 seconds. The battery indicator, error indicator, ultrasonic indicator will flash consecutively. The camera system will take approximately 15 seconds to start up. NOTE: Please wait while the mower starts up, attempting to start the mower in this time will cause an error warning and the start-up process will need to be repeated.
- Page 22 OPERATION Cutting Modes Auto Cutting In Auto cutting mode, the robotic mower will mow the lawn in a random pattern. After the robotic mower is powered on, press the Auto Mow Button for 2 seconds. Then press the START/ON Button. After 5 seconds of continuous running, you will hear beeps to indicate the blades have started to spin.
- Page 23 OPERATION ■ For the first cut each season, a higher cutting setting should be selected. USING A CUTTING HEIGHT THAT IS TOO LOW IN LONGER GRASS WILL USE MORE POWER AND REDUCE BATTERY RUN TIME. ■ Before you begin to mow, check to ensure that the blade is not blunt and that none of the fasteners are damaged.
- Page 24 OPERATION Charger Operation (See Fig. 18) WARNING Use only with the following battery approved by the manufacturer: 24LB4005, 24LB4005-C, 24LB2004, 24LB2004-C. If any part of the charger is missing or damaged, do not operate it! Replace the charger with a new one.
- Page 25 OPERATION charging temperature range of 4°C - 40°C. As soon as the permitted temperature is reached, the battery charger will automatically switch to charging. If the temperature range is correct and flashing red LED light continues, then remove and reinstall the battery pack.
-
Page 26: Maintenance
MAINTENANCE WARNING Always switch the product off, remove the isolator key and the battery pack and let the product cool down before performing inspection, maintenance and cleaning work. WARNING If a part becomes worn or damaged, use manufacturers recommended replacement parts. Use of any other parts may create a hazard or cause product damage. - Page 27 MAINTENANCE To replace the blades ■ Press the STOP button and allow the blade to come to a complete stop. ■ Lift the battery compartment cover. Remove the isolator key and the battery. ■ Slowly turn the mower over. Place it on a soft and clean surface. ■...
- Page 28 MAINTENANCE ■ Always remove the battery when storing the mower and keep in a cool dry place out of direct sunlight. ■ Store the battery only within a temperature range between 0°C and 25°C and do not subject or store the battery pack in direct sunlight. ■...
-
Page 29: Troubleshooting
TROUBLESHOOTING WARNING Only perform the steps described within these instructions! All further inspection, maintenance and repair work must be performed by a qualified specialist. Gloves and appropriate protective clothing must be worn when performing these instructions. Always turn off the mower before making any adjustment. For the latest information on where to purchase parts please visit www.cleva-europe.com. - Page 30 TROUBLESHOOTING The grass is too long. Set a higher cutting height. The battery is defective. Replace the battery. Defective START/ON Button. Contact the After Sales Helpline. Check the borders/barriers for correct setting for defining the working area. Incorrect barriers are used for Make improvements or temporary defining the working area.
- Page 31 TROUBLESHOOTING Adjust the borders/protections to decrease the size of the mowing area. Recharge the battery to mow the Working area is too big. area twice or purchase an additional battery to increase the size of the cut area. Replace all the blades and screws. Refer to Replacing the Mower Blade Grass is being cut Blades are dull.
- Page 32 TROUBLESHOOTING The robotic lawnmower has been tilted for a prolonged time in one direction. Remove and re-insert the isolator key. Remove any obstacles. Restart the The rear wheels have been lifted mower. due to an obstacle. Error indicator is yellow continuous. The mower has fallen over.
- Page 33 TROUBLESHOOTING Clean the battery contacts (e.g. by The battery contacts are inserting and removing the battery contaminated. several times) or replace the battery. No charging Check the mains voltage and fuse. Socket outlet, fuse, mains cable procedure possible. If necessary, contact the After Sales or battery charger are defective.
-
Page 34: Technical Data
TECHNICAL DATA DIMENSIONS Length 42.5 cm Width 35 cm Height 22 cm Weight (Without 4.0Ah Battery) 5.9 kg MOWING Voltage 24 V No Load Speed 3500 /min Cutting System 3 Pivoting Cutting Blades Cutting Width 16 cm Cutting Height Adjustment 20-60mm (5 Positions) Power Consumption during Cutting 40 W±20 %... -
Page 35: Recycling And Disposal
TECHNICAL DATA NOISE EMISSIONS MEASURED IN THE ENVIRONMENT AS SOUND POWER Sound Power Level (L ) Measured 64 dB(A) Noise Emissions Uncertainties K 3 dB(A) Sound Power Level (L ) Guaranteed 68 dB(A) Sound Pressure Level (L ) at the Operator’s Ear 57 dB(A) The noise emission declarations conforms to EN 50636-2-107:2015 Noise emissions in the environment measured as sound power (L... - Page 38 Fig. 7 Fig. 8 Fig. 9 Fig.10 35 cm Max. 35% slope 100 cm Fig.11 Fig.12...
- Page 39 Ⅰ Ⅱ Fig.13 Fig.14 Fig.15 Fig.16 Fig.17 Fig.18 Fig.21 Fig.19 Fig.20...
- Page 40 VBRM16 Suzhou Cleva Precision Machinery & Technology Co., Ltd. No.18, Huahong Street, Suzhou Industrial Park, 215000 Suzhou P.R.China www.cleva-europe.com...
Need help?
Do you have a question about the VBRM16 and is the answer not in the manual?
Questions and answers
Lawn Master VBRM16,not working. Camera led flashing yellow.
A flashing yellow LED on the LawnMaster VBRM16 indicates that the mower has a communication issue with the camera and it is too dark for the camera to work. Operate the mower during daylight hours only.
This answer is automatically generated
Necesita cable direccional?
No, the LawnMaster VBRM16 does not need a directional or boundary cable. It uses a camera, sensors, and Optical Grass Recognition (OGR) software to navigate and identify grass.
This answer is automatically generated