Table of Contents
Advertisement
Available languages
Available languages
Quick Links
Instruction Manual / Manuel d'instructions / Gebruiksaanwijzing
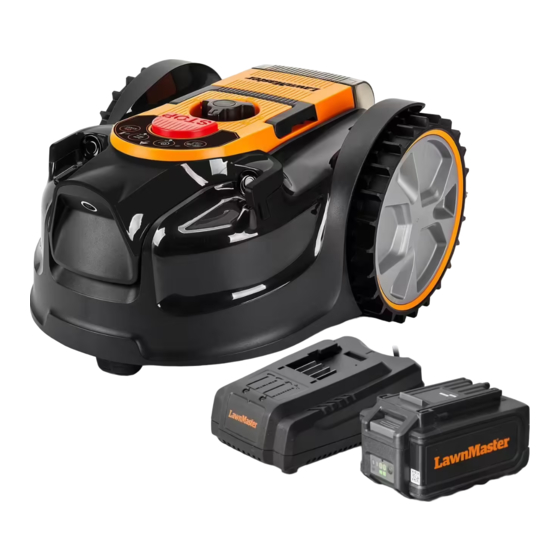
15.5cm MX 24V Lithium-Ion Cordless Robotic Lawnmower DM15
VBRM15C
Tondeuse robot sans fil MX 24V Lithium-Ion 15.5cm
DM15 / VBRM15C
MX 24V Lithium-Ion 15,5cm accu robotmaaier
DM15 / VBRM15C
Original Instructions / Instructions originales /
Originele instructies
WARNING:
Read all safety instructions carefully before assembling and operating
this machine. Ensure the machine has been assembled correctly and safely. Keep the
instructions safe and pass them on to any subsequent user so that the information is always
available.
AVERTISSEMENT :
et d'utiliser cette machine. Assurez-vous que la machine a été assemblée correctement et
en toute sécurité. Conservez les instructions en lieu sûr et transmettez-les à tout utilisateur
ultérieur afin que les informations soient toujours disponibles.
WAARSCHUWING:
in elkaar zet en gebruikt. Controleer of het apparaat correct en veilig is gemonteerd. Bewaar
de instructies op een veilige plaats en geef ze door aan toekomstige gebruikers zodat de
informatie altijd beschikbaar is.
Lisez attentivement toutes les consignes de sécurité avant d'assembler
Lees alle veiligheidsinstructies zorgvuldig door voordat u deze machine
Advertisement
Chapters
Table of Contents

Related Manuals for LawnMaster DM15


Summary of Contents for LawnMaster DM15
- Page 1 Instruction Manual / Manuel d’instructions / Gebruiksaanwijzing 15.5cm MX 24V Lithium-Ion Cordless Robotic Lawnmower DM15 VBRM15C Tondeuse robot sans fil MX 24V Lithium-Ion 15.5cm DM15 / VBRM15C MX 24V Lithium-Ion 15,5cm accu robotmaaier DM15 / VBRM15C Original Instructions / Instructions originales /...
- Page 3 Fig. 1 Fig. 2 >6 cm >6 cm >6 cm Fig. 3 Fig. 4 Fig. 5 Fig. 6...
-
Page 4: Table Of Contents
Recycling and Disposal About This Product ® Thank you for choosing the LawnMaster VBRM15C robotic lawnmower. This mower will independently mow the lawn in a random pattern without the use of a boundary wire and charging station and will operate during daylight hours only. The mower detects grass in order to know where to mow, and is also equipped with ultrasonic sensors which detect higher obstacles such as shrubs and fences. -
Page 5: Symbols
SYMBOLS The following warning symbols appear throughout this manual and indicate the appropriate safety measures you should take when operating and maintaining the appliance. SYMBOL DESIGNATION/EXPLANATION WARNING - The robotic lawnmower can be dangerous if used incorrectly. Read instruction manual before operating the machine. Keep bystanders away. - Page 6 SYMBOLS SYMBOL DESIGNATION/EXPLANATION Only recharge battery packs with the supplied charger indoors. T/3.15A Fuse Electrical appliances must not be disposed of with the domestic waste. Batteries contain Lithium-ion. Do not dispose of batteries in household waste. Li-ion Do not dispose of battery packs in rivers or immerse in water. Do not dispose of battery packs in fire.
-
Page 7: Safety Information
SAFETY INFORMATION IMPORTANT! READ CAREFULLY BEFORE USE. KEEP FOR FUTURE REFERENCE Training ■ Read the instructions carefully. Be familiar with the controls and the proper use of the machine. ■ Never allow people unfamiliar with these instructions or children to use the machine. Local regulations may restrict the age of the operator. - Page 8 SAFETY INFORMATION WARNING Never use the robotic lawnmower when people, especially children or pets, are in the cutting area. Preparation ■ Ensure that the lawn area is defined as described in the section Prepare the Mowing Area and Define the Mowing Area.
- Page 9 SAFETY INFORMATION - Before checking, cleaning or working on the machine. ■ It is not permitted to modify the original design of the mower. All modifications are made at your own risk. ■ Avoid using the mower and its peripherals in bad weather conditions especially when there is a risk of lightning.
- Page 10 SAFETY INFORMATION ■ Always be sure of your footing on slopes. ■ Always switch on the motor according to instructions with feet well away from the blade(s). ■ Warning signs shall be placed around the working area of the robotic lawnmower if it is used in public areas. The signs shall have the following text: Warning! Automatic lawnmower! Keep away from the machine! Supervise children!
- Page 11 SAFETY INFORMATION ■ Use only original equipment and accessories. It is not permitted to modify the original design of the mower. All modifications are made at your own risk. Transportation Within the working area: ■ Press the STOP button to stop the mower. Use both hands to carry the mower at the front and rear sections under the mower.
- Page 12 SAFETY INFORMATION ■ Do not crush, drop or damage the battery pack. Do not use a battery pack or charger that has been dropped or received a sharp blow. A damaged battery is subject to explosion. Properly dispose of a dropped or damaged battery immediately.
- Page 13 SAFETY INFORMATION the event of discomfort. ■ Always remove battery pack before storing the device. When battery becomes fully charged, unplug the charger from the power supply and remove the battery pack from the charger. ■ Keep battery pack dry, clean, and free from oil and grease. Always use a dry cloth when cleaning.
- Page 14 SAFETY INFORMATION ■ Protect the charger against moisture and wet conditions. There is a danger of electric shock. ■ Operate the charger only with the appropriate original batteries. Charging other batteries may result in injuries and risk of fire. ■ Keep the cord away from heat, oil, sharp edges or moving parts.
-
Page 15: In The Box
IN THE BOX (Refer to Page 2) 1. Carry Handle 11. Front wheel 2. Cutting Height Adjustment Knob 12. USB Port (Covered by Rubber Cap) 3. STOP Button 13. Blade Disc 4. Control Panel 14. Blade and Screw (x6, 3 Pre-installed 5. -
Page 16: Assembly
ASSEMBLY Preparation ■ The lawnmower is supplied fully assembled. ■ Carefully remove all contents from the product packaging. ■ The battery is supplied in a partially charged state. Place the battery on the supplied charger and allow the battery to fully charge before first use. Prepare the Mowing Area (See Figs. - Page 17 ASSEMBLY When the robotic mower detects that there is no grass or encounters an obstacle, it changes route in a random manner and starts mowing again in a new direction. To allow the robotic mower to move freely inside the lawn, the lawn must be properly checked and adjusted so that the robotic mower has enough space for recognizing when there is no grass.
- Page 18 ASSEMBLY case, garden canes are particularly effective and do not detract from the look of the lawn. In spring, you can protect flower bulbs in the lawn from the mower by sinking short canes vertically into the lawn around the area spaced at 20 cm. The mower will be physically prevented from entering any protected areas.
- Page 19 ASSEMBLY Install/Remove the Battery Pack (See Figs. 13-15) WARNING If any parts are broken or missing, do not attempt to attach the battery pack to the robotic mower or operate the robotic mower until the broken or missing parts are replaced. Failure to do so could result in serious injury.
-
Page 20: Operation
OPERATION Control Panel (See Fig. 16) START/ON Long press for 3 seconds to power on the mower. Press after selecting the Auto Mow or the Spot Cutting Button to start mowing. Battery Indicator Battery Indicator Status Green, Continuous Sufficient power for mowing/ ready for mowing. Red, Continuous Recharge required. - Page 21 OPERATION Switching On/Off ■ To switch on, press the START/ON Button for 3 seconds. The battery indicator, error indicator, ultrasonic indicator will flash consecutively. The camera system will take approximately 15 seconds to start up. NOTE: Please wait while the mower starts up, attempting to start the mower in this time will cause an error warning and the start-up process will need to be repeated.
- Page 22 OPERATION Cutting Modes Auto Cutting In Auto cutting mode, the robotic mower will mow the lawn in a random pattern. After the robotic mower is powered on, press the Auto Mow Button for 2 seconds. Then press the START/ON Button. After 5 seconds of continuous running, you will hear beeps to indicate the blades have started to spin.
- Page 23 OPERATION ■ For the first cut each season, a higher cutting setting should be selected. USING A CUTTING HEIGHT THAT IS TOO LOW IN LONGER GRASS WILL USE MORE POWER AND REDUCE BATTERY RUN TIME. ■ Before you begin to mow, check to ensure that the blade is not blunt and that none of the fasteners are damaged.
- Page 24 OPERATION Charger Operation (See Fig. 18) WARNING Use only with the following battery approved by the manufacturer: 24LB4005, 24LB4005-C, 24LB2004, 24LB2004-C. If any part of the charger is missing or damaged, do not operate it! Replace the charger with a new one.
- Page 25 OPERATION charging temperature range of 4°C - 40°C. As soon as the permitted temperature is reached, the battery charger will automatically switch to charging. If the temperature range is correct and flashing red LED light continues, then remove and reinstall the battery pack.
-
Page 26: Maintenance
MAINTENANCE WARNING Always switch the product off, remove the isolator key and the battery pack and let the product cool down before performing inspection, maintenance and cleaning work. WARNING If a part becomes worn or damaged, use manufacturers recommended replacement parts. Use of any other parts may create a hazard or cause product damage. - Page 27 MAINTENANCE To replace the blades ■ Press the STOP button and allow the blade to come to a complete stop. ■ Lift the battery compartment cover. Remove the isolator key and the battery. ■ Slowly turn the mower over. Place it on a soft and clean surface. ■...
- Page 28 MAINTENANCE Always store away from metal objects which could create a connection with the terminals. ■ Always remove the battery when storing the mower and keep in a cool dry place out of direct sunlight. ■ Store the battery only within a temperature range between 0°C and 25°C and do not subject or store the battery pack in direct sunlight.
-
Page 29: Troubleshooting
TROUBLESHOOTING WARNING Only perform the steps described within these instructions! All further inspection, maintenance and repair work must be performed by a qualified specialist. Gloves and appropriate protective clothing must be worn when performing these instructions. Always turn off the mower before making any adjustment. For the latest information on where to purchase parts please visit www.cleva-europe.com. - Page 30 TROUBLESHOOTING The grass is too long. Set a higher cutting height. The battery is defective. Replace the battery. Defective START/ON Button. Contact the After Sales Helpline. Check the borders/barriers for correct setting for defining the working area. Incorrect barriers are used for Make improvements or temporary defining the working area.
- Page 31 TROUBLESHOOTING Adjust the borders/protections to decrease the size of the mowing area. Recharge the battery to mow the Working area is too big. area twice or purchase an additional battery to increase the size of the cut area. Replace all the blades and screws. Refer to Replacing the Mower Blade Grass is being cut Blades are dull.
- Page 32 TROUBLESHOOTING The robotic lawnmower has been tilted for a prolonged time in one direction. Remove and re-insert the isolator key. Remove any obstacles. Restart the The rear wheels have been lifted mower. due to an obstacle. Error indicator is yellow continuous. The mower has fallen over.
- Page 33 TROUBLESHOOTING Clean the battery contacts (e.g. by The battery contacts are inserting and removing the battery contaminated. several times) or replace the battery. No charging Check the mains voltage and fuse. Socket outlet, fuse, mains cable procedure possible. If necessary, contact the After Sales or battery charger are defective.
-
Page 34: Technical Data
TECHNICAL DATA DIMENSIONS Length 42.5 cm Width 35 cm Height 22 cm Weight (Without 4.0Ah Battery) 6.1 kg MOWING Voltage 24 V No Load Speed 3500 /min Cutting System 3 Pivoting Cutting Blades Cutting Width 15.5 cm Cutting Height Adjustment 20-60mm (5 Positions) Power Consumption during Cutting 40 W±20 %... -
Page 35: Recycling And Disposal
TECHNICAL DATA NOISE EMISSIONS MEASURED IN THE ENVIRONMENT AS SOUND POWER Sound Power Level (L ) Measured 64 dB(A) Noise Emissions Uncertainties K 3 dB(A) Sound Power Level (L ) Guaranteed 68 dB(A) Sound Pressure Level (L ) at the Operator’s Ear 57 dB(A) The noise emission declarations conforms to EN 50636-2-107:2015 Noise emissions in the environment measured as sound power (L... - Page 36 Première opération Le VBRM15C « DM15 » est conçu pour détecter l'herbe et se déplacer dans les zones qu'il identifie comme étant de l'herbe. S'il ne peut pas voir une limite claire, il continuera à se déplacer dans des zones hors de la pelouse et dans des plantes qu'il peut identifier comme étant de l'herbe.
- Page 37 SYMBOLES Les symboles d'avertissement suivants apparaissent tout au long de ce manuel et indiquent les mesures de sécurité appropriées à prendre lors de l'utilisation et de l'entretien de l'appareil. SYMBOL DÉSIGNATION/EXPLICATION AVERTISSEMENT - Le robot tondeuse peut être dangereux s'il n'est pas utilisé correctement.
-
Page 38: Symboles
SYMBOLES SYMBOL DÉSIGNATION/EXPLICATION Ne rechargez les batteries qu'à l'intérieur avec le chargeur fourni. T/3.15A Fusible. Les appareils électriques ne doivent pas être jetés avec les ordures ménagères. Les piles contiennent du lithium-ion. Ne pas jeter les piles dans les ordures ménagères. -
Page 39: Informations Sur La Sécurité
INFORMATIONS SUR LA SÉCURITÉ IMPORTANT! LIRE ATTENTIVEMENT AVANT UTILISATION. À CONSERVER POUR TOUTE RÉFÉRENCE ULTÉRIEURE Formation ■ Lisez attentivement les instructions. Familiarisez-vous avec les commandes et l'utilisation correcte de la machine. ■ Ne laissez jamais des personnes ne connaissant pas ces instructions ou des enfants utiliser la machine. - Page 40 INFORMATIONS SUR LA SÉCURITÉ AVERTISSEMENT Le robot tondeuse peut être dangereux s'il n'est pas utilisé correctement. AVERTISSEMENT N'utilisez jamais le robot tondeuse lorsque des personnes, en particulier des enfants ou des animaux, se trouvent dans la zone de coupe. Préparation ■...
- Page 41 INFORMATIONS SUR LA SÉCURITÉ défectueuses ou si les dispositifs de sécurité, par exemple les déflecteurs, ne sont pas en place. ■ Ne pas mettre les mains ou les pieds à proximité ou sous les pièces en rotation. Ne pas toucher les pièces mobiles dangereuses avant qu'elles ne soient complètement arrêtées.
- Page 42 INFORMATIONS SUR LA SÉCURITÉ pas la tondeuse à l'eau courante et ne l'immergez pas dans l'eau. Ce produit n'est pas étanche. ■ Lorsque la tondeuse n'est pas utilisée, éteignez-la toujours en retirant la clé d'isolation. ■ La tondeuse robot ne doit jamais être stockée, utilisée ou chargée à...
- Page 43 INFORMATIONS SUR LA SÉCURITÉ Entretien et stockage ■ Veillez à ce que tous les écrous, boulons et vis soient bien serrés pour que la machine fonctionne en toute sécurité. ■ Remplacer les pièces usées ou endommagées pour des raisons de sécurité. ■...
- Page 44 INFORMATIONS SUR LA SÉCURITÉ Utilisez la poignée de transport pour transporter la tondeuse. Portez la tondeuse en éloignant le disque de la lame du corps. Longues distances : ■ Lorsque vous transportez votre tondeuse sur de longues distances, appuyez sur le bouton STOP et retirez la clé d'isolation et la batterie.
- Page 45 INFORMATIONS SUR LA SÉCURITÉ ■ Pour réduire le risque de blessures graves, n'utilisez jamais un produit sans fil en présence d'une flamme nue. Une batterie qui explose peut projeter des débris et des produits chimiques. En cas d'exposition, rincez immédiatement à l'eau.
- Page 46 INFORMATIONS SUR LA SÉCURITÉ le chargeur de l'alimentation électrique et retirez la batterie du chargeur. ■ Gardez la batterie sèche, propre et exempte d'huile et de graisse. Utilisez toujours un chiffon sec pour le nettoyer. Ne jamais utiliser de liquide de frein, d'essence, de produits à base de pétrole ou de solvants pour nettoyer la batterie.
- Page 47 INFORMATIONS SUR LA SÉCURITÉ ■ Protégez le chargeur contre l'humidité et les conditions humides. Il existe un risque d'électrocution. ■ N'utilisez le chargeur qu'avec les piles d'origine appropriées. Le chargement d'autres piles peut entraîner des blessures et un risque d'incendie. ■...
-
Page 48: Dans La Boîte
DANS LA BOÎTE 1. Poignée de transport 12. Port USB (recouvert d'un capuchon en 2. Bouton de réglage de la hauteur de coupe caoutchouc) 3. Bouton STOP 13. Disque de lame 4. Panneau de contrôle 14. Lame et vis (X6, 3 préinstallées sur le disque de 5. -
Page 49: Assemblée
ASSEMBLAGE Préparation ■ La tondeuse est livrée entièrement assemblée. ■ Retirez soigneusement tout le contenu de l'emballage du produit. ■ La batterie est livrée partiellement chargée. Placez la batterie sur le chargeur fourni et laissez-la se charger complètement avant la première utilisation. Préparer la zone de tonte (voir fig. - Page 50 ASSEMBLAGE Les capteurs à ultrasons peuvent être désactivés lorsque la pelouse à tondre est exempte d'obstacles. Dans ce cas, des haies, des murs ou d'autres barrières similaires dans la pelouse peuvent être utilisés comme limite de la zone de travail. Lorsque le robot tondeuse détecte qu'il n'y a pas d'herbe ou qu'il rencontre un obstacle, il change d'itinéraire de manière aléatoire et recommence à...
- Page 51 ASSEMBLAGE tondeuse. Cette limite peut être inférieure à 6 cm, de manière à être indétectable par les capteurs d'objets à ultrasons, et être également plus étroite que 35 cm. Lorsque le robot rencontre cette barrière physique, il s'arrête, recule et tourne. Ce type de délimitation peut convenir à votre pelouse dans certaines zones.
- Page 52 ASSEMBLAGE L'illustration montre une zone de travail correctement définie pour le bon fonctionnement de la tondeuse (Fig. 12). Il est très important que les limites visuelles autour des étangs soient larges et évidentes pour la tondeuse. Les plantes et les algues de l'étang peuvent être interprétées comme de l'herbe.
-
Page 53: Fonctionnement
FONCTIONNEMENT Panneau de contrôle (Fig. 16) START/ON Appuyez longuement pendant 3 secondes pour mettre la tondeuse en marche. Appuyez sur cette touche après avoir sélectionné le bouton de tonte automatique ou de coupe localisée pour commencer à tondre. Indicateur de batterie Indicateur de batterie Statut Vert, continu... - Page 54 FONCTIONNEMENT Bouton marche/arrêt ultrasonique Une seule pression permet d'activer/désactiver la fonction ultrasonique. 2. Mise en marche/arrêt ■ Pour allumer l'appareil, appuyez sur le bouton START/ON pendant 3 secondes. L'indicateur de batterie, l'indicateur d'erreur et l'indicateur d'ultrasons clignotent consécutivement. Le système de l'appareil photo prend environ 15 secondes pour démarrer.
- Page 55 FONCTIONNEMENT pour commencer à tondre. ■ Pour arrêter la tondeuse en cours de fonctionnement, appuyez sur le bouton STOP. ■ Pour éteindre la tondeuse, soulevez le couvercle du compartiment de la batterie et retirez la clé d'isolation. REMARQUE: Si la tondeuse est bloquée ou a été arrêtée pendant plus de 20-25 minutes, elle se met automatiquement en veille (hors tension).
- Page 56 FONCTIONNEMENT Réglage de la hauteur de coupe (voir Fig. 17) AVERTISSEMENT N'effectuez aucun réglage sur le robot de tonte sans avoir préalablement arrêté le moteur. Ne vous approchez pas du disque de la lame lorsque vous en réglez la hauteur. La hauteur de coupe de la tondeuse peut être réglée de MIN (20 mm) à...
- Page 57 FONCTIONNEMENT Veillez à ce que la batterie soit chargée entre 4°C et 40°C. Cela garantit une durée de vie optimale de la batterie. Protégez la batterie de la chaleur, d'une exposition continue au soleil et tenez-la à l'écart des radiations ou d'autres sources de chaleur. Ne laissez pas la batterie dans la tondeuse en plein soleil pendant de longues périodes.
- Page 58 FONCTIONNEMENT ■ Appuyez sur le bouton de déverrouillage de la batterie et retirez-la du chargeur. REMARQUE: il est normal que la batterie et le chargeur deviennent chauds (mais pas brûlants) pendant le processus de charge. Si la batterie ne se charge pas correctement, vérifiez que la prise électrique est opérationnelle.
-
Page 59: Maintenance
ENTRETIEN AVERTISSEMENT Il faut toujours éteindre le produit, retirer la clé d'isolation et la batterie et laisser le produit refroidir avant d'effectuer des travaux d'inspection, d'entretien et de nettoyage. AVERTISSEMENT Si une pièce est usée ou endommagée, utilisez les pièces de rechange recommandées par le fabricant. - Page 60 ENTRETIEN rechange recommandées. Veillez à ce que les trois lames et les vis soient remplacées en même temps afin de conserver un système de coupe équilibré. Visitez le site www.cleva-europe.com pour savoir où acheter des lames supplémentaires. Pour remplacer les lames : ■...
- Page 61 ENTRETIEN Entretien de la batterie et du chargeur ■ Veillez à ce que la batterie et le chargeur soient propres et exempts de débris. Ne laissez aucun matériau étranger pénétrer dans la cavité encastrée ou sur les contacts. Essuyez-les avec un chiffon sec.
- Page 62 DÉPANNAGE ATTENTION N'effectuez que les opérations décrites dans ce mode d'emploi ! Tous les autres travaux d'inspection, d'entretien et de réparation doivent être effectués par un spécialiste qualifié. Des gants et des vêtements de protection appropriés doivent être portés lors de l'exécution de ces instructions.
-
Page 63: Dépannage
DÉPANNAGE PROBLÈME CAUSE POSSIBLE SOLUTION Réglez une hauteur de coupe plus L'herbe est trop longue. élevée. La tondeuse robotisée ne La batterie est défectueuse. Remplacer la pile. démarre pas. Contactez le service d'assistance Bouton START/ON défectueux. après-vente. Vérifier que les bordures/barrières sont correctement réglées pour Des barrières incorrectes sont délimiter la zone de travail. - Page 64 DÉPANNAGE PROBLÈME CAUSE POSSIBLE SOLUTION Différentes versions (épaisseurs) Vérifier si les lames sont de versions de lames sont utilisées. différentes (épaisseur). La tondeuse robotisée vibre. La vis de la lame est desserrée. Serrer les vis de la lame. Ajustez les bordures/protections pour réduire la taille de la zone de tonte.
- Page 65 DÉPANNAGE PROBLÈME CAUSE POSSIBLE SOLUTION Retirer et réinsérer la clé d'isolation. Vérifiez qu'il n'y a pas d'obstacles de Le capteur de levage est activé plus de 10 cm de haut dans la zone pendant 10 secondes. de travail et retirez-les. Redémarrez la tondeuse.
- Page 66 DÉPANNAGE PROBLÈME CAUSE POSSIBLE SOLUTION Il fait trop sombre pour que l'appareil L'indicateur photo fonctionne. N'utilisez la La tondeuse a un problème de ultrasonique clignote tondeuse qu'en plein jour. Retirez communication avec la caméra. en jaune. et réinsérez la clé d'isolation. Redémarrez la tondeuse.
-
Page 67: Données Techniques
DONNÉES TECHNIQUES DIMENSIONS Longueur 42.5 cm Largeur 35 cm Hauteur 22 cm Poids (sans batterie 4.0Ah) 6.1 kg TONTE Tension 24 V Vitesse à vide 3500 /min Système de coupe 3 lames de coupe pivotantes Largeur de coupe 15.5 cm Réglage de la hauteur de coupe 20-60mm (5 positions) Consommation d'énergie pendant la coupe... -
Page 68: Recyclage Et Élimination
DONNÉES TECHNIQUES ÉMISSIONS SONORES MESURÉES DANS L'ENVIRONNEMENT EN TANT QUE PUISSANCE ACOUSTIQUE Niveau de puissance acoustique (L ) mesuré 64 dB(A) Incertitudes sur les émissions sonores K 3 dB(A) Niveau de puissance acoustique (L ) garanti 68 dB(A) Niveau de pression acoustique (L ) à... - Page 69 Eerste operatie De VBRM15C "DM15" is ontworpen om gras te detecteren en naar gebieden te gaan die het als gras herkent. Als het geen duidelijke grens kan zien, zal het blijven bewegen naar gebieden buiten het gazon en naar planten die het kan identificeren als gras.
-
Page 70: Symbolen
SYMBOLEN De volgende waarschuwingssymbolen staan overal in deze handleiding en geven aan welke veiligheidsmaatregelen moeten worden genomen bij het gebruik en onderhoud van het apparaat. SYMBOL BENAMING/UITLEG WAARSCHUWING - De robotmaaier kan gevaarlijk zijn bij verkeerd gebruik. Lees de gebruiksaanwijzing voordat u het apparaat gebruikt. Houd voorbijgangers uit de buurt. - Page 71 SYMBOLEN SYMBOL BENAMING/UITLEG Laad batterijen alleen binnenshuis op met de meegeleverde oplader. T/3.15A Zekering Elektrische apparaten mogen niet met het huishoudelijk afval worden weggegooid. De batterijen bevatten lithium-ion. Gooi batterijen niet weg met het huishoudelijk afval. Li-ion Gooi batterijen niet in rivieren en dompel ze niet onder in water. Gooi batterijen niet weg in vuur.
-
Page 72: Veiligheidsinformatie
VEILIGHEIDSINFORMATIE BELANGRIJK! VOOR GEBRUIK ZORGVULDIG LEZEN. BEWAREN VOOR TOEKOMSTIG GEBRUIK Training ■ Lees de instructies zorgvuldig door. Maak uzelf vertrouwd met de bedieningselementen en het juiste gebruik van de machine. ■ Laat het apparaat nooit gebruiken door mensen die niet bekend zijn met deze instructies of door kinderen. Plaatselijke voorschriften kunnen de leeftijd van de bediener beperken. - Page 73 VEILIGHEIDSINFORMATIE WAARSCHUWING De robotmaaier kan gevaarlijk zijn bij onjuist gebruik. WAARSCHUWING Gebruik de robotmaaier nooit als er mensen, vooral kinderen of huisdieren, in het maaigebied zijn. Voorbereiding ■ Zorg ervoor dat het gazongebied is gedefinieerd zoals beschreven in de paragrafen Het maaigebied voorbereiden en Het maaigebied definiëren.
- Page 74 VEILIGHEIDSINFORMATIE ■ Plaats uw handen of voeten niet in de buurt van of onder draaiende onderdelen. Raak geen gevaarlijke bewegende onderdelen aan totdat ze volledig tot stilstand zijn gekomen. ■ Til of draag een machine nooit met draaiende motor. ■ Verwijder altijd de isolatiesleutel: - Voordat u een verstopping verwijdert ;...
- Page 75 VEILIGHEIDSINFORMATIE kan het product of de batterij beschadigen. Hierdoor kan het product of de batterij beschadigd raken. ■ Maai alleen bij daglicht of bij goed kunstlicht. De maaier heeft goed licht nodig om het te maaien gebied correct te identificeren. ■...
- Page 76 VEILIGHEIDSINFORMATIE de ogen, enz. ■ De machine moet worden onderhouden volgens de instructies van de fabrikant. ■ Als er abnormale trillingen optreden, stop dan de maaier, verwijder de isolatiesleutel en de accu en controleer het blad op beschadiging. Vervang een versleten of beschadigd mes om het evenwicht te bewaren.
- Page 77 VEILIGHEIDSINFORMATIE Veiligheidsinformatie over batterijen ■ Laad de batterij alleen op met de door de fabrikant gespecificeerde oplader. Een oplader die geschikt is voor een bepaald type batterij kan brandgevaar opleveren als deze wordt gebruikt voor een ander type batterij. Verkeerd gebruik kan leiden tot elektrische schokken, oververhitting of lekkage van bijtende vloeistof uit de batterij.
- Page 78 VEILIGHEIDSINFORMATIE kan de batterij gaan lekken. Als de vloeistof in contact komt met uw huid, was deze dan onmiddellijk met water en zeep. Als de vloeistof in uw ogen komt, spoel ze dan minstens 10 minuten met schoon water en raadpleeg onmiddellijk een arts.
- Page 79 VEILIGHEIDSINFORMATIE beschadigde stekker, want dit kan kortsluiting en elektrische schokken veroorzaken. Stop onmiddellijk met het gebruik van de oplader als deze beschadigd is. Vervang de oplader door een exemplaar dat identiek is aan het exemplaar dat wordt vermeld in de productspecificaties in deze handleiding.
- Page 80 VEILIGHEIDSINFORMATIE moet overeenkomen met de voedingsspanning van de stroombron. ■ Raak de stekker nooit aan met natte handen. Einde productgebruik ■ De grasmaaier en de accessoires moeten aan het einde van hun levensduur op de juiste manier worden gerecycled om te voorkomen dat afgedankte elektrische en elektronische apparatuur op stortplaatsen terechtkomt en om de kwaliteit van het milieu te beschermen en te verbeteren.
-
Page 81: In De Doos
IN DE DOOS 1. Draagbeugel 12. USB-poort (afgedekt door rubberen kap) 2. Knop voor aanpassing maaihoogte 13. Bladschijf 3. STOP-knop 14. Blad en schroeven (X6, 3 vooraf geïnstalleerd op 4. Bedieningspaneel bladschijf) 5. Ultrasone objectdetectoren 15. Batterij 6. Grasdetectiecamera 16. Batterijontgrendelingsknop 7. -
Page 82: Vergadering
ASSEMBLAGE Voorbereiding ■ De maaier wordt volledig gemonteerd geleverd. ■ Verwijder voorzichtig alle inhoud van de productverpakking. ■ De batterij wordt gedeeltelijk opgeladen geleverd. Plaats de batterij in de meegeleverde oplader en laat deze volledig opladen voordat je hem voor het eerst gebruikt. Bereid het maaigebied voor (zie afb. - Page 83 ASSEMBLAGE gebruikt om het werkgebied af te bakenen. Wanneer de robotmaaier detecteert dat er geen gras is of dat hij een obstakel tegenkomt, verandert hij zijn route willekeurig en begint hij opnieuw te maaien in een nieuwe richting. Opdat de robotmaaier zich vrij in het gazon kan bewegen, moet het gazon correct worden gecontroleerd en afgesteld zodat de robotmaaier voldoende ruimte heeft om de afwezigheid van gras te herkennen.
- Page 84 ASSEMBLAGE zijn voor uw gazon. Tijdelijke fysieke barrières Wanneer de robot voor de eerste keer wordt gebruikt, wanneer het gazon wordt ingezaaid of wanneer er seizoensbloemen zijn, kan het raadzaam zijn om een tijdelijke methode te gebruiken om het gedeelte van het gazon dat door de robot moet worden gemaaid te beschermen of af te bakenen.
- Page 85 ASSEMBLAGE Het is heel belangrijk dat de visuele grenzen rond vijvers breed en duidelijk zijn voor de maaier. Planten en algen in de vijver kunnen worden geïnterpreteerd als gras. Fysieke grenzen rond vijvers worden ten zeerste aanbevolen en zullen voorkomen dat uw maaier per ongeluk waterschade oploopt, wat niet wordt gedekt door de garantie van de fabrikant.
-
Page 86: Hoe Het Werkt
WERKING Bedieningspaneel (Afb. 16) START/AAN Houd deze knop 3 seconden ingedrukt om de maaier in te schakelen. Druk op deze knop nadat je de knop voor automatisch maaien of spotmaaien hebt geselecteerd om het maaien te starten. Batterij-indicator Batterij-indicator Status Groen, continu Voldoende vermogen om te maaien/klaar om te maaien. - Page 87 WERKING Ultrasone aan/uit-knop Met één druk op de knop activeer/deactiveer je de ultrasone functie. In-/uitschakelen ■ Om het apparaat in te schakelen, drukt u 3 seconden op de START/ON knop. De batterij-indicator, foutindicator en ultrasone indicator knipperen achtereenvolgens. Het opstarten van het camerasysteem duurt ongeveer 15 seconden.
- Page 88 WERKING ■ Druk op de STOP-knop om de maaier tijdens gebruik te stoppen. ■ Om de maaier uit te schakelen, tilt u het deksel van het batterijvak op en verwijdert u de isolatiesleutel. OPMERKING: Als de maaier geblokkeerd is of langer dan 20-25 minuten heeft stilgestaan, gaat hij automatisch in de stand-bymodus (uitgeschakeld).
- Page 89 WERKING De maaihoogte van de maaier kan worden ingesteld van MIN (20 mm) tot MAX (60 mm) (Afb. 17). Kies de eerste paar weken van het maaien altijd de hoogste maaihoogte (40 mm). Daarna kan de maaihoogte elke week geleidelijk worden verlaagd tot de gewenste maaihoogte is bereikt. ■...
- Page 90 WERKING ■ LED-indicatoren batterij De batterij is uitgerust met een laadniveau-indicatiepaneel dat de laadstatus aangeeft. Dit laadniveau-indicatiepaneel bestaat uit 4 LED's op de batterij. Houd de laadindicatorknop van de batterij ingedrukt om de laadniveau-indicator te activeren. De LED's op de laadniveau-indicator gaan uit nadat je de knop hebt losgelaten.
- Page 91 WERKING De indicatielampjes op de lader geven de laadstatus aan: Symbool Controlelampjes Status Rood, Laden onderbroken, zie knipperend onderstaande instructies. Aangesloten op voeding (Stand- Rood, continu Groen, knippert Laden Groen, continu Volledig geladen De intelligente oplader meet het oplaadniveau van de batterij en laadt de batterij op met de vereiste stroom en spanning, afhankelijk van de temperatuur en spanning van de batterij, zodat de batterij maximaal meegaat.
-
Page 92: Onderhoud
ONDERHOUD WAARSCHUWING Schakel het product altijd uit, verwijder de isolatiesleutel en de batterij en laat het product afkoelen voordat u inspectie-, onderhouds- of reinigingswerkzaamheden uitvoert. WAARSCHUWING Als een onderdeel versleten of beschadigd is, gebruik dan de reserveonderdelen die door de fabrikant worden aanbevolen. - Page 93 ONDERHOUD reservemessen. Zorg ervoor dat alle drie de messen en schroeven tegelijkertijd vervangen worden om het maaisysteem in balans te houden. Ga naar www.cleva-europe.com om te zien waar je extra messen kunt kopen. De messen vervangen : ■ Druk op de STOP-knop en laat het blad volledig tot stilstand komen. ■...
- Page 94 ONDERHOUD Onderhoud van batterijen en opladers ■ Houd de batterij en oplader schoon en vrij van vuil. Zorg dat er geen vreemd materiaal in de uitsparing of op de contacten terechtkomt. Veeg ze af met een droge doek. Gebruik geen oplosmiddelen of water en plaats het apparaat niet in vochtige omstandigheden.
-
Page 95: Problemen Oplossen
PROBLEEMOPLOSSING WAARSCHUWING Voer alleen de handelingen uit die in deze instructies worden beschreven! Alle andere inspectie-, onderhouds- en reparatiewerkzaamheden moeten worden uitgevoerd door een gekwalificeerde specialist. Draag geschikte beschermende handschoenen en kleding bij het uitvoeren van deze instructies. Schakel de maaier altijd uit voordat u aanpassingen uitvoert. Ga voor de meest recente informatie over waar u reserveonderdelen kunt kopen naar www.cleva-europe.com. - Page 96 PROBLEEMOPLOSSING PROBLEEM MOGELIJKE OORZAAK OPLOSSING Het gras is te lang. Stel de maaihoogte hoger in. De robotmaaier start De batterij is defect. Vervang de batterij. niet. Neem contact op met de dienst na Defecte START/ON-knop. verkoop. Controleer of de stoepranden/ barrières correct zijn geplaatst om Er worden onjuiste barrières het werkgebied af te bakenen.
- Page 97 PROBLEEMOPLOSSING PROBLEEM MOGELIJKE OORZAAK OPLOSSING Pas de randen/beschermingen aan om het maaigebied te verkleinen. Het werkgebied is te groot. Laad de accu op om het gebied twee keer te maaien of koop een extra accu om het maaigebied te vergroten. Vervang alle messen en schroeven.
- Page 98 PROBLEEMOPLOSSING PROBLEEM MOGELIJKE OORZAAK OPLOSSING Verwijder en vervang de isolatiesleutel. Verwijder eventuele obstakels. Controleer of het gras te De obstructiesensor ging binnen hoog is. Maai het gras indien nodig een minuut 10 keer af. tot minder dan 60 mm met een conventionele maaier.
- Page 99 PROBLEEMOPLOSSING PROBLEEM MOGELIJKE OORZAAK OPLOSSING Laat de machine afkoelen tot de normale temperatuur. Start de maaier De accutemperatuur is vervolgens opnieuw. Neem contact abnormaal. op met de klantenservice als het probleem aanhoudt. De batterij-indicator knippert rood. Verwijder de isolatiesleutel en Storing in de elektrische kern (de plaats deze terug.
- Page 100 TECHNISCHE GEGEVENS AFMETINGEN Lengte 42.5 cm Breedte 35 cm Hoogte 22 cm Gewicht (zonder 4.0Ah batterij) 6.1 kg TONTE Spanning 24 V Onbelaste snelheid 3500 /min Snijsysteem 3 draaibare snijmessen Snijbreedte 15.5 cm Aanpassing maaihoogte 20-60 mm (5 posities) Energieverbruik tijdens snijden 40 W±20 % Maximale helling van het maaigebied Aanbevolen werkcapaciteit met één batterij...
-
Page 101: Technische Gegevens
TECHNISCHE GEGEVENS GELUIDSEMISSIES GEMETEN IN DE OMGEVING ALS GELUIDSVERMOGEN Gemeten geluidsvermogensniveau (L 64 dB(A) Onzekerheden over geluidsemissies K 3 dB(A) Gegarandeerd geluidsvermogensniveau (L 68 dB(A) Geluidsdrukniveau (L ) bij het oor van de operator 57 dB(A) De geluidsemissieverklaringen voldoen aan de norm EN 50636-2-107:2015. Omgevingsgeluid wordt gemeten als geluidsvermogen (L ) in overeenstemming met de Europese richtlijn 2000/14/EG. - Page 105 Fig. 7 Fig. 8 Fig. 9 Fig.10 35 cm Max. 35% slope 100 cm Fig.11 Fig.12...
- Page 106 Ⅰ Ⅱ Fig.13 Fig.14 Fig.15 Fig.16 Fig.17 Fig.18 Fig.19 Fig.20 Fig.21 Fig.22...
- Page 108 Imported and distributed by Elem 81 rue de Gozée 6110 Montigny-le Tilleul Belgique 0032 71 29 70 70 www.elemtechnic.com info@eco-repa.com www.eco-repa.com DM15 VBRM15C No.8 Ting Rong Street Suzhou Industrial Park, Suzhou Jiangsu Province, China www.cleva-europe.com...
Need help?
Do you have a question about the DM15 and is the answer not in the manual?
Questions and answers