Advertisement
Table of Contents
- 1 Table of Contents
- 2 Important Warnings
- 3 A few Tips on How to Save Power with Your Refrigerator-Freezer Combo
- 4 Appliance Description
- 5 Installation and Connection
- 6 Changing the Door Opening Direction
- 7 Operating the Appliance
- 8 Freezing Fresh Food and Storing Frozen Food
- 9 Defrosting the Appliance
- 10 Cleaning the Appliance
- 11 Troubleshooting
- 12 Information on Appliance Noise
- Download this manual
Advertisement
Table of Contents

Related Manuals for Gorenje F6181AX


Summary of Contents for Gorenje F6181AX
- Page 1 Instructions for use Upright Freezer...
-
Page 2: Table Of Contents
We thank you for the confi dence you have shown by purchasing our appliance. We wish you a lot of pleasure using the appliance. The appliance is intended solely for household use. The upright freezer is intended for use in households, for freezing fresh food and long-term storage of frozen food (up to one year, depending on the type of food). -
Page 3: Important Warnings
Important warnings BEFORE USING THE APPLIANCE FOR THE FIRST TIME The appliance is manufactured in compliance with the effective safety standards. However, it can be used by children aged from 8 years and above and persons with reduced physical, sensory or mental capabilities or lack of experience and knowledge if they have been given supervision or instruction concerning use of the appliance in a safe way and understand the hazards involved. - Page 4 WARNING! Risk of fi re/fl ammable IMPORTANT SAFETY INSTRUCTIONS materials. The appliance must be connected to the power mains and grounded in compliance with the effective standards and regulations. WARNING! Do not locate multiple portable socket-outlets or portable power supplies at the rear of the appliance. Before cleaning the appliance, unplug it from the power mains (unplug the power cord from the wall outlet).
- Page 5 Danger of frostbite Never put frozen food in your mouth and avoid touching frozen food as this may cause frostnip or frostbite. Safety of children and vulnerable persons The appliance is not intended for use by persons (including children) with reduced physical, sensory or mental capabilities, or lack of experience and knowledge, unless they have been given supervision or instruction concerning use of the appliance by a person responsible for their...
- Page 6 Children shall not play with the appliance. Cleaning and user maintenance shall not be made by children without supervision. Children aged from 3 to 8 years are allowed to load and unload refrigerating appliances. Warning regarding the refrigerant The appliance contains a small amount of an environmentally friendly yet fl...
- Page 7 The appliance may not be used outdoors and it may not be exposed to rain. Do not store explosive substances such as aerosol cans with a fl ammable propellant in this appliance. If the appliance will be out of use for an extended period of time, switch it off using the relevant button, and unplug it from the power mains.
- Page 8 ENVIRONMENT PROTECTION Packaging is made of environmentally friendly materials that can be recycled, disposed of, or destroyed without any hazard to the environment. Removing an obsolete appliance To protect the environment, take the obsolete appliance to an authorized home appliance collection centre. Before doing so, do the following: •...
-
Page 9: A Few Tips On How To Save Power With Your Refrigerator-Freezer Combo
A few tips on how to save power with your refrigerator-freezer combo • Observe the installation instructions. • Do not open the appliance door more frequently than necessary. • Occasionally check whether air can circulate freely behind the appliance. • Condenser unit mounted on the appliance back wall must be kept clean at all times (see section “Cleaning the appliance”). -
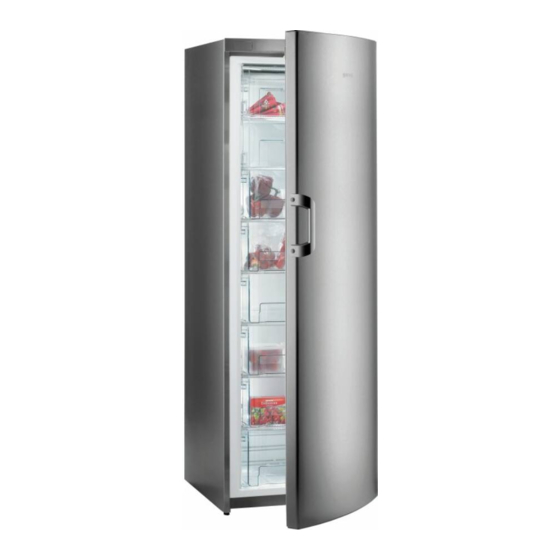
Page 10: Appliance Description
Appliance description TRADITIONAL FREEZER 1 Control panel 7 Defrost drain outlet groove 2 Interior light* 8 Leg support* 3 Freezing compartment 9 Leg 4 Fast freeze for small quantities of food* 10 Wheels* 5 Larger drawer SpaceBox* 11 Cold accumulator* 6 Storage compartment •... - Page 11 NO FROST FREEZER 1 Control unit 2 Interior illumination* 3 NO FROST freezing unit (cooler, fan ...)* 4 Freezing and storage area 5 Large space - SpaceBox drawer* 6 Leg support* 7 Leg 8 Wheel* • Interior accessories of the appliance may vary according to the model. •...
-
Page 12: Installation And Connection
Installation and connection Selecting the room • The appliance should be installed in a dry and well ventilated room. The appliance will operate correctly if the environment temperature is within the ranges listed in the table below. The appliance class is indicated on the label with the basic information on the appliance. - Page 13 Note: When placing the appliances side by side, the anti-dew (anti-condensation) set has to be purchased and installed. Code for ordering the set: 151046 Connecting the • Use the power cord to connect the appliance to the power appliance mains. The wall outlet should be fi tted with a ground contact (safety socket).
-
Page 14: Changing The Door Opening Direction
Changing the door opening direction Tools required: ring spanner (box-end wrench) No. 8, screwdriver, torx25, fl athead screwdriver 1. Use the fl at-bladed screwdriver to remove the covers A and B1. 2. Remove, starting from the top and working your way down: hinge (C), door (D), and hinge (E1). Make sure the door is not damaged. - Page 15 Version I + II 4. VERSION I: Door (D): move the hinge (J) to the opposite side. Remove the door retainer (K1) with the support (L) and attach a symmetric retainer (K2) supplied in the bag along with the support (L), on the opposite side. VERSION II: Door (D): undo the screw of the door cover (M) and remove it, including the cover (N).
- Page 16 Version III Required tools: socket spanner nr. 8, screwdriver, torx 25 Caution! After unscrewing of before fi xing hinges, hold the door to prevent it from falling and damaging. 1. Remove upper hinge cover (keep it for eventual later use), together with cover on the opposite side of the upper hinge cover (on the opposite side you will insert the attached cover during the assembly), and remove the cover on the opposite side of the upper part of the door.
-
Page 17: Operating The Appliance
Operating the appliance CONTROL UNIT I no frost CONTROL UNIT II A Temperature setting dial and on/off switch B Signal light: on when appliance is in operation C Freezer sound alarm acknowledgment key D Signal light: fl ashing during freezer alarm E Freezer power boost key F Signal light: on when the freezer power boost is activated G Digital temperature display indicates actual temperature in the appliance from -16°C to -24°C*... - Page 18 Switching the appliance Switch on the appliance by rotating the A dial towards the max on/off sign. Signal light B goes on. To switch off the appliance, align the recessed par of the dial with the sign (there is still current and voltage in the appliance).
- Page 19 Freezer power boost • Use this setting after switching on the appliance for the fi rst time, before cleaning, and when adding larger quantities of food (see “Freezing process”). • Press the E key – signal light F goes on. The function is automatically deactivated after two days.
- Page 20 CONTROL UNIT III CONTROL UNIT IV SUPER A Temperature setting knob, on/off, and freezer power bost D Signal light on/ fl ashing: High temperature alarm...
- Page 21 Turning the appliance on Rotate the thermostat knob A clockwise towards the thicker end of the sign. Control unit III: When the appliance is switched on for the fi rst time, the D signal light will be on. It will go off automatically when the freezer cools down to a temperature that no longer presents danger of food spoilage.
- Page 22 Setting the appliance • Recommended setting for the thermostat knob A is half way temperature between the thinner and the thicker end of the sign. • A change in the environment temperature will affect the temperature in the appliance. The thermostat knob setting should be adjusted accordingly.
-
Page 23: Freezing Fresh Food And Storing Frozen Food
Freezing fresh food and storing frozen food Maximum quantity of fresh food that can be Freezing procedure introduced into the appliance at a time is indicated on the label with basic information on the appliance. If this quantity is exceeded, freezing quality will deteriorate, as will the quality of the already frozen food. - Page 24 It is important that the food is frozen as quickly as possible; therefore, smaller packages should be preferred. Before freezing, the food should be cooled. Avoid contamination of To avoid contamination of food, please respect the following food instructions: • Opening the door for long periods can cause a signifi cant increase of the temperature in the compartments of the appliance.
- Page 25 Icemaker function Remove the cover of the ice mold (only supplied with some models) and fi ll it with cold water or other fl uid suitable for freezing, up to the marking. Close it and place in on the freezer shelf with mold-side down.
-
Page 26: Defrosting The Appliance
Defrosting the appliance Defrosting traditional • The freezer should be defrosted 2 – 3 times a year, or more freezer often if appliance door is opened more frequently. Moving the cold accumulators (only with some models) directly onto the frozen food in the upper freezer compartment may reduce the number of times the freezer needs to be defrosted. -
Page 27: Cleaning The Appliance
Cleaning the appliance Before cleaning, disconnect the appliance from the power mains – rotate the thermostat knob A to the position and unplug the power cord from the wall outlet. • Use a soft cloth to clean all surfaces. Cleaners containing abrasive particles, acids, or solvents, are not appropriate as they will damage the surface. -
Page 28: Troubleshooting
Troubleshooting Problem: Cause or remedy: After connecting to the power • Make sure the wall outlet is powered and that the appliance mains, the appliance does not is plugged in. operate: Cooling system has been • Too high environment temperature. working continuously for a long •... -
Page 29: Information On Appliance Noise
WE RESERVE THE RIGHT TO CHANGES THAT TO NOT AFFECT THE APPLIANCE FUNCTIONALITY. Instructions for use of the appliance can also be found on our website at www.gorenje.com / < http://www.gorenje.com />... - Page 32 ZOS2467 ZOS2461 ZOS2467C ZOS3167 ZOS3161 ZOF2467C ZOF2461C FREEZER BASIC en (01-20)
Need help?
Do you have a question about the F6181AX and is the answer not in the manual?
Questions and answers