
Related Manuals for Nordson EFD 1500 Series


Summary of Contents for Nordson EFD 1500 Series
- Page 1 sales@artisantg.com artisantg.com (217) 352-9330 | Click HERE Find the EFD 1500DV at our website:...
- Page 2 Operating Guide 1500 Series Dispenser 1500XL 1500XL-15 1500XL-CA 1500DV-15 1500D • • • • ® US & Canada: 800-556-3484 In the UK: 0800 585733 In Mexico: 001-800-556-3484 A NORDSON COMPANY Downloaded from www.Manualslib.com manuals search engine...
- Page 3 Introduction The advanced 1500 Series dispensers provide years of trouble-free, productive service. This Operating Guide will help you maximize the usefulness of your new dispenser. Please spend a few minutes to become familiar with the controls and features of your new dispenser. Follow our recommended testing procedures.
-
Page 4: Table Of Contents
Contents Getting Started ................4 Specifications First Steps ..................5 Unpacking the Dispenser & Activating your Ten Year No-fault Warranty Microprocessor Control ............. 6-7 How to Use the Display and Control Pad 1500XL - Setup & Use ..............8 Hookup ......8-9 Setup for Testing .. -
Page 5: Getting Started
Getting Started We have organized this Guide to provide setup and testing proce- Specifications dures for the 1500 Series dispensers. Input Voltage: Selectable If you have the 1500XL, 1500XL-15 or 1500XL-CA, first review 100/120/220 VAC pages 8 - 11 which illustrate how to hook up the dispenser and what 50/60Hz 1500XL the controls do. -
Page 6: First Steps
First Steps First: Unpack and use the checklist enclosed with the Dispenser Kit to identify all items. If there is any discrepancy, please call us immediately. Second: Power and compressed plant air should be available where the dispenser is to be set up. Air pressure should be between 80 and 100 psi (5.5 and 6.9 bar). -
Page 7: Microprocessor Control
Microprocessor Control Once your dispenser is set up, return to these pages to familiarize yourself with the various functions of the microprocessor controls. Disconnect the male quick-connect on the barrel adapter hose from the dispenser before testing each function to prevent inadvertent fluid dispensing. -
Page 8: How To Use The Display And Control Pad
How to Use the Display and Control Pad To change the displayed time Start by setting the digits at zero. Press the button twice to zero the display. .050 seconds Press the button below each panel to set a specific time. Be sure the decimal is in the correct place for the time you require. - Page 9 Note: For hookup purposes, connections for the 1500XL, 1500XL-15 and 1500XL-CA models are identical. Plant air, 125 psi maximum to regulator. Output from regulator should be a minimum of 80 psi, maximum of 100 psi. Power cord Air input ❶ hose ❹...
-
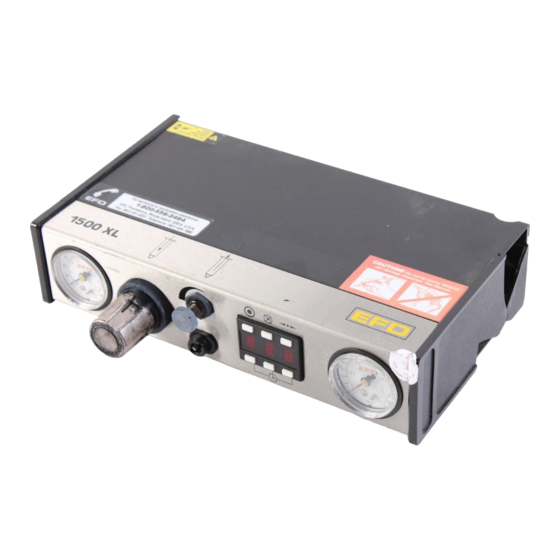
Page 10: Hookup
1500XL -- Hookup ❶ Spare Fuse Connect the air input hose to a plant air source. Set plant air supply within 80 to 100 psi (5.5 to 6.9 bar). Where required, use an EFD five-micron filter regulator #2000F755 (see Warranty). ❷... - Page 11 1500XL CONTROLS & CONNECTIONS Note: The controls for the 1500XL, -15 and -CA models are identical. Barrel vacuum control ❻ Air pressure Display and Air gauge regulator control pad Vacuum gauge ❹ ❷ ❼ ❸ Refer to pages 6-7 for detailed instructions.) ❺...
-
Page 12: Setup For Testing
1500XL -- Setup for Testing ❶ Power switch should be off. The amount of material dispensed each cycle depends on the combination of air pressure, time of air pulse, viscosity of material and dispensing tip size. Note: The following steps refer to the 1500XL dispenser. For the 1500XL-15 and 1500XL-CA dispensers, refer to "Making Timed Deposits of Watery-thin Fluids"... - Page 13 Note: For hookup purposes, the connections for the 1500DV and 1500DV-15 models are identical. Plant air, 125 psi maximum to Power cord regulator. Output from regulator ❹ should be a minimum of 80 psi, Check voltage label maximum of 100 psi. on dispenser ❶...
- Page 14 1500DV -- Hookup ❶ Spare Fuse Connect the air input hose to a plant air source. Set plant air supply within 80 to 100 psi (5.5 to 6.9 bar). Where required, use an EFD five-micron filter regulator #2000F755 (see Warranty). ❷...
- Page 15 1500DV CONTROLS & CONNECTIONS Note: The controls for the 1500DV and 1500DV-15 models are identical. Barrel vacuum control ❻ Air pressure Display and Pickup pen Air gauge regulator control pad vacuum control ❹ ❸ ❷ ❼ Refer to pages 6-7 for detailed instructions.) ❺...
-
Page 16: Setup For Testing
1500DV -- Setup for Testing ❶ Power switch should be off. The amount of material dispensed each cycle depends on the combination of air pressure, time of air pulse, viscosity of material and dispensing tip size. Note: The following steps refer to the 1500DV dispenser. For the 1500DV-15 dispenser, refer to "Making Timed Deposits of Watery-thin Fluids"... - Page 17 Plant air, 125 psi maximum to regulator. Output from regulator Power cord should be a minimum of 80 psi, ❹ maximum of 100 psi. Check voltage label on dispenser Air input ❶ hose ❷ ❸ Foot pedal assembly ❺ Adapter assembly 1500D ❻...
- Page 18 1500D -- Hookup ❶ Connect the air input hose to a plant air source. Set plant air Spare Fuse supply within 80 to 100 psi (5.5 to 6.9 bar). Where required, use an EFD five-micron filter regulator #2000F755 (see Warranty). ❷...
- Page 19 1500D CONTROLS & CONNECTIONS Air pressure Display and Air gauge regulator control pad ❹ ❸ ❷ Refer to pages 6-7 for detailed instructions.) ❺ Air output Time set buttons quick-connect Voltage selector and Power Foot pedal fuse cartridge switch receptacle ❶...
-
Page 20: Setup For Testing
1500D -- Setup for Testing ❶ Power switch should be off. The amount of material dispensed each cycle depends on the combination of air pressure, time of air pulse, viscosity of material and dispensing tip size. The first step is to remove the tip cap from the prefilled barrel of blue test material (twist and pull). -
Page 21: Testing The Dispensers
Testing the Dispensers Making Timed Deposits of Medium to Thick Fluids - - - (1500XL, 1500DV and 1500D) (Fig. 1) You are now ready to test the prefilled, nontoxic, blue test fluid. This material is representative of thick, non-leveling fluids like sealants, pastes or greases. -
Page 22: Programming Deposit Size
Green Tip Settings Dot Tests - Use the convenient Dot Test sheet included. Test Pressure Time Dot Size Dot Test with Green Tapered Tip 30 psi First, follow the settings illustrated on the left, and you will get dots about the size shown. Try other times and pressures to see how 20 psi easy it is to get just the dot size you want. -
Page 23: How To Use The Vacuum Control
How to Use the Vacuum Control Making Timed Deposits of Watery-thin Fluids (1500XL, 1500XL-15, 1500XL-CA 1500DV, 1500DV-15) Insert LV ™ Barrier The vacuum control allows low viscosity liquids, even water, to be consistently dispensed without dripping between cycles. The vacuum Remove Air gap orange... - Page 24 If you choose to use the piston, please follow these instructions Three things to remember carefully: If you do not use the piston 1. While holding the barrel upright in one hand, twist on an orange when dispensing thin fluids: tip cap.
- Page 25 Advanced Dispensing System If you dispense thick fluids, several problems may For Thick Fluids occur. First, the repetitive air cycles can bore tunnels through non-leveling fluids, causing spit- ting and inconsistent deposits. Second, thick fluids Air Pressure Air Pressure contain trapped air that leads to drooling and oozing.
- Page 26 If you use low to medium viscosity fluids, the white For Thin Fluids SmoothFlow ™ piston has several advantages. First, vacuum adjustment is much less sensitive. Second, the piston prevents fumes from the fluid being exhausted into the work environment. Third, the piston prevents fluid backflow into the dis- penser if the barrel is inadvertently turned upside down.
-
Page 27: Loading The Barrel Reservoirs
Loading the Barrel Reservoirs Caution: Do not completely fill barrels. The optimum fill is a maxi- mum 2/3 of the barrel capacity and 1/2 of the barrel capacity when using the LV Barrier ™ If the fluid you are dispensing is pourable, take the barrel, twist on a tip cap and pour your fluid in. - Page 28 EFD offers productive alternatives to traditional barrel loading meth- ods. Here are a few suggestions that can help keep your work area clean, save time and reduce the chance of entrapped air in the fluid. 1. You could use the EFD #920BL Barrel Loader. Pack the fluid into the 12 ounce cartridge as shown.
- Page 29 Schematics and Parts 1500XL, 1500XL-15, 1500XL-CA, 1500D Replacement Parts List Models 1500XL, 1500XL-15, 1500XL-CA 1. 2024-160 1/4" OD x .160" ID tubing 2. 2001B Gauge 0 to 15 psi (0 to 1.0 bar) 2001C Gauge 0 to 100 psi (0 to 6.9 bar) 3.
- Page 30 Schematic and Parts 1500DV, 1500DV-15 Replacement Parts List Models 1500DV, 1500DV-15 1. 2024-160 1/4" OD x .160" ID tubing 2. 2001B Gauge 0 to 15 psi (0 to 1.0 bar) 2001C Gauge 0 to 100 psi (0 to 6.9 bar) 3.
-
Page 31: How The 1500 Series Dispensers Work
How the 1500 Series Dispensers Work With the air connected and the power on, here’s what happens when you press the foot pedal. (1) The digital solid-state timer is energized and begins dispense cycle countdown. (2) The timer opens a solenoid and closes the vacuum pressure for all 1500 Series dispensers except the 1500D, allowing preset air pres- sure to flow to the barrel reservoir. - Page 32 ™ ULTRA System Dispensing Components For complete selection and technical details, please refer to EFD Catalog and price list. Barrel adapter assemblies General purpose precision tips ™ All EFD dispensing tips incorporate the unique Molded one-piece, yellow, SnapLok adapter head with ™...
-
Page 33: Ten Year No-Fault Warranty
EFD Ten Year No-fault Warranty All components of EFD 1500 Series dispensers are warranted to the original end user for ten years from date of purchase. Within the period of this warranty, EFD will repair or replace free of charge any defective component, regardless of fault, on return of the part, or the complete dispenser, prepaid to the factory.
Need help?
Do you have a question about the EFD 1500 Series and is the answer not in the manual?
Questions and answers