
Related Manuals for Avision AM30 A Series


Summary of Contents for Avision AM30 A Series
- Page 1 A4 Multi-Function Printer AM30 Series User’s Manual Regulatory model: AM30XX, AM30XXA, AM30XXAF, AM30XXAFP Avision Inc.
- Page 2 Warranty The information contained in this document is subject to change without notice. Avision makes no warranty of any kind with regard to this material, including, but not limited to, the implied warranties of fitness for a particular purpose. Avision shall not be liable for errors contained herein or for incidental or consequential...
-
Page 3: Safety Information
Safety Information When using this equipment, the following safety precautions should always be followed. Safety During Operation In this manual, the following important symbols are used: WARNING: Indicates potentially hazardous situations, which if instructions are not followed, could result in death or serious injury. CAUTION: Indicates a potentially hazardous situation which, if instructions are not followed, may result in minor or moderate injury or damage to property. -
Page 4: Copyrights And Trademarks
Precautions Do not install the equipment near heating or air conditioning units. Do not install the equipment in a humid or dusty place. Place the equipment in a separate area with good ventilation. It is recommended to make good use of recycled paper for copying. ... -
Page 5: Safety Instruction
Safety Instruction This printer is a page printer which is operated by means of a LSU (Laser Scanning Unit) printhead. There is no possibility of danger from the LSU printhead, provided the printer is operated according to the instructions in this manual. Since radiation emitted by the LSU printhead is completely confined within protective housings and external covers, the LSU beams cannot escape from the machine during any phase of user operation. -
Page 6: Federal Communications Commission (Fcc) Compliance Information Statement
Federal Communications Commission (FCC) compliance information statement Part 15 This equipment has been tested and found to comply with the limits for a Class B digital device, pursuant to Part 15 of the FCC Rules. These limits are designed to provide reasonable protection against harmful interference in a residential installation. - Page 7 FCC Caution: Any changes or modifications not expressly approved by the party responsible for compliance could void the user’s authority to operate this equipment. This device is intended only for OEM integrators under the following conditions: 1) The antenna must be installed such that 20 cm is maintained between the antenna and users.
- Page 8 Product Safety Guide Please clearly read all these instructions, and follow all instructions and warnings before installing and using the device. The following indications are used in this document to obviate any chance of accident or damage to you and/or the device. WARNING Indicates potentially hazardous situations, which if instructions are not followed, could result in death or serious injury.
- Page 9 CAUTION: Do not locate the device on rackety or aslope tables. Do not locate the device on unstable surface. The device may fall down and this may result in injury. Do not place heavy objects on the unit. It may cause unbalance and the device may fall ...
- Page 10 Overview Introduction Congratulations on your purchase of Avision’s MFP. This MFP is Avision’s most innovative product which integrates scan, copy, print, email, and fax functions into one unit. The product supports document size up to legal size. In addition, through the network port at the back of the machine, the product is able to work as a network printer.
- Page 11 Printing: When the product is connected to a computer through the USB interface or a network port, it is able to perform 2-Sided printing through a computer on the network. Scan-to-e-mail, USB, FTP or CIFS The product offers an unprecedented document delivery technology, transmitting paper documents electronically over the internet to various destinations including e-mail addresses, the MFP’s memory, an USB flash drive (supports partition type FAT16/FAT32), ftp servers, or someone else’s computer on the network.
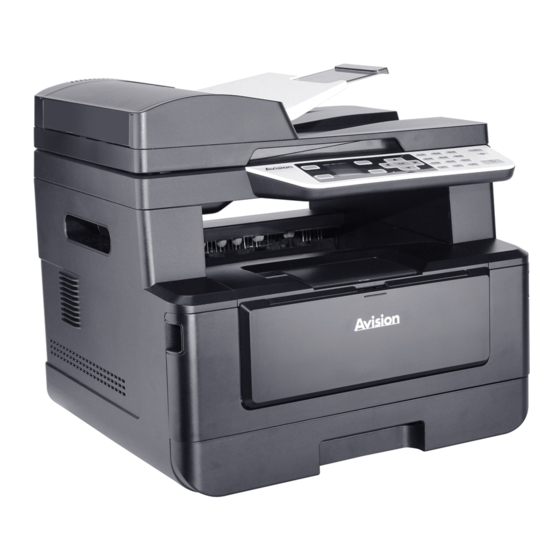
- Page 12 The External View The Front View A MFP with an Auto Document Feeder A Flatbed MFP 6. Handle of the Front Cover 1. Auto Document Feeder 2. Paper Guide 7. USB Port (USB Flash Drive, FAT16/FAT32) 3. Control Panel 8. Handle of the Side Cover 4.
-
Page 13: The Rear View
The Rear View 1. Handle of the Rear Cover 6. Network Port 2. USB Port (Type A, to USB flash Disk ) 7. Power Receptacle 3. Ext (Telephone Set) 8. Handle of the Side Cover 4. Line (Telephone Line) 9. Handle of the Front Cover 5. - Page 14 Package Contents CD-ROM (Including Driver, and User’s Manual) USB Cable Main Unit Power Cord Toner Cartridge...
-
Page 15: Control Panel
Control Panel Part A Part D Part C Part B Part A: Function / Used to choose a working mode. LCD screen Used to display information and provide access to the product’s functions. Menu Used to enter the Menu mode. ... - Page 16 Part D: Start Button & Other Buttons Used to choose the Start button to perform the copy, scan, fax, e-mail, or filing function. Power: Press to turn on the machine. Stop/Cancel: Press to pause a current job. Start: Press to start a copy, scan-to, fax, or other job. LCD Screen and Status Bar Status Bar Function...
- Page 17 Ethernet A green icon indicates connection Mode successful A gray icon indicates no connection of the wired network cable. An Auto IP address has been given to the device since DHCP server is not working. Yet network connection is only limited to Local Area Network (LAN).
-
Page 18: Installing Your Machine
2. Installing Your Machine Precautions Do not install the equipment near heating or air conditioning units. Do not install the equipment in a humid or dusty place. Place the equipment in a separate area with good ventilation. The equipment is equipped with both the power-saving and standby modes. -
Page 19: Removing The Tapes Of The Toner Cartridge
Removing the Tapes of the Toner Cartridge Important! When you unpack the machine, a toner cartridge has been packed separately besides the machine. Please remove the package cushion and tapes on the toner cartridg before using Installing the Toner Cartridge Please follow these steps to install the toner cartridge:... - Page 20 Open the front cover by pulling the handles on both sides as shown. Hold the handle of the drum unit and pull it out as shown. Drum Unit...
- Page 21 Install the toner cartridge to the drum unit. Toner Cartridge Hold the handle of the drum unit and toner cartridge assembly and insert the assembly to its original place. Press down the toner cartridge to fix it into place. Close the front cover.
-
Page 22: Install The Output Bin
Install the Output Bin Lift the output bin up to the stuck position. Output Bin Paper Stopper... -
Page 23: Loading The Main Input Tray
Loading The Main Input Tray To insert paper to the main input tray, Fan your paper first to ensure that the pages do not stick together. Align the edges of the documents by tapping the bottom of the stack against the table top. - Page 24 Press the width guide tab ( ), and then move the width guide ( ) to the correct position for the paper size being loaded. Unlock the length guide, squeeze the length guide tab inward as shown, and ...
- Page 25 To set the length slider back to A4, press the 2 length slider ( ) and then move it to the left ( Load the paper stack with the Printing Side FACE DOWN as illustrated. Insert the tray.
- Page 26 Note: To avoid the chance of miss-fed, make sure the length guide tab and length slider are installed in their proper positions. Make sure the end of your paper slightly touch the length guide as indicated in below. Length Guide Tab Make sure the length slider is installed in the specified location in either ...
- Page 27 Paper sizes and weights used for Main Input Tray Paper capacity 250 pages(70g/m² plain paper) Paper size A4 (210 x 297 mm) A6 (105 x 148 mm) A5 (148 x 210 mm) B6 (125 x 176 mm) B5 (176 x 250 mm) Letter (216 x 279 mm) Legal (216 x 356 mm) Custom Size: 76.2 x 127 mm ~ 216 x 356 mm...
-
Page 28: Loading The Manual Tray
Loading the Manual Tray When you need to print different size paper, you can use the manual tray. Open the manual tray by grasping the handle and pull it down. Manual Tray Pull out the manual tray extension to meet your paper size. - Page 29 Fan your paper first to ensure that the pages do not stick together. Align the edges of the documents by tapping the bottom of the stack against the table top. Rotate the stack 90 degrees and repeat. Load the paper stack with the Printing Side FACE UP as illustrated.
- Page 30 Slide the paper guides so that they slightly touch the paper stack. Paper sizes and weights used for Manual Tray Paper capacity 10 pages(70g/m² plain paper) A4 (210 x 297 mm) Paper size A6 (105 x 148 mm) A5 (148 x 210 mm) B6 (125 x 176mm) B5 (176 x 250 mm) Letter (216 x 279 mm)
-
Page 31: Connecting To A Wired Network
Connecting to a Wired Network Connect one end of your network cable to an available port of your Ethernet Hub Connect the other end to the LAN port at the back of the product as shown. -
Page 32: Connecting Directly To A Telephone Wall Jack
Connecting directly to a Telephone Wall Jack Connect the machine to a telephone line to send fax (available for AM30XXF only). Make sure you have a telephone cord and a telephone wall jack. Connect one end of the telephone cord into the 「LINE」port of the machine. LINE Connect the other end of the telephone cord into an active telephone wall jack. -
Page 33: Connecting To A Telephone
Connecting to a Telephone Connect a telephone to the machine to use the fax line as a normal telephone line if an optional fax modem is included in the machine. Make sure you have the following: A telephone Two telephone cords ... -
Page 34: Connecting To Power
Connecting to Power Connect the small end of the power cable to the power jack of your product. Connect the other end to an appropriate power outlet. -
Page 35: Turning On The Machine
Turning On The Machine To turn on the product, press the Power button on the control panel, the LED light will turn solidly on. To turn off the product, hold and press the Power button for three seconds, the LED light will be off. Note: When the product is not in use, be sure to turn off the product to get a zero power consumption state. -
Page 36: Specifing Your Country
Specifing Your Country When the product is turned on for the first time, the following enquiring will be displayed. Please specify your country to use the optional fax function properly. Country Germany Taiwan China Singapore Malaysia Thailand Use the arrow key to select your country and then press [OK] to complete. Choice: USA, Germany, Taiwan, China, Singapore, Malaysia, Thailand, Indonesia, Korea, and South Africa. - Page 37 Checking the Product’s Default IP Address If the product has been connected to a network through a Ethernet cable, after turning on, an IP address will be automatically given by default through the DHCP server. Follow these steps to check the product’s IP address: To check the product’s IP address, Turn on the product by pressing the Power button.
-
Page 38: Specifying The Product's Date And Time
Specifying the Product’s Date and Time To set the product’s date and time, Refer to the preceding section, Checking the Product’s Default IP Address, to get the product’s IP address from the DHCP server. Open your browser. Type the product’s IP address on the URL field of your browser. For example, 10.1.20.25. -
Page 39: Installing The Scanner/Printer (Windows)
Installing the Scanner/Printer (Windows) System Requirement Windows XP, Windows Server 2003, Windows Vista, Windows 7, Windows 8, Windows For USB Interface Users Please follow these steps to install the scanner, printer, and fax drivers if this machine is connected to your computer via a USB cable. Important! DO NOT connect the USB cable before installing the scanner, printer, and fax drivers. - Page 40 Connect the other end to the USB port of your product. When 「Found New Hardware」screen appears, click Next and follow the on-screen instruction to complete the installation. When the following dialog box appears, click [Yes] if you wish to create a desktop shortcut for the scanning software Capture Tool.
-
Page 41: For Network Interface Users
For Network Interface Users Please follow these steps to install the scanner, printer, and fax drivers if this machine is connected to your computer via a network. Insert the supplied CD into your CD-ROM drive. The installation menu wil be displayed. - Page 42 Host Name Enter the product’s host name to be connected in the blank box of the Host Name option. IP Address Enter the product’s IP address to be connected in the blank box of the IP Address option. Auto Search Searches the product’s printers automatically, and all the product’s host names found in the network will be displayed in the box of the Automatic Search.
-
Page 43: Changing The Product 'S Ip Address In A Wired Network
Changing the Product ’s IP Address in a Wired Network To change the product’s IP address, you need to install the Network Setup Tool. The Network Setup Tool is included in the USB printer driver. After the installation of the USB printer driver is completed, the Network Setup Tool is automatically installed onto your computer. -
Page 44: Setting The Product's Ip Address In A Wireless Network
Check [Obtain an IP address automatically] to obtain the IP address directly from the DHCP server or you may enter your static IP on the [IP Address], [Subnet Mask], and [Gateway] field respectively. If you have assigned a specific IP, enter your domain name server and WINS server as well and then click [Update Setting] to update the IP information to the product. - Page 45 Make sure the product is connected to your computer via a USB cable. Start the Network Setup Tool by choosing the Start button and then select All Programs>AM30XX MFP>Network Setup Tool in succession. The following Network Setup Tool screen will be prompted. AM30 Series Printer On the [General] page, check [Wi-Fi (Station)].
-
Page 46: Uninstalling The Scanner Driver And Printer Driver
Click [Connect] to start connecting the SSID (wireless network name) and then update the IP information to the product. If update is successfully, an [Update Device Successfully] message will be displayed and the Network Setup Tool will be automatically closed. Uninstalling the Scanner Driver and Printer Driver From the 「Start」menu, select 「All Programs」, 「the AM30 Series MFP」, and then 「Uninstall Driver」. - Page 47 The screens in this section are basically from Mac OS 10.11. The screens on your Macintosh will vary depending on your operating system. Follow the procedure to install Avision’s AM30 Series printer driver for Macintosh computer from the CD-ROM supplied with the printer.
- Page 48 Double-click the [Avision AM30…] icon. Click the [Continue] button on the Welcome window. If you wish to change the default installation disk, click [Change Install Location…] or click the [Install] button to continue installing the program. Log in with a password that has admin rights and click the [Install Software] button.
- Page 49 When [Add Printer AM30_Net Successful] message is displayed, click [Exit] to continue. (If wish to add more AM30 printer, enter the IP address again and then click [Add] to continue.) When the [The installation was successful] screen appears, click the [Close] button to close the installation.
- Page 50 Adding a new Printer You may also add a new printer by following these steps: Select the Apple icon in the top-left corner, then click [System Preferences] and then [Print & Scan]. Or click [System Preferences] icon on your dock, and then [Print & Scan].
- Page 51 Click and then [Add Other Printer or Scanner] to add the printer. A dialog appears listing printers on your local network. It may take a minute or two for your printer to appear. Select your printer when it appears in the list. If your printer still doesn’t appear in the list, try adding the printer by its IP address.
- Page 52 A dialog appears listing current printer drivers installed on your computer. Select your printer and click [OK]. Your [Print Using] option will display the printer you have selected. Click the [Add] button to add the printer. Now your printer will be in the list on the upper-left corner as shown in below.
-
Page 53: Specifying The Product's Smtp Server
Specifying the Product’s SMTP Server To use the scan-to-email feature, you must specify the product’s SMTP server. To specify the SMTP server, Refer to the preceding section, Specifying the Product’s Date and Time, to launch the product’s embedded web page. On the product’s web page, choose [Properties] and then choose [Network] on the left side as shown in the following: Network... - Page 54 Note: Please check the SMTP server information with your Network Administrator. Click [Update] to save the setting and exit the page. Note: 1. The login name is case-sensitive and is up to 32 digits or characters. 2. The password is case-sensitive and is up to 16 characters.
-
Page 55: Creating A File Destination On The Network
Creating a File Destination on the Network The product allows you to scan and save the scanned image to a specified destination including FTP and CIFS server on the network, or a USB flash drive. Before sending the image files to FTP or CIFS server on the network, you need to first setup the FTP or CIFS destination through the embedded web page. - Page 56 Item Description Filing Name Enter the name of the destination. (The name will be (Name of displayed in the destination list.) Destination) Protocol Choose type of protocol. Choice: CIFS, FTP Enter the domain name or IP address for the server. For URL (Address) example, domainname.com\foldername or 10.1.23.145\foldername.
-
Page 57: Creating Your Address Book
Creating Your Address Book The product allows you to scan and save the scanned image to your recipients via e-mail or fax. Yet before sending the image files to e-mail or fax, you need to first setup address book through the embedded web page. Please follow these steps to create your address book. -
Page 58: Operation
Operation Loading Paper The product can scan and send document(s) either in the ADF (Automatic Document Feeder) or on the glass. If you need to send multiple pages, please load your papers in the ADF. The ADF can hold up to 35 pages (70 , 20 lbs) at one time. -
Page 59: Loading Your Document In The Adf Paper Tray
Loading Your Document in the ADF Paper Tray Fanning Your Document Note: To avoid occasional multi-feeds or paper jams, please fan your documents and align the top edges before feeding them into the scanner. 1. Hold both ends of the documents and fan them a few times. 2. -
Page 60: Placing Document(S) In The Adf
Placing Document(s) in the ADF Make sure your document is free of staples, paper clips and is not torn out. If you have multiple pages, fan your document(s) to avoid occasional paper jam. Place your document(s) with the text FACE UP in the ADF and make sure that the top of each page feeds in first. -
Page 61: Placing Document(S) On The Glass
Placing Document(s) on the Glass Open the document(s) cover to reveal the glass. Place your document with the text FACE DOWN on the glass and align the document in the upper-left corner. Document Cover Face Down Upper-Left Corner Close the document cover. -
Page 62: Paper Orientation
Paper Orientation Place your A4 or LTR paper vertically on the glass with the text facing down and align it with the A4 or LTR marks. Glass... - Page 63 Copy Place your multi-page document Face Up, Top First in the auto document feeder or place your single-page document Face Down on the document glass. Press the Function / key until the following「Copy」mode is shown in the LCD display. (Copy mode is the default operational mode.) Ready Confirm or change Copy options as desired such as Original, Density, Paper Supply, and Sort.
- Page 64 Collated Collated: Place your copies in 「Sort」order (e.g. page 1,2,3 /1,2,3 /1,2,3). Uncollated: Place your copies in 「Stack」order (e.g. 1,1,1/2,2,2/3,3,3). * The default settings is displayed in italic bold style. Enter your copy count with the numeric keypad. The copy count will be displayed.
-
Page 65: Id Card Copy
ID Card Copy The ID Card Copy function allows you to copy both the front and rear side of your ID card easily and correctly in a second. The Operation Steps: Place one side of your ID card FACE DOWN, align it to the 「ID Card」 mark as indicated below: Press Function /... - Page 66 Mode Choice: *Left/Right, Up/Down, Duplex, Big Card Left/Right – Copy the left and right side of your ID card on one side of a sheet. Up/Down – Copy the front and rear side of your ID card on the upper and bottom half of one side of a sheet.
- Page 67 Important! The ID Card copy feature does not support loading your cards from the auto document feeder.
-
Page 68: Scan To E-Mail
Scan to E-mail The scan function allows you to first scan your documents and then send the scanned image to a specified e-mail address. To send your scanned images to an e-mail address, you need to first set the e-mail settings including the address book through the product’s embedded web page. - Page 69 Density Lighten or darken your image. Choice: 1~7 (default: Resolution Choose the resolution of the scanned image. The higher the value, the more details can be reviewed yet more disk space will be required. Choice: 150/200/300/600 dpi 150 dpi: Suits to be viewed on the screen. 200 dpi: Suits for most business document.
-
Page 70: Scan To Cifs/Ftp
Scan to CIFS/FTP The scan function allows you to first scan your documents and then send the scanned image to a server in the network such as CIFS or FTP servers. To save your scanned images to the network, you need to first set the CIFS or FTP settings through the product’s embedded web page. - Page 71 Choose the resolution of the scanned image. The Resolution higher the value, the more details can be reviewed yet more disk space will be required. Choice: 150/*200/300/600 dpi 150 dpi: Suits to be viewed on the screen. 200 dpi: Suits for most business document. 300 dpi/600 dpi: High quality image helps increase OCR (optical character recognition) accuracy.
-
Page 72: Scan To Usb
Scan to USB The scan function allows you to first scan your documents and then send the scanned image to a USB flash drive inserted to the product. The operating steps: Place your multi-page document Face Up, Top First in the auto document feeder or place your single-page document Face Down on the document glass. - Page 73 Choose the resolution of the scanned image. The Resolution higher the value, the more details can be reviewed yet more disk space will be required. Choice: 150/*200/300/600 dpi 150 dpi: Suits to be viewed on the screen. 200 dpi: Suits for most business document. 300 dpi/600 dpi: High quality image helps increase OCR (optical character recognition) accuracy.
- Page 74 The function which is available for the model of AM30XX allows you to scan your documents and then send the scanned image to your recipient by fax. Before using the fax function, be sure you have connected a telephone line to the machine.
- Page 75 Quality Choice: *Standard, Fine, Super Fine, Photo, Auto Standard Fine Super Fine Photo Auto Density Lighten or darken your image. Choice: 1~7 (default: 4) Trans- Choose if you wish to send the fax later. mission Choice: Off/On Mode Off (no delay send) Delay Send Hook Choose if you wish to use the hook feature –...
-
Page 76: Manually Receiving Or Sending A Fax
Manually Receiving or Sending a Fax The operating steps: Make sure the device is connected to a working telephone line. Press repeatly until (hook on icon) is highlighted. Press until (hook off icon) appears. Enter the fax number via the numeric keypad. When the line is connected and you hear a high-pitched tone, press the 。... -
Page 77: Speak And Then Send A Fax
Speak and then Send a Fax Important! It may be possible that faxes will reach unintended recipients due to the misdialing or incorrect registration of fax/telephone numbers. When you send important documents, it is recommended that you send them after speaking on the telephone. -
Page 78: Using The Optional Scan Module (Csa6) For Id Cards
Using the Optional Scan Module (CSA6) for ID Cards Simply loading your ID card to the scan module (CSA6), the print can be started and in a second the front side and rear side of your ID card are printed in one side of a sheet. Knowing the Scan Module: Card Feeder USB Cable... - Page 79 Installing the Scan Module: 1. Note two reserved holes on the side wall beneath the operational panel and fasten the scanning module with two fixing screws as shown. 2. Connect the USB cable to the USB port on rear side. 3.
- Page 80 Making ID Card Copy: 1. Insert your card FACE OUTWARD to the card feeder and make sure the bottom of card feeding first as illustrated. Card Feeder 2. In a second, the front side and the rear side of your ID card will be copied in one side of a sheet.
-
Page 81: Setting Up And Managing Destinations
4. Setting up and Managing Destinations This section provides procedure for the administrator to setup and manage your destinations including e-mail addresses or network folders to distribute the scanned document on the network. Setting up Your Address Book This section provides procedure for the administrator on how to setup Address Book which includes e-mail address and fax number. -
Page 82: Modifying A Current Member
5. Choose [Add New] to prompt the following page. 6. Enter the name, fax number, and e-mail address for an individual recipient. 7. After completing entering the settings, click「Submit」to finish. The new recipient will be displayed in the e-mail list. This means you have successfully created an address book. -
Page 83: Adding A New Group
Adding a New Group To send multiple recipients simultaneously at one time, you can create groups to speed up the process. Up to 5 members can be included in one group and a total of 10 groups can be created. Follow these steps to create a new group, Repeat Step 1 to Step 4 from the previous section, Adding a New Member. -
Page 84: Deleting A Current Group
Deleting a Current Group To delete a current e-mail group, Repeat Step 1 to Step 4 from the previous section, Adding a New Member. The [Address Book] page appears. Click [Group] and choose the group you want to delete from the list and then choose [Delete] to erase the group. -
Page 85: Deleting A Current One Touch Key
Deleting a Current One Touch Key To delete a current e-mail group, Repeat Step 1 to Step 4 from the previous section, Adding a New Member. The [Address Book] page appears. Click [One Touch] and choose the number you want to delete from the list and then choose [Delete] to erase the one-touch key. -
Page 86: Exporting Current Address Book
Exporting Current Address Book The product allows you to export current address book of this device to another device in a .csv file format. To export current address book, Repeat Step 1 to Step 4 from the previous section, Adding a New Member. The [Address Book] page appears. -
Page 87: Setting Up Your File Destinations
Setting up Your File Destinations The section provides procedure on how to setup your file destinations to send your scanned document to a specified network folder. Adding a New File Destination To create a new file destination, follow these steps: On the product’s web page, choose [Properties] and then choose [FTP/CIFS Setup] on the left side. -
Page 88: Deleting A Current File Destination
Deleting a Current File Destination To delete a current file destination, Repeat Step 1 to Step 2 from the previous section, Adding a New File Destination. The [New File Destination] page appears. Choose the destination you want to delete from the list and then choose [Delete] to erase the destination. -
Page 89: Customizing The Product's Settings
5. Customizing the Product’s Settings This chapter is specifically targeted to the persons who are responsible for the administration of the product. It is recommended that the administrator read this chapter before installing the machine. The product’s settings can be customized via the control panel or the product’s embedded web page. - Page 90 Customize System’s Settings via the Embedded Web Page Note: Any update of the web page requires administrator’s login. You may choose your network connection type through the webpage. Obtain the product’s IP address by pressing the [Menu] key and select [Information]>[IP Address].
- Page 91 Setting Items to be Customized Status (Available only on the webpage) Displays the status and basic information of the product. Item Description Information Display the following basic information of the product. Displays the machine status. Machine Status Host Name Displays the host name. Displays the machine’s series number.
- Page 92 Network (Available only on the LCD Screen) *Factory Default Item Description Choice Network Wi-Fi/ Wi-Fi: Choose to turn on or off Wi-Fi Wi-Fi WPS connection. Choice: Wi-Fi/Wi-Fi WPS Button/Direct Link Button/ Network Filter Turn on Wi-Fi and enter Wi-Fi Station Mode. Please go to the product’s web page to select a wireless network (SSID).
- Page 93 Wi-Fi Connection: Wired LAN: If the device is connected to a wired LAN via an ethernet cable, the Wi-Fi connection will automatically set to to AP mode. A wired LAN and a wireless network can be working at the same time. Wireless Network: If SSID has been connected successfully, the wired LAN ...
- Page 94 Paper Size *A4/LTR/LGL Choose default paper size. Default Media Type Thin/*Plain/Thick/Envelope/L Choose default media type. aser/Bond/Postcard Choose to enable/disable Duplex Print ON/*Off duplex print. Network Wi-Fi/ Wi-Fi WPS Wi-Fi: Choose to turn on Wi-Fi connection. Choice: Wi-Fi/Wi-Fi WPS Mode /Direct Button/Direct Link Link Turn on Wi-Fi and enter...
- Page 95 Management Factory Def. Reset all settings to factory default values. Copy Perform copy calibration. Immediate/ 1 ~ 30 days Calibration (for LCD screen only) Scanner Perform scanner calibration. Immediate/ 1 ~ 30 days Calibration (for webpage only) Choose to reset count for Reset Count ADF Pad/ADF Roller/Tray 1 roller or pad after...
- Page 96 Copy Settings (Available on the LCD Screen and webpage) *Factory Default Item Description Option Copy Mode Select your copy mode to *Text/Photo/Mixed enhance your text or pictures. On/*Off Collate Selecting On sorts documents by the order, (1,2,3 / 1,2,3 / 1,2,3).
- Page 97 ID Card Copy Settings (Available on the LCD Screen and webpage) *Factory Default * This is also the factory default settings if you have installed an optional scan module for ID card (CSA6). If desired, change your CSA6 setting here. Item Description Option...
- Page 98 Scan Settings (Available on the LCD Screen and webpage) *Factory Default Setting Item Description Option B&W/Grayscale/*Color Scan Mode Choose your Color Mode to enhance your text or pictures. Density Lighten or darken an image. 1/2/3/*4/5/6/7 Resolution Choose the resolution of the 150/*200/300/600 dpi scanned image.
- Page 99 Fax Settings (Available for LCD Screen and webpage) (To access the setting, you need to install a fax module and a telephone line first.) *Factory Default Item Description Option Quality Select a document quality. *Standard/Fine/Super Fine/Photo/Auto Density Lighten or darken an image. 1/2/3/*4/5/6/7 Header Sets header information for...
- Page 100 Off/On/*Error TX Report Choose if you wish to print the fax transmission report or print the error report only. *Off/On/Error Protocol Log Print the protocol information. USA/Germany/Taiwan/China/ Country Specify a country name for Singapore/Malaysia/Thailand/ fax. Indonesia/Korea/South Africa *Off/Fax Number/E-mail Forward Tx Sets ON if you wish to forward all incoming faxes or Fax Number:Number/*Local...
- Page 101 FTP/CIFS Setup (Available on the web page) To send your scanned document to a specified network folder, you need to setup your file destination. To create or modify your file destination, please refer to the preceding section, Setting up Your File Destination, on page 64. Address Book (Available on the web page) To send your scanned document to an e-mail address or group, you need to setup your address book.
- Page 102 SMTP Mail Server Enter the IP address of your SMTP server. SMTP Port # Enter the port number of the SMTP server. * 25 Authentication Method Enter the email authentication method. Choice: *None, SMTP, POP3 Login Name Enter the login name for SMTP authentication. Password Enter the password for SMTP authentication.
-
Page 103: Updating The Product's Firmware
Updating The Product’s Firmware Before updating the product’s firmware, you need to first download the latest firmware from our web site at www.avision.com onto your computer. To update the product’s firmware, follow these steps: Refer to the preceding section, Knowing the Product’s Default IP Address, to get the product’s IP address from the DHCP server. -
Page 104: Configuring The Printer Driver
6. Configuring the Printer Driver Displaying the Printer Driver Properties Dialog Box (Windows) To display the Printer Driver Properties dialog box, Click Start on the system tray and choose Printers and Faxes. Right-click the product’s printer name and choose Properties. The product’s Printer Properties dialog box appears. - Page 105 Click Printing Preferences to prompt the following Printing Preferences dialog box.
-
Page 106: Configuring Printer Driver Settings
Configuring Printer Driver Settings The Printing Preferences dialog box consists of the Basic tab, the Paper tab, the Layout tab, the Watermark tab, the Duplex tab, and the More tab. The contents of each tab will be explained in the following sections. The Basic Tab The Basic tab contains settings for Orientation, Copies, Effect, Density, Toner Save, and Invert. - Page 107 Copies Choose the number of copies to be printed. You can enter up to 999. Collated: Click to print your document in the page order such as 1/2/3, 1/2/3, 1/2/3. N to 1: Click to reverse the printing order of your document. As a result, the last page of your document will be printed first and vice versa.
-
Page 108: The Paper Tab
The Paper Tab The Paper tab contains settings for Original Size, Tray, and Media Type. Paper Original Size: Choose the size of paper loaded in the designated tray. Choice: A4, A5, A6, B5, B6, Legal, Letter, User Define Tray: Choose the tray from which your paper should be fed. Choice: Auto, Manual Tray, Main Tray Auto means automatically select the paper tray which is available (priority: 1: manual tray;... - Page 109 The Layout Tab The Layout tab contains settings for N-up, and Output Paper Size. N-up N-up: Choose number of pages to be printed on a single sheet of paper. Choice: Off, 2up(2-in-1), 4-up(4-in-1), 9-up(9-in-1), 16-up(16-in-1) Border: Choose if you wish to add border around each page when printing more than one page on a single sheet of paper.
-
Page 110: Output Paper Size
N-up Choose the style you want when printing multi-page Style: document on a single sheet. Choice: Right, then Down/Down, then Right/Left, then Down/Down, then Left Right, then Down Down, then Left Down, then Right Left, then Down Output Paper Size User Define You can reduce or enlarge your printed image using Scale... -
Page 111: The Watermark Tab
The Watermark Tab The Watermark tab allows you to add some text or image (such as CONFIDENTIAL, IMPORTANT, DRAFT, etc) for your document. First Page only Check to print watermark only on the first page. Clear the check box will print watermark on all pages. - Page 112 Adding a new watermark text To add a new watermark text, Choose Text and then click the Add/New button. The following Watermark dialog box appears. Name Name your watermark text. This name will be shown in the Watermark text list. String Enter your watermark text, such as confidential, important, and so on.
-
Page 113: Editing A Current Watermark Text
Angle Specify the angle of the watermark text from 0° to 360° Size Specify the size of your watermark text from 1 to 288. Shading Specify a relative density for the watermark text. Choice: Lightest, Light, Medium, Dark, Darkest. Click the OK button to save the settings. If the new watermark text is created successfully, the watermark name will be shown in the Text list. - Page 114 Adding a new watermark image To add a new watermark image, Choose Image and then click the Add/New button. The following Watermark dialog box appears. Name Name your watermark image. This name will be shown in the Watermark image list. File Click the Browse button to locate your watermark image.
- Page 115 Editing a current watermark image To edit a current watermark image, Choose the watermark name that you wish to edit from the Image list. Click the Edit button. The Watermark Edit dialog box appears. Change your settings for the selected watermark image and choose OK to complete.
-
Page 116: The Duplex Tab
The Duplex Tab The Duplex tab allows you to print your document on two sides of the paper. Flip Horizontal Check to flip the duplex document on the left edge. Flip Vertical Check to flip the duplex document on the bottom edge. Note: The duplex feature supports only paper size of A4, B5, or letter in the paperweight of 60 ~ 105 g/m... -
Page 117: The More Tab
The More Tab On the More tab, a Wait Timeout option is provided to set the amount of time the MFP waits for data to come from computer during a job. If the data stream pauses for longer than the specified number of seconds, the job is cancelled. Permitted timeout values: 60~1800 seconds, default timeout values: 300 seconds... - Page 118 Accessing the Features of the Printer Driver (Mac OS) The Avision AM30 Series Printer provides the following printer features. You can change the following printer settings when you print from your computer. Choosing Page Setup Options Open your document and then click File, then Page. Make sure XXXX Printer (where XXXX is your model name) is chosen in the Printer pop-up menu.
- Page 119 Cover Page You can make the following cover page settings: AM30 Series Printer Print Cover page: If you want to add a cover page to your document, use this function. Choice: None, Before Document, After document...
- Page 120 Layout AM30 Series Printer Pages per Sheet: Choose number of pages to be printed on a single sheet of paper. Choice: 1, 2 ,4, 6, 9, 16 Layout When you specify the pages per sheet, you can also Direction: specify the direction of the layout.
- Page 121 Short-Edge binding Short-Edge binding (Landscape) (Portrait) Note: The duplex feature supports only page sizes of A4, B5, and letter with paper weight between 60g/m and 105g/m Reverse Page Check Reverse Page Orientation to reverse the data Orientation: from up to down. Flip Horizontally: ...
- Page 122 Paper Handling AM30 Series Printer Collate pages: Your printer can sort multiple copy jobs. For example, if you print two copies of a three-page document and you choose not to collate them, the pages print in this order: 1, 1, 2, 2, 3, 3. If you choose to collate, the pages print in this order: 1, 2, 3, 1, 2, 3.
- Page 123 Printer Features AM30 Series Printer Media Type: Choose the type of media to be used for printing. Choice: Plain Paper, Thin Paper, Thick Paper, Laser Paper, *CardStock, *Bond, *Envelope *: Only available in the manual tray for one-side printing Toner Save: ...
- Page 124 TextEdit AM30 Series Printer Print Header and If you wish to print header and footer, use this Footer: function. Rewarp contents Adjust contents to fit your page. to fit page: Preview AM30 Series Printer Auto Rotate: Check to automatically rotate your image to fit your paper. Scale: ...
-
Page 125: Printing Documents From A Mobile Device
Printing Documents from a Mobile Device By connecting an external USB dongle (Wi-Fi module) to the product and installing the Mopria™ app on your Android mobile device, the product can be converted into a wireless device and your mobile device is able to print emails and documents by simply tapping Print from the menu,. -
Page 126: Connecting A Usb Dongle
Connecting a USB dongle Insert the supplied USB dongle (Wi-Fi Module) to the USB flash port at the back of the product, and then turn on the product. Connecting to a Wireless Network via the Network Setup Tool Before You Begin! Make sure the computer has been connected to the product via the USB cable. - Page 127 Launch the program by clicking the Start>All Programs>Avision AM30 Series MFP>Network Setup Tool. The main window appears. AM30 Series Printer On the [General] page, check [Wi-Fi (Station)]. Click the [Wi-Fi (Station)] tab to prompt the [Wi-Fi (Station)] page. Check [DHCP] to obtain the IP address directly from the DHCP server or you may enter your static IP on the [IP Address], [Subnet Mask], and [Gateway] field respectively.
- Page 128 Click [Connect] to start connecting the SSID (wireless network name) and then update the IP information to the product. If update is successfully, an [Update Device Successfully] message will be displayed and the Network Setup Tool will be automatically closed.
-
Page 129: Printing Your File From A Android Mobile Device
Printing Your File from a Android Mobile Device Make sure that the Mopria Print Service (Print App) has been installed on your Android mobile device. The Mopria Print App can be purchased for free from an application store such as Google Play. Select same wireless network as your printer. - Page 130 Select your printer. Select [AM30 Series at AM30] from the printer list. Open the file which you want to print. Open the file you want to print. Choose [Print] from the menu and select your printer.
-
Page 131: Change The Print Settings
Choose print settings and print. If you do not need to change print options, tap Print to send the print job. If you need to change print options, continue to the next section. Change the Print Settings Mopria Print Service allows you to print web pages, documents, emails, photos, and content from apps that support Android printing. -
Page 132: Changing The Orientation
Changing the Orientation In the print settings menu, tap [Orientation], then select the option you prefer. Portrait or landscape may be options offered depending upon the app or printer. Defining the Page Range In the print settings menu, to print multiple pages, tap [Pages], and then select the page range that you want to print. -
Page 133: Printing Your File From A Ios Mobile Device
Printing Your File from a iOS Mobile Device Turn on your mobile devices such as iPhone or iPad. Tap 「Settings」 and then open Wi-Fi. Select the network same with your printer. Open the picture or the document that you want to print. Tape the Share icon ( ) and then the print icon ( )。... -
Page 134: Using The Product As A Scanner
Before you begin, be sure the scanner is on. 1. Select Start>Programs>Avision xxx Scanner>Avision Capture Tool. The Select Scanner Model dialog box will be displayed. 2. Select your driver type and scanner model and click OK. The following Avision Capture Tool dialog box will be displayed. - Page 135 Actual Page Size Save File Format File Path Scan Setup 3. Choose your desired file format from the File Format drop down list box. (Default is JPEG, other choice includes TIFF, MTIFF, PDF, MPDF, GIF, and BMP.) The supported file formats vary depending on your scanner model. 4.
-
Page 136: Starting A Scan From Other Image Editing Application
9. In the Scan Validation dialog box, click the Scan button ( ) or choose Scan from the File menu. The document will be scanned and displayed in the Scan Validation screen. After the scanned images have been displayed, your scanner installation verification is completed. - Page 137 Pull down the File menu and choose Acquire. A dialog box containing scanning features appears. Select the scanning method you want to use on the Scan Method drop-down menu. Select the mode you want to use for your scans on the Image Type drop-down menu.
-
Page 138: A Glance Of The User Interface
A Glance of the User Interface 1. Scan Method Choice: Flatbed, Simplex/Multi-Page, Duplex/Multi-Page 2. Image Type Choice: Black & White, 8-Bit Gray, 24-Bit Color Choice: 50, 72, 100, 144, 150, 200, 300, 600 (dpi). 3. Resolution 4. Brightness: Adjust the brightness level from –100 to +100. 5. -
Page 139: Using Basic Features
Using Basic Features Choosing Scan Method Choice: Flatbed: Select this setting if you need to scan a single page from the flatbed. *Simplex/Multi-Page, Duplex/Multi-Page—use this setting if you are using the automatic document feeder (ADF) to scan documents at a time. Selecting Proper Image Type Choose B&W if your original contains only B&W text, Black &... -
Page 140: Mirror Function
Note this function only enlarging your preview image. This does not enlarge your real image. Inverting And Selecting Your Image The invert command reverses the brightness and the color in the image. For color images, each pixel will be changed into its complementary color at the command of Invert. -
Page 141: Using Advanced Features
Color Adjustment Adjusts the color quality of the image so that it comes close to the original. This function uses default parameters to adjust the image. After Color Matching Normal Auto Level Automatically adjusts the highlight and shadow areas of the scanned image to optimize your image. - Page 142 Adjusting Highlight/Shadow Levels Highlight refers the lightest point in a scanned image while shadow refers the darkest point. Using Highlight and Shadow tool together allows you to extend the range of color and reveal more details in a gray or color image. 1.
- Page 143 When the value of highlight and shadow change, the image changes accordingly. Highlight: 255/Shadow: 0(Normal) Highlight: 210/Shadow:10 Highlight: 200/Shadow:0 Highlight: 255/Shadow: 50 Adjusting the Brightness Curve Adjusts the midtones of the image without dramatically altering then lightest and the darkest areas. When the curve is moved up or down, the image turns brighter or darker.
- Page 144 Changing Color Hue/Saturation/Lightness Improve your image by changing the level of hue/saturation/lightness. (1). Hue Adjust the hue by moving the triangle to the right or left. (Note the level of intensity for the color will be changed simultaneously when the hue adjustment is made).
- Page 145 Using Color Balance The Color Balance allows you to obtain an optimal image quality. Move the pointer toward Red, the image turns into a reddish hue. Move the pointer toward Green, the image turns into a greenish hue.
- Page 146 Color Drop-out Click the button and a dialog box in below will be displayed. This dialog allows you to remove one of the R (Red), G (Green), or B (Blue) color channel. This function is particularly useful when you need to convert text using OCR software. Note that this function supports only black &...
- Page 147 Custom Settings Click the Custom Settings button to access a dialog box where you can save your scan settings and configuration settings. There are two tabs: Scan Settings and Configuration Settings. Scan Settings The Scan Settings tab allows you to save your scanning feature settings in a file, load an existing file, or delete an existing file.
- Page 148 Configuration Settings The Configuration Settings tab allows you to customize configuration settings. Energy Saving Mode—checks the Enable box to enable energy savings. You can specify a time delay in the Minutes box. Click the Apply button to save the changes. The default setting is 15 minutes. Hint Setting—check the Show Hints box if you wish to show a pop-up menu when your cursor is placed on an item.
- Page 149 Using Other Tools 1. Measuring Unit A reminder of the measuring system in use. By clicking the button, you can change the measuring unit. Choice: Inch, cm, Pixel. 2. Paper Size Provide frequently used scan sizes. Choice: Card 4x2.5 in., Photo 5x3 in., Photo 6x4 in., B5, A5, A4, Letter, and Scanner Maximum.
-
Page 150: Using Pc-Fax
Installing a telephone line, you are able to send files to other fax machines through your computer. Simply open your file, select 「Avision AM30XX Fax」as your printer, and enter the recipient’s fax number through the AM30XX fax properties dialog box. The fax job is done! Yet before using the PC-Fax function, make sure that you have successfully installed the product’s printer driver on your computer. -
Page 151: Accessing The Pc-Fax Properties
Accessing the PC-Fax Properties This PC-Fax Properties dialog box consists of several tabbed window which allows you to customize your fax settings and create your phone book. The General Setting Tab The General Setting tab allows you to choose your output paper size, your desired fax resolution, and your desired density level. -
Page 152: The Address Setting Tab
The Address Setting Tab The Address Setting tab allows you to enter your fax number or select your desired fax numbers from current address book of your Windows system. Fax number: Enter your recipient’s fax number. You may click the Option Settings button to enter more information including company, department, and name of your recipient. -
Page 153: The Sending Options Tab
The Sending Options Tab The Sending Options tab allows you to set more options such as delay fax, or fax message. FAX Delay Transmit: Enter your desired time in 24-hour format to send the delayed fax. Cover Page: Choose Cover Page and then click the Message box. A Message dialog box appears to let you enter your message. -
Page 154: The Sender Information Tab
The Sender Information Tab The Sender Information tab allows you to enter the sender’s information which will be included as cover page. The sender’s information includes company name, department name, recipient’s name, telephone number and fax number. -
Page 155: The Authentication Tab
The Authentication Tab The product allows the administrator to setup the privilege to use the fax function through the embedded web page. If so, an authentication is required in the product’s fax properties dialog box to prevent unauthorized access of the fax function. -
Page 156: Maintaining The Product
10. Maintaining the Product Cleaning The Glass The product is designed to be almost maintenance-free. However, it still needs to be cleaned occasionally to ensure optimum image quality and performance. To clean the glass, Open the document cover as shown below. Dip a soft clean cloth with isopropyl alcohol (95%). -
Page 157: Cleaning The Adf
Cleaning the ADF From time to time the pad assembly and feeding rollers may become contaminated with ink, toner particles or paper dust. In this case the product may not feed documents smoothly. If this occurs please follow the cleaning procedures to return your machine to its original state. -
Page 158: Cleaning The Pad In The Cassette
Cleaning the Pad in the Cassette If the Pad in the Cassette is smeared with paper powder or dirt or every 30K copies, paper may not feed smoothly or noise occurs during paper feeding. Follow the procedure below to clean the Pad in the Cassette. You need to prepare: cotton swab Remove all paper in the cassette. -
Page 159: Cleaning The Drum Unit
Cleaning the Drum Unit If the drum unit is smeared with paper powder or dirt, the print out may appear defective image of regular interval. Follow the procedure below to clean the drum unit. Turn off the power and remove the power cord from the power outlet. Open the front cover by pulling the handles on both sides as shown. - Page 160 Remove the toner cartridge from the drum unit as shown. Drum Unit Toner Cartridge Clean the drum unit with a clean and soft cloth. Clean this area.
-
Page 161: Clearing The Adf Paper Jam
Clearing the ADF Paper Jam In the event of a paper jam in the ADF, follow the procedures below to remove the paper: Gently open the ADF front cover to the left Carefully pull the paper out of the ADF unit Close the ADF front cover. -
Page 162: Replacing The Snap-In Pad Module
Replacing the Snap-in Pad Module After scanning about 20,000 sheets through the ADF, the pad may be worn out and you may experience problems with document feeding. In this case, it is highly recommended to replace the pad module with a new one. For ordering the pad module, please consult your nearest dealer and follow the procedure below to replace it. -
Page 163: Replacing The Toner Cartridge
Replacing The Toner Cartridge The toner cartridge that comes with the product needs to be replaced after printing approximately 3,000 pages. When the toner cartridge is running low, you will be prompted with a [Toner Low] message. Buy a new toner cartridge and have it ready before you receive [Replace Toner] message. - Page 164 Remove the toner cartridge from the drum unit as shown. Drum Unit Toner Cartridge Installing the Toner Cartridge Unpack the new toner cartridge. Remove the protective cover. Tilt the toner cartridge up and down and then right and left 10 times to distribute the toner evenly inside the toner cartridge.
- Page 165 Install the toner cartridge to the drum unit. Drum Unit Toner Cartridge Warning! Be careful not to inhale toner. If toner gets on your clothing or other fabric, wipe off the toner with a dry cloth. Wash the items in cold water and air dry. To avoid print quality problems, DO NOT touch the toner rollers.
- Page 166 Hold the handle of the toner cartridge assembly and insert the toner cartridge assembly to its original place. Press the handle to fix it firmly in place. Note: Do not dispose of the toner cartridge. Put the used toner cartridge into the bundled plastic bag, and then return it to a dealer or service representative.
-
Page 167: Replacing The Drum Unit
Replacing The Drum Unit The drum unit that comes with the product needs to be replaced after printing approximately 12,000 pages. When the drum unit is running low, you will be prompted with a [Drum Low] message. Buy a new toner cartridge and have it ready before you receive [Replace Drum] message. - Page 168 Remove the toner cartridge from the drum unit as shown. Drum Unit Toner Cartridge Installing the Drum Unit Install the toner cartridge to the new drum unit. Hold the handle of the toner cartridge and insert the toner cartridge to its original place.
- Page 169 Close the front cover.
-
Page 170: Troubleshooting
11. Troubleshooting Monitoring Your Printer Using Printer Status Monitor Printer Status Monitor allows you to monitor your printer’s status, get information on consumable parts, and alerts you when printer errors occur. Printer Status Monitor is available when the printer is connected directly to a host computer via the USB port or a network port. -
Page 171: Getting Printer Status Details
Getting Printer Status Details You can monitor printer status and get information on consumable products using the Printer Status Monitor dialog box. a Port Name Port name for the specified printer. b Progress Bar The progress bar to access the latest data of the specified printer. - Page 172 j Consumables Click to show the information of the paper tray and the consumables parts such as Drum, Toner Cartridge. Drum Usage Remain The Consumables window k IP for a Click here to enter the IP for a shared printer to Shared Printer get the printer status.
-
Page 173: Setting Monitoring Preferences
Setting Monitoring Preferences To make specific monitoring settings, click the Setting tab on the Printer Status Monitor window. Displays the language of the window. Language Status Alert Define the interval to refresh the printer Update Time error status. Choice: 1, 5, 10 (minute), Custom (1 ~ 1400 minute) Display in Pop-up Window Check the [Pop-up Window] box to... -
Page 174: Clearing A Warning Or Error Message
Clearing A Warning or Error Message If a problem occurs during operation, a warning or error message and QR code will display on the LCD panel. In addition, the Error LED will be flashing or solidly lit to indicate a warning or an error status. To solve the problem, please follow the on-screen instruction and the following table for more detailed information or use your mobile phone to scan and view the troubleshooting video. -
Page 175: System Error
Error Message Possible Causes or Solution Error Message and Codes System error Restart MFP. If this error persists, call service Service code: 100111 personnel for help. An unexpected error from scanner parts occurs. Scan module error (000113) Restart MFP or call service to replace scanner Restart MFP or call service. - Page 176 The rear cover has to be opened when bond, Please open rear cover (200002). card, or transparency is selected as media type. Please load paper in manual tray Paper empty in the manual tray. (200080). Please check tray 1 and press OK Pick up error.
- Page 177 The Custom Zoom feature does not support Custom zoom not support N in 1 N in 1 (2 in 1 or 4 in 1). Paper Jam ADF paper jam (002013). 1. Open ADF cover and clear paper. 2. Close ADF cover. Paper jam (200301).
- Page 178 Locations of the Jammed Paper Front Cover: Open the front cover by Rear Cover: Open the rear cover by pulling the handles of the front cover on pulling the handle of the rear cover as both sides as illustrated. shown. Duplex tray: Pull the duplex tray Manual tray: Open the manual tray by beneath the rear cover out of the main...
- Page 179 Fuser: The area around the fuser is hot. To avoid a burn injury, be careful not to touch the fuser until it cools down and follow these steps to remove the jammed paper: 1. Open the Front Cover and the 2.
- Page 180 Sending to FTP/CIFS Errors Invalid login name or Please check your login name or password on the password. product’s web page. Connection failed. Connection fails during scan to FTP/CIFS. Unable to connect to Check network environment or tray again later. server.
- Page 181 Possible Causes or Solution Error Message and Codes System error Restart MFP. If this error persists, call service personnel for Error (Number). help. 300100 Printer API_NVRAM_RW_TEST_FAIL 300101 Printer API_NVRAM_WRITE_FAIL 300102 Printer API_NVRAM_READ_FAIL 300200 Printer Flash Error 300201 Printer FLASH_BLOCK_ERASE_FAILED 300202 Printer FLASH_CHIP_ERASE_FAILED 300203 Printer FLASH_PROGRAM_FAILED...
- Page 182 Image Problem Troubleshooting Problem Image Example Solution Use paper of standard weight: If you are using thin paper, try to use paper of standard weight (80 Use paper with less moisture: Load Paper curls the paper to the paper tray immediately after removing them from the packaging.
- Page 183 Image Problem Troubleshooting Problem Image Example Solution Dirty background(partial Check if toner is not leaked from page) the toner cartridge. If so, replace the toner cartridge. 1. The paper might not meet the printer’s specifications (for Dirty example, the paper is too thin). background(entire page) 2.
-
Page 184: Technical Support
No. 20, Creation Road I, Science-Based Industrial Park, Hsinchu 300, Taiwan, ROC TEL: +886 (3) 578-2388 FAX: +886 (3) 577-7017 E-MAIL: service@avision.com.tw Web Site: http://www.avision.com.tw US and Canada Area Avision Labs, Inc. 6815 Mowry Ave., Newark CA 94560, USA TEL: +1 (510) 739-2369 FAX: +1 (510) 739-6060 E-MAIL: support@avision-labs.com... -
Page 185: Specifications
12. Specifications All specifications are subject to change without notice. For detailed specifications, please refer to our web site at http://www.avision.com General Regulatory Model AM30xyzzz(x=0~9,A~Z; Number y=1 or 2; zzz=A/D/blank, P/blank, F/blank) Type Functions Copier-Printer-Scanner-E-mail-Fax 300MHz ARM9MP (build in SOC) - Page 186 Opearating Temperature 10°C ~ 32 °C Environment Humidty 15% ~ 80% RH Storing Temperature -40°C ~ 65°C Environment Humidty 10% ~ 90% RH 100~127Vac, 50/60Hz,12A Current consumption Or 220~240Vac, 50/60Hz, 6.5A Toner cartridge lifetime 3,000 prints Drum unit lifetime 12,000 prints Product Lifetime 60,000 prints Copy Functions...
- Page 187 Scaling 25 ~ 400% Duplex print Network print Scan Function Scanner type Flatbed/ADF/CIS type, Color/BW Max scanning size Legal (216 x 356 mm (8.5 x 14 in.) (ADF) Optical resolution 1200 x 1200 dpi Color - 24bit(output)/48bit (input) Gray - 8bit(output)/16bit (input) Scanning bit depth B/W - 1bit File format...
- Page 188 Redial Interval *1 min, 2 min, 3 min Reduction Rx *OFF, ON Phone Book One Touch, Speed Dial, Group Dial, Block Fax Special Fax SFAX Hotkey, Mem. Manage. SFAX Hotkley: Delay Tx, Broadcast, Polling Rx, Secure Tx, Secure Rx, Color Fax Mem.
Need help?
Do you have a question about the AM30 A Series and is the answer not in the manual?
Questions and answers