
Related Manuals for ProHD DT-X53F


Summary of Contents for ProHD DT-X53F
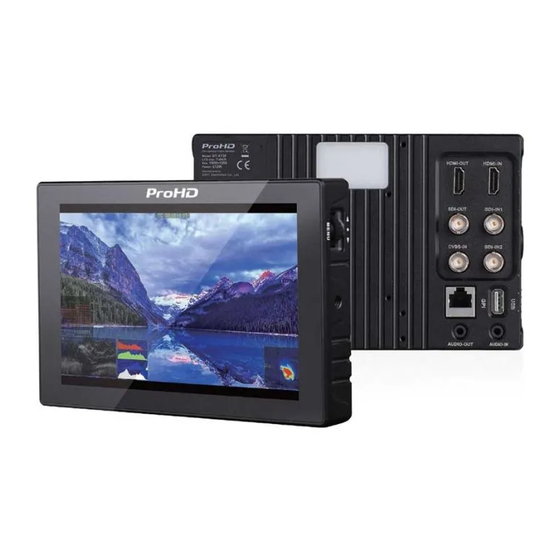
- Page 1 Model: DT-X53F 5.5’’ Full HD Camera-top LCD Monitor User Manual Ver: B Please read this User Manual throughout before using.
-
Page 2: Preface
Preface 1. All internal technologies of this product are protected, including device, software and trademark. Reproduction in whole or in part without written permission is prohibited. 2. All brands and trademarks are protected and other relative trademarks in this user manual are the property of their respective owners. -
Page 3: Maintenance
Maintenance Warning 1. In order to reduce the risk of fire and electrical shock, do not lay this product in rain or damp places. 2. Please keep away from the strong magnetic field; it may cause the noise of the video and audio signals. -
Page 4: Table Of Contents
Contents Preface .................................. 2 Maintenance ................................. 3 Contents ................................4 Packing list ................................4 Operation Instructions ............................6 ·OSD ................................7 ·Zoom-in and mapping ..........................8 Main menu................................10 Sub-Menu ................................11 Specification ................................ 18 Trouble-shooting..............................19 Packing list Basic package includes: 1x Foldable sun hood 1x SSL-JVC battery plate 1x D-tap to lockable pole-tap DC cable... - Page 5 Dimension The main body (mm) Sun hood installation ⑴ Take out the sun hood from the flannel bag, see pic1; ⑵ Push out the sun hood as pic2, unfold as pic3; ⑶ Fold the two bottom parts inward as pic3, with the internal magnets attached and fixed as pic4; ⑷...
-
Page 6: Operation Instructions
Operation Instructions ⑴ F1 - F3: User definable function keys User can set F1, F2, F3 keys to corresponding function for quick operation. For details please refer to “Sub Menu - 4.Function key”. When user press and hold the function keys for more than 3 seconds, it will pop-up a definable function list menu, user can rotate and press to select functions. -
Page 7: Osd
·OSD ⑴ Timecode (SDI) Under SDI input, it can display Timecode. If no Timecode information is detected, it will be displayed as “TC: UNLOCKED”. User can set function keys F1 -F3 as “Timecode” to turn on or off this function ⑵... -
Page 8: Zoom-In And Mapping
Zoom-in and mapping Set “Zoom-in” to function keys, and enable zoom-in mode, the OSD displays as above. ⑴ Zoom-in steps operation Scroll the Menu key up and down, to quick adjust zoom-in steps among: 1.2x, 1.5x, 1.8x, 2.0x, 2.4x, 2.6x, 2.8x and 3.0x. The zoom-in indication window is displayed on bottom right of the screen. - Page 9 Introduction of audio and video functions 16-ch embedded audio meters The monitor can display max 16 channels audio meters for SDI embedded audio, and 2 channels meters for HDMI embedded audio. The audio meter is green, and will turn yellow when audio exceeds -20dB, and turn red when audio exceeds -9dB.
-
Page 10: Main Menu
Main menu DT-X53F has OSD to adjust the parameters and settings, for example: Picture, color temp., function keys, etc. 1. Press “MENU” button, the main menu will pop-up from the left top of the screen. The selected main menu highlights in yellow. -
Page 11: Sub-Menu
Sub-Menu (the default values are marked with underline) 1. Exit & Status Displays the current status, the details are as down below: *1 Display the current video signal and format *2 Display the current function keys setup 2. Picture To adjust picture parameters Color Temp To select different color temperature or setup user-defined color parameters * Only “Color Temp”... - Page 12 4. Function key To define the F1 - F3 function keys *1 Function keys F1-F3 can be set as the down below functions: source, Waveform, Display, Color Temp, Time Code, Zebra, Vector, Audio Bar, Histogram, False Color, AFD, H/V Delay, R/G/B/Mono, Marker, Color Bar, UMD, Audio Alarm, Max backlight, Focus Assist, Aspect Ratio, Scan Mode, Zoom Mode, Mute, Freeze Frame, Flip Mode.
- Page 13 6. Marker *1 When “Fit Marker” is “Off”, the size of safety area is benchmarked against the actual display screen, accounting for 80% ~ 95% of actual display screen. When “Fit Marker” is “On”, the size of safety area is benchmarked against the area inside the scales marker, accounting for 80% ~ 95% of the area inside the scales marker.
- Page 14 When the current “Select Channel” is set to “Channel1-8”, the left channel and right channel output can be selected from Channel1 to channel8. When the current “Select Channel” is set to “Channel1-16”, the left channel and right channel output can be selected from Channel1 to channel 16. In audio bar, the left channel information will be in green, and the right channel information will be in red.
- Page 15 SDI has no recognized signal, and HDMI has recognized signal, then the input signal will be HDMI. When set to “No”, update model will not be supported. *3 Logo When powered on, the screen will display ProHD logo.
- Page 16 *4.*5 Update Driver/ Kernel Download latest firmware files in USB disk - root directory. Switch on the monitor, and insert USB disk into the USB socket on rear panel, by a Micro-USB OTG cable. Enter Menu – System – Update Kernel, select YES and the monitor will upgrade automatically, and will restart when upgrade finished.
- Page 17 13. OSD 14. Key Inhibit If the “Key Inhibit” is “On”, there is no response when all the buttons except ” MENU” are pressed.
-
Page 18: Specification
Specification LCD Performance Size 5.5 inch Display area 120.96×68.04 mm Resolution 1920×1080 Color 8 bit Aspect ratio 16:9∕4:3 Brightness 400 cd/m Contrast 1000:1 Viewing angle Horizontal∕Vertical: 160°∕160° Input∕Output HDMI×1 HDMI input Input BNC×1 2K/3G/HD/SD-SDI input Micro-USB×1 For firmware upgarde 2K/3G/HD/SD-SDI loop through output BNC×1 or HDMI converted to SDI output Output... -
Page 19: Trouble-Shooting
Trouble-shooting symptom Possible causes Solution Please check if the power is connected, and then The power is not turned on press ”POWER” button to turn on the monitor Unstable power voltage Reconnect to power supply BNC or HDMI cable loose No display Check and correctly connect the contact or not correctly... - Page 20 This model is manufactured by SWIT Electronics Co., Ltd. and distributed, warranted and supported in Europe by JVCKENWOOD Deutschland GmbH To obtain service or for further information, please contact: JVCKENWOOD Deutschland GmbH · Konrad-Adenauer-Allee 1-11 · 61118 Bad Vilbel Telefon: +49 (0) 6101 / 4988 - 0 · Telefax: +49 (0) 6101 / 4988 - 50 www.jvcpro.eu...
Need help?
Do you have a question about the DT-X53F and is the answer not in the manual?
Questions and answers