Advertisement
Quick Links
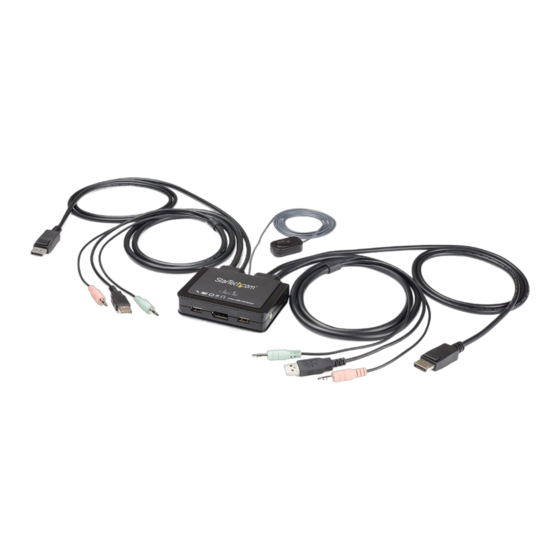
2-Port USB DisplayPort™ Cable KVM Switch w/ Audio and Remote Switch - 4K 60Hz
Product Diagram (SV211DPUA4K)
4
8
1
2
3
5
6
7
Component
1
• Connect a DisplayPort Enabled Computer
DisplayPort Connector
Microphone Audio
• Connect the Microphone Audio to the
2
Connector
• Transmit the signal of a Keyboard and Mouse
3
USB-A Connector
4
• Connect a Microphone
Microphone Audio Port
• Connect the Speaker Audio from the
5
Stereo Audio Connector
• Connect a Keyboard and Mouse
6
USB HID Ports
• (Optional) Connect USB Peripherals
7
DisplayPort Port
• Connect a DisplayPort Display
8
LED Indicators
• Indicates Computer selection and activity
9
• Connect Stereo Speakers
Stereo Audio Port
• A wired button used to switch between
10
Remote Switch
• Press and Release the Remote Switch to
To view manuals, FAQs, videos, drivers, downloads, technical drawings, and more, visit www.startech.com/support.
10
9
6
Function
Computer
from the KVM Switch to the Computer
Computer
Computer 1 and 2
switch between Computer 1 and 2
Requirements
• DisplayPort Enabled Computers x 2
• DisplayPort Display x 1
• USB HID Devices (Keyboard and Mouse) x 2
• (Optional) USB Peripherals x 2
• (Optional) Microphone x 1
• (Optional) Stereo Speakers or Headphones x1
• (Optional) Headset x 1
Note: A Headset may require the use of a Headset Adapter. Check with the
manufacturer of the Headset for more details.
• (Optional) 3.5 mm Audio Cables x 2
For the latest requirements and to view the full User Manual, please visit
www.startech.com/SV211DPUA4K.
Installation
Connect the Computers
1. Connect the built-in Computer 1 DisplayPort Connector to the DisplayPort Port
on Computer 1.
2. Connect the built-in Computer 1 USB-A Connector to the USB-A Port on
Computer 1.
3. (Optional) Connect the built-in Computer 1 Stereo Audio Connector (green) to the
3.5 mm Stereo Audio Port on Computer 1.
4. (Optional) Connect the built-in Computer 1 Microphone Audio Connector (pink)
to the 3.5 mm Microphone Audio Port on Computer 1.
5. Repeat steps 1-4 to install Computer 2.
Connect the Console
1. Connect the USB-A Devices (Keyboard, Mouse, or USB Peripherals) to the USB-A
Ports on the KVM Switch using the built-in Keyboard and Mouse USB Cables or
USB-A Cables (sold separately).
2. (Optional) Connect a 3.5 mm Audio Cable from the Stereo Speakers or
Headphones to the Speaker Audio Port (pink) on the KVM Switch.
3. (Optional) Connect a 3.5 mm Audio Cable from the Microphone to the
Microphone Audio Port (pink) on the KVM Switch.
Quick-Start Guide
Manual Revision: December 9, 2019 12:12 PM
Advertisement

Related Manuals for StarTech.com SV211DPUA4K


Summary of Contents for StarTech.com SV211DPUA4K
- Page 1 Computer 1 and 2 Remote Switch • Press and Release the Remote Switch to switch between Computer 1 and 2 To view manuals, FAQs, videos, drivers, downloads, technical drawings, and more, visit www.startech.com/support. Manual Revision: December 9, 2019 12:12 PM...
- Page 2 StarTech.com. Where they occur these references are for illustrative purposes only U.S.A. NN4 7BW and do not represent an endorsement of a product or service by StarTech.com, or an endorsement of the product(s) to which United Kingdom...
Need help?
Do you have a question about the SV211DPUA4K and is the answer not in the manual?
Questions and answers