Table of Contents
Advertisement
Quick Links
Advertisement
Chapters
Table of Contents

Subscribe to Our Youtube Channel
Related Manuals for Acer Altos easyStore M2


Summary of Contents for Acer Altos easyStore M2
- Page 1 Altos easyStore M2 User Guide...
- Page 2 Copyright © 2009 All Rights Reserved. Altos easyStore M2 User Guide Model Name : Altos easyStore M2 Part Number: Purchase Date: Place of Purchase:...
-
Page 3: Safety Instructions
Information for your safety and comfort Visit http://registration.acer.com and discover the benefits of being an Acer customer. Safety instructions Read these instructions carefully. Keep this document for future reference. Follow all warnings and instructions marked on the product. Turning the product off before cleaning Unplug this product from the wall outlet before cleaning. - Page 4 Warnings • Do not use this product near water. • Do not place this product on an unstable cart, stand or table. If the product falls, it could be seriously damaged. • Slots and openings are provided for ventilation to ensure reliable operation of the product and to protect it from overheating.
- Page 5 • This product's power supply is equipped with a three-wire grounded plug. The plug only fits in a grounded power outlet. Make sure the power outlet is properly grounded before inserting the power supply plug. Do not insert the plug into a non-grounded power outlet. Contact your electrician for details.
-
Page 6: Additional Safety Information
For more information on the Waste from Electrical and Electronics Equipment (WEEE) regulations, visit http://www.acer-group.com/public/Sustainability/sustainability01.htm Mercury advisory For projectors or electronic products containing an LCD/CRT monitor or display: Lamp(s) inside this product contain mercury and must be recycled or disposed of according to local, state or federal laws. - Page 7 Tips and information for comfortable use Computer users may complain of eyestrain and headaches after prolonged use. Users are also at risk of physical injury after long hours of working in front of a computer. Long work periods, bad posture, poor work habits, stress, inadequate working conditions, personal health and other factors greatly increase the risk of physical injury.
- Page 8 viii Eyes • Rest your eyes frequently. • Give your eyes regular breaks by looking away from the monitor and focusing on a distant point. • Blink frequently to keep your eyes from drying out. Display • Keep your display clean. •...
-
Page 9: Fcc Notice
Regulations and safety notices FCC notice This device has been tested and found to comply with the limits for a Class B digital device pursuant to Part 15 of the FCC rules. These limits are designed to provide reasonable protection against harmful interference in a residential installation. - Page 10 Cet appareil numérique de la classe B est conforme a la norme NMB-003 du Canada. Declaration of Conformity for EU countries Hereby, Acer, declares that this PC series is in compliance with the essential requirements and other relevant provisions of Directive 1999/5/EC. Compliant with Russian regulatory certification...
- Page 11 Notice for New Zealand The grant of a Telepermit for any item of terminal equipment indicates only that Telecom has accepted that the item complies with minimum conditions for connection to its network. It indicates no endorsement of the product by Telecom, nor does it provide any sort of warranty. Above all, it provides no assurance that any item will work correctly in all respects with another item of Telepermitted equipment of a different make or model, nor does it imply that any product is compatible with all of...
-
Page 12: Laser Compliance Statement
Laser compliance statement The CD or DVD drive used with this computer is a laser product. The CD or DVD drive's classification label (shown below) is located on the drive. CLASS 1 LASER PRODUCT CAUTION: INVISIBLE LASER RADIATION WHEN OPEN. AVOID EXPOSURE TO BEAM. - Page 13 Radio device regulatory notice Note: Below regulatory information is for models with wireless LAN and/or Bluetooth only. General This product complies with the radio frequency and safety standards of any country or region in which it has been approved for wireless use. Depending on configurations, this product may or may not contain wireless radio devices (such as wireless LAN and/or Bluetooth modules).
-
Page 14: Declaration Of Conformity
The following local Manufacturer/Importer is responsible for this declaration: Product: Model number: Name of responsible party: Address of responsible party: Contact person: Tel: Fax: Server AcerSystem Acer America Corporation 333 West San Carlos St. San Jose, CA 95110 U. S. A. Acer Representative 254-298-4000 254-298-4147... - Page 15 Declaration of Conformity Acer Computer (Shanghai) Limited 8F, 88, Sec.1, Hsin Tai Wu Rd., Hsichih, Taipei Hsien 221, Taiwan Contact Person: Mr. Easy Lai Tel: 886-2-8691-3089 Fax: 886-2-8691-3120 E-mail: easy_lai@acer.com.tw Hereby declare that: Product: Server Trade Name: Acer Model Number:...
- Page 16 EN300 440-2 V1.1.2 (Applicable to non-bluetooth wireless keyboard mouse set) • EN300 328 V1.7.1 • EN301 893 V1.4.1 (Applicable to 5GHz high performance RLAN) Year to begin affixing CE marking 2009. Easy Lai, Manager Regulation Center, Acer Inc. Feb. 9, 2009 Date...
-
Page 17: Table Of Contents
Information for your safety and comfort Safety instructions Additional safety information Disposal instructions Mercury advisory Tips and information for comfortable use Regulations and safety notices FCC notice Laser compliance statement Digital audio output statement Radio device regulatory notice Federal Communications Commission Declaration of Conformity 1 Introduction Features... - Page 18 Dashboard FileSafe Express Quick Status SAN Disk Manager SAN Disk Manager window Menu bar Toolbar Details pane Navigation tree pane Disks Storage Servers Host Applications Events Licenses 4 Managing the storage system Managing users Adding users Modifying users Removing users...
- Page 19 Managing shared folders Creating a shared folder Assigning users to shared folders Expanding shared storage Deleting a shared folder Managing backups Expanding the FileSafe Server backup space Deleting backup spaces Managing iSCSI disks Deleting a client Deleting iSCSI disks Setting up e-mail alerts Upgrading the firmware Connecting an external device Disconnecting an external device...
- Page 20 Backing up files to your storage system Restoring your backup files Deleting backups Viewing backup log report Optimizing FileSafe Express performance 7 Using SAN Disk Manager Starting SAN Disk Manager Adding a storage system Changing the storage system protocol settings Viewing the storage system properties Removing a storage system Creating an iSCSI virtual disk...
- Page 21 Index...
- Page 22 xxii...
-
Page 23: Introduction
1 Introduction Thank you for choosing Altos easyStore M2. The Altos easyStore M2 is an intelligent network storage solution for small and medium-sized offices and home network environments. Featuring an Intel® Atom™ processor, up to 2 GB memory, four-drive hot-swap bay, Gigabit Ethernet, eSATA and five USB ports for... -
Page 24: Features
- Discover storage system in your network subnet - Log on to the storage system - Launch the IPStor Express Manager - Map or unmap drive letters to shared folders 1 By default the Altos easyStore M2 hard disk drives is configured as RAID 5. 1 Introduction... - Page 25 • IPStor Express Manager - Web-based management interface - Secure administration access - Manage users and shared folders - Manage backups - Setup e-mail alerts - Easily upgrade firmware images on the storage system - Safely disconnect USB or eSATA storage devices - Change system settings - Change system and network settings - Reconfigure your storage system’s hard disk drives...
- Page 26 - Reports/alerts - Generates a log file of system activity for determining the cause of abnormal system behavior • SAN Disk Manager - Provides easy access to virtual disks (that is, iSCSI disks on the storage system) - Automatically installed with FileSafe Express - Manage iSCSI disk - Manage the storage system, change protocol settings, view and properties...
-
Page 27: Specifications
Specifications Processor Intel® Atom™ processor 230 Chipset Intel 945GC Express Chipset Drive storage Four 3.5-inch hot-swappable SATA hard disk drives in RAID 5 configuration Max HDD capacity 6 terabyte (TB) RAID Maximum four disks for linear, RAID 0, 1, 5, and 10 Supports one RAID volume Flash ROM 256 MB... - Page 28 Network protocol/ iSCSI service information Network teaming (802.3ad) File sharing CIFS/SMB protocol Network service DHCP client/server Note: Default is DHCP client/Static IP is 192.168.0.101. Client software Storage System Console applications IPStor Express Manager FileSafe Express SAN Disk Manager 1 When an HDD hot-swap event occurs, the overall system will remain in operation. The RAID wizard will inform the administrator of this event or send an e-mail alert if settings are toggled.
-
Page 29: Overview
Overview Front bezel Icon Component Security keylock This lock on the front bezel prevents unauthorized access for maximum security. Power indicator Network indicator Hard disk drive (HDD) access indicator RAID status indicator... -
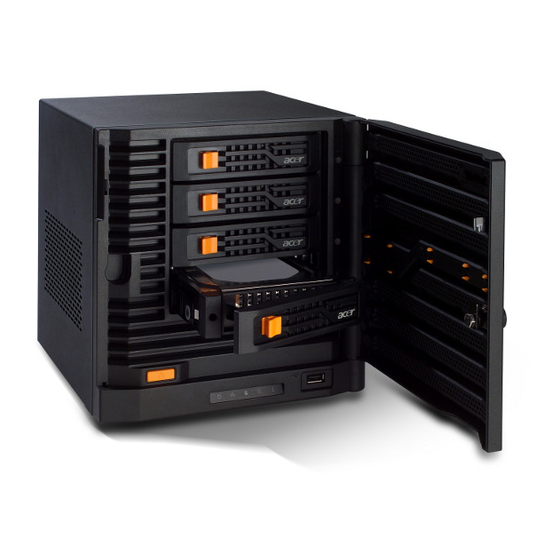
Page 30: Front Panel
Icon Front panel Component Hot-swap HDDs Power button HDD 1 to 4 status indicators Component System status indicator USB 2.0 port Front door Open the door to access the hot-swap HDDs 1 Introduction... -
Page 31: Rear View
Rear view Icon Component Lock slot Keyhole A pair of system keys attached for unlocking the front door. Reset pinhole eSATA port USB ports Gigabit Ethernet port Expansion slot For installing a PCI Express network card. Power connector System fan... -
Page 32: System Led Indicators
System LED indicators Front panel LED indicators The LED indicators mounted on the front panel provide information about the status of the system, its hard disk drives, and network connection. Indicator Color Power Blue Network Blue State Description System is connected to the power supply and turned on and ready for System is not powered on Link between system and network... - Page 33 Indicator Color HDD access Blue RAID status Blue Purple None System Blue status State Description Blink HDD is in use No HDD activity RAID 5 Blink RAID 5 rebuild RAID 1 and RAID 10 Blink RAID 1 and RAID 10 rebuild RAID 0 JBOD Blink...
- Page 34 Indicator Color HDD status Blue (1 to 4) None State Description HDD is mounted into the drive bay or no access. For detailed instructions on how to add a drive into the server storage, see “Adding a hard disk drive” on page 244.
- Page 35 Gigabit Ethernet port LED indicators Indicator Color Speed None indicator Green Amber Link/ Green activity indicator State Description 10 Mbps connection 100 Mbps connection 1000 Mbps connection Network link is detected Random Transmit or receive activity blink No network connection...
- Page 36 1 Introduction...
-
Page 37: Setting Up The System
2 Setting up the system Follow these steps to set up Altos easyStore M2 to run in your home or office network. • Check package contents • Select a location for the storage system • System requirements • Connect the power cord •... -
Page 38: Check Package Contents
Check package contents Check the following items from the package: • Altos easyStore M2 storage system • Power cord • Network cable • Altos easyStore M2 Installation Disc Use this disc to install the following client software applications: • Install the Storage System Console. Refer to “Installing the Storage System”... -
Page 39: Select A Location
Select a location Before unpacking and installing the storage system, select a suitable site for the system for maximum efficiency. Consider the following factors when choosing a site for the system: • Near a grounded power outlet • Clean and dust free •... -
Page 40: System Requirements
System requirements For best results, the computer should meet the following hardware and software requirements. Hardware requirements The client computer should meet the following hardware requirements. • Intel Pentium 4 - 3.5GHz processor or above • Minimum of 512 MB memory, 1 GB memory recommended •... -
Page 41: Ipstor Express Manager
Internet Explorer version 5.5 or above • For Windows 200-series operating systems, Windows Installer 3.0 Notes: The Altos easyStore M2 Software Installation Disc includes 32-bit • and 64-bit executables: - FSE1.0.15-SDM*.*-***-32bit.exe can be installed only on a computer running a 32- bit version of the Windows OS - FSE1.0.15-SDM*.*-***-64bit.exe can be installed only on a a... -
Page 42: San Disk Manager
SAN Disk Manager • Operating system • Windows 2008 32-/64-bit • Windows Vista 32-/64-bit • Windows Server 2003 R2 Enterprise Edition with Service Pack 2 32-/64-bit • Windows XP Professional Edition with Service Pack 2 or newer 32-/64-bit • Windows 2000 Advanced Server with Service Pack 4 32-bit •... -
Page 43: Connect The Power Cord
Connect the power cord Plug the power cord into the power connector and the other end into an electrical outlet. -
Page 44: Connect To The Network
Connect to the network Important: Connect the Altos easyStore M2 storage system to your broadband router with a network cable. Wireless connection to your broadband router is not supported. However, computers that are connected through a wireless connection is supported. -
Page 45: Power On The System
Power on the system After making sure that you have set up the storage system properly and connected all the required cables, you can now power on the storage system. If necessary, unlock the front door. (1) Insert the key into the lock. (2) Turn the key counterclockwise to the unlocked position (3) Open the front door. - Page 46 Press the power button to turn the storage system on. During initial startup, the LEDs on the front panel displays: • Power LED turns to solid blue to indicate system is powered on. • Network LED • HDD access LED drive(s) is in use.
- Page 47 After the storage system finish booting, the system status LED turns to solid blue. You can now proceed with installing the client software. To power down the storage system, press the power button once, the system status LED blinks blue and system will shut down gracefully.
-
Page 48: Install The Client Software
Installing FileSafe Express will automatically install the SAN Disk Manager. Installing the Storage System After setting up your Altos easyStore M2 storage system, you must install the Storage System Console on your computer. To install the Storage System Console: Before you begin installation of the Storage System Console, refer to the Storage System Console system requirements on page 18. - Page 49 (3) Double-click the Storage System Console.exe file. The Welcome window displays. Click Next. The License Agreement window displays.
- Page 50 Select the “I accept the terms of the license agreement” option button, then click Next. The Customer Information window displays. Enter your name and company name, then click Next. The Choose Destination Location window displays. 2 Setting up the system...
- Page 51 Click Next to install the Console in the displayed location or click Change to select or specify a different location, then click Next. Click Install to begin installation.
- Page 52 Once installation is completed, the InstallShield Wizard Complete window displays. Click Finish. If you want to start the Storage System Console immediately after it is installed, select the “Launch Storage System Console” check box before you click Finish. 2 Setting up the system...
-
Page 53: Installing Filesafe Express And San Disk Manager
Installing FileSafe Express and SAN Disk Manager FileSafe Express requires the Intelligent Management Agent (IMA), which is installed automatically if it is not already installed. SAN Disk Manager is also installed automatically when you install FileSafe Express. An iSCSI Initiator is required by SAN Disk Manager to access the storage system. - Page 54 Obtain valid credentials for connecting to the storage system. Only an IPStor Express administrator can provide you with a user name and password. Place the Altos easyStore M2 Software Installation Disc in the optical drive of the computer in the same subnet as your storage system.
- Page 55 Click Run. The FalconStor PrimeVault installation progress window displays. Click Install. After the InstallShield Wizard starts and the Welcome window displays.
- Page 56 Click Next. The License Agreement window appears. Select the “I accept the terms of the license agreement” option button, then click Next. The Choose Destination Location window displays. 2 Setting up the system...
- Page 57 Click Next to install the Console in the displayed location or click Browse to select or specify a different location, then click Next. The Intelligent Management Agent (IMA) is installed automatically during installation of the FileSafe Express. After the IMA is installed, the Setup Status window appears. Once installation is completed, the InstallShield Wizard Complete window displays.
-
Page 58: Start The Storage System Console
Start the Storage System Console After you have installed the Storage System Console, you can use the following procedures to start it. Notes: If the storage system is not directly connected to your computer • and your network does not have a DHCP server, you must change the IP address of your computer to use the same subnet as the storage system. - Page 59 As soon as you start the Storage System Console, it automatically scans the network for storage systems. This might take a few minutes. As soon as the scan is complete, the left pane displays a tree view of all the storage systems it found. Note: If you connect a storage system to the network after the Storage System Console has already scanned it, or if you change the IP address of the storage system, you must click Discover...
-
Page 60: Access The Ipstor Express Manager
Access the IPStor Express Manager You can access the Web-based management interface (the IPStor Express Manager) to add users, create shared folders, and perform other tasks related to managing your storage system. There are two ways to access the IPStor Express Manager: •... - Page 61 To access the IPStor Express Manager using the Storage System Console: Note: The Storage System Console launches a Web browser, so the computer where you install the Storage System Console must have Microsoft Internet Explorer 6.0 or Firefox 3.0 or newer installed as your default browser.
- Page 62 To access the IPStor Express Manager using a Web browser: From any computer in your network, enter the following in the address bar, then press Enter. https://storage_system where storage_system is the name or IP address of the storage system. Note: You can use the storage system name only if your computer is in the same subnet as the storage system, if you added the storage system’s IP address and name to your local hosts file, or if you manually registered the name with a DNS server in your...
-
Page 63: Log In To The Ipstor Express Manager
Log in to the IPStor Express Manager To ensure that your connection to the storage system is secure, the HTTPS protocol is used. Only individuals who know the administrator user name and password can view or change any of the storage system settings. - Page 64 If the security alert page displays, click the “Continue to this website (not recommended)” option. You will be directed to the Advanced: Select Registration Method page displays. Select a registration method. Note: Registration is required the first time you connect to the IPStor Express Manager.
- Page 65 • If an Internet connection is available, select the “Offline Registration” option to save the registration data file to your local disk and e-mail it for registration, then click Apply. The Offline Registration page displays. Follow the steps below to finish offline registration. (1) Click Generate to generate a registration data file.
- Page 66 2 Setting up the system After you finish registration, the Login page displays.
- Page 67 Enter the administrator user name and password, then click LogIn. The IPStor Express Manager Home page appears. The default user name is admin, and the default password is storage. (These are case-sensitive.) Once you have logged in, you can change both the administrator user name and password at any time.
-
Page 68: Getting To Know The Ipstor Express Manager
2 Setting up the system Getting to know the IPStor Express Manager Once you log in to the IPStor Express Manager, the Home page appears. -
Page 69: Navigation Bar
Contact Us Provides information about Acer and the other products and services it offers. Logout Logs you out of the IPStor Express Manager. -
Page 70: Add Users
Add users By default the storage system includes a user named guest that has a password of guest. The guest account is convenient for authorizing temporary access to shared folders without having to add another user. The guest account is automatically enabled and can be disabled by the administrator. - Page 71 To add a user: In the navigation bar, click Users. Click Add. Select the type of user that you want to add, then click Next. The operating system used by the user determines which option you should choose — Windows/Mac OS X user (CIFS) or Linux/ Other Mac user (NFS).
- Page 72 The page that displays next varies, depending on the user type you selected. Enter the requested user information and click Done. For this type Do this of user Windows/ Enter the user name and password for accessing the Mac OS X shared folders.
- Page 73 Repeat steps 2 through 4 until you have added all the users that you want to add at this time. (You can always add more users later.) If you’d like to put Windows/Mac OS X users into groups, refer to “Working with groups”...
-
Page 74: Create Shared Folders
2 Setting up the system Create shared folders By default, the storage system includes a shared folder named public and a shared folder named Home Folders. All Windows and Mac OS X users assigned to the public folder can create, modify, or delete files there (unless you change the list of authorized users or their access rights as described in “Assigning users to shared folders”... - Page 75 To create a shared folder: In the navigation bar, click Shared Folders. Note: The Shared Folders list includes usbdisk1, usbdisk2, usbdisk3, usbdisk4, usbdisk5, and esatadisk1, whether or not any USB or eSATA storage devices have been connected to the storage system.
- Page 76 Specify the disk space to be used for the shared folder and click The Shared Folders screen displays reflecting the new shared folder. For additional information on managing your shared folders, see “Managing shared folders” on page 143. For more information on how to access shared folders, see “Accessing shared folders”...
-
Page 77: System Management Tools
3 System management tools The client software applications used to manage the Altos easyStore M2 storage system include: • Storage System Console • IPStor Express Manager • FileSafe Express • SAN Disk Manager... -
Page 78: Storage System Console
Storage System Console The Storage System Console window includes two panes. The left pane displays a tree view of your storage system and the shared folders associated with it. The right pane displays details about the storage system (such as the IP address of the storage system or the drive letter currently mapped to a shared folder). - Page 79 Toolbar The toolbar gives quick access to basic functions of the Storage System Console. • Discover Storage Systems — Discovers storage system(s) in your network subnet • Log On Storage System Manager — Logs on to the IPStor Express Manager •...
-
Page 80: Ipstor Express Manager
IPStor Express Manager The IPStor Express Manager enables you to perform a number of tasks to help you get the most from your storage system. After logging into the IPStor Express Manager, the Home page displays. The IPStor Express Manager includes a navigation bar that provides access to all of the features of the storage system. -
Page 81: Home
Home The Home page displays information about your storage system, including how the storage space is being used and which users are connected. This page displays two different views: Storage Status and Connection Status. You can switch from one view to the other by clicking the desired button on the Home page. - Page 82 Note: The total storage capacity will be less than the total size of all your HDDs, some of the disk space is needed for the operating system and management software. In addition, the amount of used backup capacity will be greater than the total size of all the disks listed on the Backups page, additional storage space is needed for the data that has changed between backups.
- Page 83 Notes: If anyone accessed a shared folder using the guest user name, • guest displays in the Users column, followed in parentheses by the computer name. Due to the nature of the NFS protocol, Linux, and other Mac • users are not listed on this page. Ongoing backup or recovery activities do not appear on this •...
-
Page 84: Users
Users The Users page allows you to add, modify, or remove users; put users into groups; or change the authentication mode. The left pane of the Users page include the following options for managing users in the storage system. • Users &... - Page 85 Users & Computers The Users & Computers page displays the current authentication mode and a list of all currently configured Windows and Mac OS X users, as well as Linux and other Mac computers. Note: In this user guide, the term “user” refers to both individuals and computers.
- Page 86 If you are using local authentication mode, you can also put Windows and Mac OS X users into groups. This makes it easier to give several users access to the same shared folder at once. For example, in an office environment, you might create one group for all users and give that group read-only access to a shared folder with corporate policies.
- Page 87 Groups The Groups page displays a list of all currently configured groups and allows you to view the current members of the group. This page include options for grouping users to provide access to the same shared folder at the same time. The command options on the Groups page allow you to: •...
-
Page 88: Authentication Mode
Authentication Mode The Authentication Mode page allows you to change the storage system operation mode. Your storage system can operate in one of the two modes: • Local authentication mode In local authentication mode, the storage system authenticates all users who try to connect to the shared folders, and you can add, modify, or remove all types of users (both Windows/Mac OS X and Linux/other Mac users), the storage system uses local authentication mode. - Page 89 Notes: The authentication mode has no effect on backups performed • using FileSafe Express. If you use Active Directory authentication mode, the User must • change password at next logon check box must be cleared in the properties for each user on the Active Directory server who will be accessing shared folders on the storage system.
- Page 90 Advanced User Properties The Advanced User Properties page allows you to enable or disable a home or guest account. The command options on the Advanced User Properties page allow you to: • Enable a home or guest account • Disable a home or guest account 3 System management tools...
- Page 91 iSCSI Users The iSCSI Users page allows you to add, modify, and remove an iSCSI user account. The command options on the iSCSI Users page allow you to: • Add — Create a new iSCSI user account • Edit — Change the iSCSI user account •...
-
Page 92: Shared Folders
Shared Folders The Shared Folders page displays a list of all currently configured shared folders and lets you add shared folders, expand shared folders, change which users can access them, and remove them. This page also allows you to define which users and groups can have access to each shared folder and assign folder quotas The left pane of the Shared Folders page include the following options for managing shared folders in the storage system. - Page 93 Shared Folders The Shared Folders page displays a list of all currently configured shared folders and lets you add shared folders, expand shared folders, change which users can access them, and remove them. This page displays a list of shared resources, along with the size of each folder. By default, the storage system includes a shared folder named public and a shared folder named Home Folders.
- Page 94 You can create additional shared folders and delete them at any time. For both shared folders and external disks, you can change which users can access them and what they can do with the subfolders and files there. To create a shared folder, refer to “Managing shared folders” on page 143.
- Page 95 Shared Assignments The Shared Assignments page displays a list of shared resources and allows you to assign access rights to a shared folder or external disk.
-
Page 96: Shared Quota Management
3 System management tools Shared Quota Management The Shared Quota Management page lets you assign folder quotas. -
Page 97: Backups
Backups The Backups page displays the amount of space allocated for the FileSafe server when you have FileSafe server to backup your computer files. You can use Backups to expand the FileSafe server space and delete backups or a backup client. The left pane of the Backups page include the following options for managing shared folders in the storage system. - Page 98 Filesafe Server Space Use the Filesafe Server Space page to expand the Filesafe server space. Your storage system is divided into three partitions, one for shared folders and one for Filesafe server backups and the other for iSCSI disks. The maximum amount of Filesafe server space is 2 TB while the minimum space requirement is 200 MB.
- Page 99 Filesafe User Cleanup Use the FileSafe User Cleanup page to delete a user’s backup space on the Filesafe server.
-
Page 100: Iscsi
iSCSI The iSCSI page displays a list of iSCSI disks that are currently allocated. You can delete all selected iSCSI disks or delete the client and all iSCSI disks for that client. Once you have used SAN Disk Manager (SDM) to allocate iSCSI disks to the client computer from the storage system, the iSCSI screen displays a list of each allocated computer. -
Page 101: Advanced
Advanced The Advanced page provides access to advanced storage system configuration options, such as setting up e-mail alerts; upgrading the firmware; removing USB devices; changing the system, network, or disk configuration settings; viewing information about the system status or system events; and shutting down the system remotely. The Advanced page allows you to configure the settings for the following categories: •... - Page 102 • System Cleanup • BIOS Update • Shut Down Alerts The Alerts page allows you to specify whether or not you want the storage system to send out an e-mail notification when an error or warning occurs. To take advantage of this feature, you must have access to an SMTP e-mail server, either within your own network, or through an Internet service provider.
- Page 103 Firmware The Firmware page displays the current version of the firmware that is installed on your storage system. It also allows you to upgrade it if a newer firmware becomes available. For additional security, you must enter your administrator password in order to upgrade the firmware.
-
Page 104: External Devices
3 System management tools External Devices The External Devices page displays a list of all external disks that are currently connected to the storage system, including the type of device it is, the manufacturer, and the name. External disks are identified by the names usbdisk1 to usbdisk5 and esatadisk1. - Page 105 System The System page displays the settings that you specified when you initially configured the storage system, such as the storage system name, and the current date and time. You can change basic system settings as well as the password for logging in to the IPStor Express Manager from this page.
- Page 106 Network The Network page displays the network settings that were set when you initially configured the storage system. (Only the first Ethernet port was configured during setup. The second uses its default settings unless you change them here.) You can change these settings at any time.
- Page 107 You can also configure the storage system to act as a DHCP server. In other words, the storage system can assign IP addresses to other computers in your network, simplifying the network configuration of each individual system. Your storage system can act as an FTP server. You can select to enable FTP server in the Network page to allow all Windows and Mac OS X users to use a Web browser to access the public folder.
- Page 108 Disks The Disks page displays information about all the HDDs that are currently installed in your storage system. The Disks page includes the following details: • The disk configuration (that is, whether the HDDs use a linear or RAID configuration, and the RAID level) •...
- Page 109 • The current status of each HDD: • Linear or RAID specified configuration. • New — The HDD has been added to the storage system but is not currently being used. • Spare — The HDD is acting as a spare disk for the RAID. •...
-
Page 110: System Status
CPU and disks, the IP address of the gateway, the IP address(es) of the DNS servers in your network, the network settings of your ports, the MAC addresses of your ports, and the speed at which data is being sent and received. -
Page 111: System Log
System Log The System Log page displays a list of events that have occurred on the storage system. Reviewing this list can help you identify and resolve any problems that you might encounter. This page displays the date and time of the event, the type of event (I for informational, E for error, W for warning, and C for critical), and a brief description of the event. - Page 112 3 System management tools S.M.A.R.T. The Self-Monitoring, Analysis and Reporting Technology (S.M.A.R.T.) page allows you to view the SMART information of each HDD on the storage system.
-
Page 113: System Cleanup
System Cleanup The System Cleanup page allows you to remove the clients and disks that are no longer used. -
Page 114: Bios Update
BIOS Update The BIOS Update page allows you to upgrade the storage system BIOS to it’s latest version. Caution: Updating the BIOS is an inherently dangerous activity that could potentially render your system inoperative. Without the BIOS, the storage system will be unable to boot. Be sure to back up all important files before starting the BIOS update procedure. -
Page 115: Shut Down
Shut Down The Shut Down page allows you to remotely power down the storage system. Note: Shutting down the storage system will prevent user access to shared folders and interrupt backup and recovery activities. -
Page 116: Contact Us
3 System management tools Contact Us In the Contact Us page you will find the services and support information for the storage system. -
Page 117: Logout
Logout Click Logout on the navigation bar to log out of the IPStor Express Manager. -
Page 118: Filesafe Express
3 System management tools FileSafe Express FileSafe Express is a software application that protects your data by backing up files and folders to a remote storage system. Once you select the files and folders that you want to back up, you can configure backups to occur according to a set schedule, continuously every time a selected item is modified, or manually. -
Page 119: Filesafe Express Console
FileSafe Express Console The FileSafe Express Management Console is a tabbed display that allows you to set your backup mode, create a backup list, retrieve backups, set system options, and view backup reports. The FileSafe Express console includes the following tabs: •... -
Page 120: Welcome
The status bar at the bottom of the page is visible from all screens. It tells you if FileSafe Express is connected to the Altos easyStore M2 storage system, displays the user name, and graphically shows the amount of data you and others have backed up relative to the total... -
Page 121: Computer
Computer The Computer page is a Windows Explorer-style browser that lets you quickly review your file system and choose files and folders to include in your backup policy. Each file and folder is preceded by a checkbox - clicking the checkbox adds displays a checkmark and the item is included in the backup list. - Page 122 FileSafe Express uses default global filters to block certain items from any backup automatically: cookies, temporary Internet files, offline Web pages, IIS temporary compressed files, hibernating files, the Windows folder, system volume information files, pagefile.sys, and the Recycle Bin. To change the backup list, you can uncheck folders or files already checked, and check folders or files that you now want to backup.
-
Page 123: Command Buttons
Checkmarks and indicators Icon Description A file or folder with a checkmark is included in backups. A folder shows this checkbox when files in that folder are included in the backup list. An optical (CD or DVD) drive shows this symbol because it cannot be backed up. -
Page 124: Vault
Vault The Vault page is also a Windows Explorer-style browser. This is a remote browser that lets you review backups of all computers that have backups in the storage system repository (the Vault) and select the ones you want to restore. Folders panel Folders panel... - Page 125 Version panel Over time, the repository contains multiple backup versions of each file. To display all backup versions in the Version panel, double-click a backup in the right panel or click its magnifier Delete buttons are now disabled. To restore or delete a file version (also known as pruning), use the buttons in the Version panel.
- Page 126 Backups for other computers When you select a computer in the Folders panel that is not the one you are currently using, the icons for all folders and files in the Backups panel are dimmed, because these items are not present on the computer you are using.
- Page 127 Command buttons The Delete and Restore buttons are available when you select the computer you are currently using. When you select any other computer, only the Restore button is available. When the Version panel is visible, the Delete and Restore buttons are disabled.
-
Page 128: Settings
Settings The Settings page includes two tabs — Schedule and Options. The Schedule tab allows you to specify a backup mode for the FileSafe Express and the Options tab allows you to configure the FileSafe Express settings. Schedule When performing backup you can choose from the following backup modes: •... - Page 129 • Manual — Turns off Continuous or Scheduled backup. To initiate backup, click the Back Up Now button on the Computer screen to back up all selected folders/files. To change the backup mode, click another option and then click Save. After you select a backup mode, but before you click Save, you can click Reset to return to the last saved backup mode.
- Page 130 3 System management tools Use VSS By default, FileSafe Express uses Microsoft VSS to back up open/locked files (such as an Outlook e-mail file) when they are being used. This may cause FileSafe Express to perform more slowly on some systems. If backing up open or locked files is not important to you, you can turn off this option.
-
Page 131: Dashboard
Dashboard The Dashboard page includes three tabs — Status, Reports, Events, and Account. Status The Status tab lets you monitor status of backup jobs. The status display uses progress bars to show how many files have been backed up and how many are waiting overall, as well as the current status, which identifies the document being backed up and its path. - Page 132 Reports The Reports tab lists all backup jobs that have been run, including the following: • Start date and time • Elapsed time from start to finish • Backup mode • Status (Complete, Ongoing, or Waiting) • Number of files in the backup list that were analyzed •...
- Page 133 Events The Events tab in the Dashboard screen keeps track of informational and warning messages.
- Page 134 Account The Account tab displays information about the current user, IP address of the connected storage system, amount of vault space currently used (this matches the Used (Me) value in the Total Space graphic in the status bar), and FileSafe Express version information Connection status If you become disconnected from the storage system (you will see...
-
Page 135: Filesafe Express Quick Status
FileSafe Express Quick Status As soon as you complete FileSafe Express setup, an icon is placed in your system tray to help you easily monitor FileSafe Express status. When you double-click the icon, a FileSafe Express Quick Status window, similar to the one below, is displayed. The Quick Status window shows at a glance what FileSafe Express is doing at the moment, using the same progress bars as the Dashboard. - Page 136 Icon State Backing up Cancelled Error condition Backup paused 3 System management tools Status window message Files are being backed up Backup cancelled An error occurred Backup has been paused...
-
Page 137: San Disk Manager
SAN Disk Manager SAN Disk Manager is a utility that is automatically installed with FileSafe Express. Note: If a previous version of the SAN Client software is currently installed, you must remove it before you install SAN Disk Manager. Using SAN Disk Manager, you can perform a number of different tasks: •... -
Page 138: San Disk Manager Window
3 System management tools SAN Disk Manager window The SAN Disk Manager window has a menu bar, toolbar, navigation tree pane, details pane, and status bar. The navigation tree is in the left pane, and the results, or details, are in the right pane. When you select a node from the navigation tree, information about that node is displayed in the right pane. -
Page 139: Menu Bar
Menu bar The menu bar at the top of the window provides access to several functions that are common to all Microsoft Management Console- based applications, such as exiting the application. • File — This menu includes commands related to Microsoft Management Console (MMC), such as creating, opening, and saving MMC console files, add or remove snap-in console, set MMC console options and exit the application. -
Page 140: Toolbar
Navigation tree pane The left pane contains a navigation or console tree with nodes that you can click, expand, and collapse. The tree contains the following nodes. • Disks • Storage Servers • Host Applications • Events • Licenses 3 System management tools... -
Page 141: Disks
Disks Note: In this guide the term “virtual disks” refers to “iSCSI disks” on the storage system. When you click Disks in the navigation tree, the right pane displays a list of all the virtual disks currently assigned to this client. Note: If virtual disks have been assigned to the client but those disks do not appear in the right pane, you must add the storage system where the disks reside (as described in “Adding a storage... -
Page 142: Storage Servers
Storage Servers Note: In this guide the term “storage servers” refer to “storage system”. When you add a storage system to the list of targets in your iSCSI initiator, information about your storage system is saved on your computer. However, this information is not automatically detected by SAN Disk Manager. -
Page 143: Host Applications
Host Applications When you click Host Applications in the navigation tree, the right pane displays a list of all host applications that use IMA, including FileSafe Express.. For each listed application, the right pane displays the following information: • Name of the application •... -
Page 144: Events
Events All activities performed by IMA are recorded in the Windows event logs. To make it easier to view the events associated with these components, you can access them via SAN Disk Manager. When you expand the Events node in the navigation tree and click IMA Events or Host Application Events, the right pane displays a list of all the events associated with that component. -
Page 145: Licenses
Licenses Most host applications (such as FileSafe Express) provide their own mechanisms for adding, changing, or removing a license. However, for some host applications, you must use SAN Disk Manager to change or remove the license. (You are prompted to add the license during installation.) You must also use SAN Disk Manager to license its own advanced options. - Page 146 3 System management tools To view these same properties on the License Properties dialog box, you can double-click the application. (Alternatively, you can right-click the application and then click Properties.)
-
Page 147: Managing The Storage System
4 Managing the storage system The IPStor Express Manager is a Web-based storage system manager that enables you to perform a number of tasks to help you get the most from your storage system: • Managing users — Add, modify, or remove users; put users into groups;... - Page 148 • Viewing system status information — See details about CPU and memory usage, how long the storage system has been running, disk temperatures, etc. • Viewing the disk S.M.A.R.T. status information — Select the slot number to see the disk SMART status. •...
-
Page 149: Managing Users
Managing users When you click Users in the navigation bar, the Users & Computers page displays. This page displays a list of all currently configured Windows and Mac OS X users, as well as all Linux and other Mac computers. (In this guide, the term “user” refers to both “individuals” and “computers”.) By default, the storage system uses local authentication mode, which means that you can add, modify, or remove all types of users at any... -
Page 150: Adding Users
You might then create separate groups for each department (such as Sales or HR) and give those groups read/write access to shared folders with information specifically for those groups (such as expense reports or company benefits). Each user can be a member of multiple groups. (If you are using Active Directory authentication mode, you cannot create groups using the IPStor Express Manager. - Page 151 Make the desired change and click OK. For this type Do this of user Windows/ Enter the password for accessing the shared folders. Mac OS X (You must enter the password a second time to confirm user (CIFS) it.) Note: If the user name and password specified here are the same as the person’s Windows user name and password, the person will not be prompted to provide a user name and password when accessing the shared...
-
Page 152: Removing Users
Removing users In local authentication mode, you can remove any user except the guest user. In Active Directory authentication mode, you an remove any Linux user or any Mac user not running Mac OS X, but you cannot remove any Windows/Mac OS X user. Those can be removed only on the Active Directory server. -
Page 153: Adding An Iscsi User
Adding an iSCSI user To add an iSCSI user: In the navigation bar, click Users. In the left pane, click iSCSI Users. Click Add. Enter the user name and password for accessing the shared folders. The user name can be up to 15 characters long and can include letters and numbers. -
Page 154: Working With Groups
4 Managing the storage system Working with groups Windows and Mac OS X users can be put into groups, which makes it easier to give several users access to the same shared folder at once. When you click Users in the navigation bar and click Groups in the left pane, the page displays a list of all currently configured groups. -
Page 155: Adding A Group
Adding a group In local authentication mode, when you create a group, you typically specify which users should be members of that group, although you can create an empty group and add users later. (You must add users as described in “Adding users” on page 128 before you can add those users to a group.) Each user can be a member of multiple groups. - Page 156 Changing the group membership In local authentication mode, you can change which users are members of each group at any time. user to a group, that user immediately has access to all the shared folders that the group is authorized to access. However, if you remove a user from a group, the change does not take effect until that user disconnects from the shared folder or shuts down the computer.
- Page 157 Specify which users should belong to this group, then click OK: To do this Add all users to the group Add selected users to the group Remove all users from the group Remove selected users from the group 1 To select multiple, contiguous users, hold down the Shift key and select the first user, then select the last user.
- Page 158 Removing a group In local authentication mode, removing a group does not remove the users that are members of that group; it simply means that the group will no longer appear in the Groups list on the Groups page. The users remain listed on the Users &...
-
Page 159: Using The Everyone Group
Using the Everyone group An Everyone group is created and available by default. It is automatically maintained to contain an updated list of all users on the storage system. By assigning the Everyone group to a shared folder, the administrator can ensure the folder can be accessed through the login credentials of any Altos user. - Page 160 If you are currently using local authentication mode, Active Directory authentication mode is selected automatically. Click Next. In the Primary server IP address text box, enter the IP address of your primary Active Directory server. (You cannot use the server’s name.) If desired, enter the IP address of a secondary Active Directory server in the Secondary server IP address text box.
- Page 161 Note: If the storage system time and Active Directory server time differ by more than five minutes, an error message displays. You must adjust the storage system time, time zone, or both to ensure that they match (as described in “Changing the system settings” on page 165).
- Page 162 Modifying the Active Directory properties If your storage system is currently in Active Directory authentication mode, Active Directory Properties displays in the left pane when you click Users in the navigation bar. Click Active Directory Properties to change the IP address of your primary or secondary Active Directory server, or the user name or password for browsing the Active Directory tree.
-
Page 163: Directory Server
To change this The user name or password for browsing the Active Directory tree Synchronizing the storage system and Active Directory server By default, the storage system obtains information about users and groups from the Active Directory server every 30 minutes. You can modify this setting as described in “Modifying the Active Directory properties”... -
Page 164: Enabling And Disabling An Account
If the clocks of the storage system and the Active Directory server • differ by more than five minutes, errors will occur when the two systems synchronize. You must adjust the storage system time, time zone, or both to ensure that they match (as described in “Changing the system settings”... -
Page 165: Managing Shared Folders
Managing shared folders The Shared Folders page displays a list of shared resources, along with the size of each folder. By default, the storage system includes a shared folder named public and a shared folder named Home Folders. In local authentication mode, all users are automatically assigned to the public folder and can create, modify, or delete files there. -
Page 166: Creating A Shared Folder
Creating a shared folder You can create additional shared folders and delete them at any time. For both shared folders and external disks, you can change which users can access them and what they can do with the subfolders and files there. -
Page 167: Assigning Users To Shared Folders
Assigning users to shared folders For any shared folder or external disk, you can specify which users can access it and what level of access they have. When you add a user to the list of authorized users for a shared folder or external disk, that change takes effect immediately. - Page 168 Select either RO (read only) or RW (read/write) access. You can specify which users can access any shared folder or external disk, as well as setting their level of access. To do this Allow selected users to access to the shared folder or external disk Unassign user access...
-
Page 169: Expanding Shared Storage
Note: If you created groups (as described in “Adding a group” on page 133), you can perform this step with the Group Tab. This tab will display all groups. For example, if you created a group named Group1, and added User2 and User3 to that group and none of them will be assigned access to the shared folder. -
Page 170: Deleting A Shared Folder
Note: Allocated space is approximate. A small amount will be used by the file system. For example, allocating 1 GB might display as 1014 MB on the screen. Click OK. When the confirmation message displays, click OK. Deleting a shared folder Once you create a shared folder, you can remove it at any time. - Page 171 To delete a shared folder: In the navigation bar, click Shared Folders. In the Shared folders list, select the shared folder that you want to delete. Click Remove. When prompted to confirm the deletion, click OK. The shared folder no longer displays in the Shared folders list, and all associated subfolders and files are deleted.
-
Page 172: Managing Backups
Managing backups Once you have used FileSafe Express to back up your computer files to the storage system, the Backups page displays the current amount of space allocated for the FileSafe server, the amount of space used, and the users. This information also displays in the Backups field of the Home page. -
Page 173: Expanding The Filesafe Server Backup Space
Expanding the FileSafe Server backup space To expand the FileSafe Server backup space: In the navigation bar, click Backups. In the left pane, click FileSafe Server Space. The FileSafe Server Space page displays the current amount of space allocated for the FileSafe server and the amount of space used for backup. - Page 174 4 Managing the storage system When you clean up the user data from FileSafe User Cleanup • page, the FileSafe Express which using this user account to login cannot continue backing up data any more. You must re-install the FileSafe Express and login the account again.
-
Page 175: Managing Iscsi Disks
Managing iSCSI disks Once you have used SAN Disk Manager to allocate iSCSI disks to the client computer from the storage system, the iSCSI page displays a list of each allocated computer (Refer to “SAN Disk Manager” on page 115 for more information.) For more information on how to add or create an iSCSI disk refer to page 218. -
Page 176: Deleting A Client
Deleting a client To delete all iSCSI disks for a particular computer, you must delete the client. To delete a client: In the navigation bar, click iSCSI. In the Select column, select the radio button to the left of the computer whose iSCSI disk and computer name you want to delete from the storage system. -
Page 177: Setting Up E-Mail Alerts
Setting up e-mail alerts The Alerts page allows you to set up the storage system to notify up to three people via e-mail if a problem occurs. To take advantage of this feature, you must have access to an SMTP e-mail server, either within your own network or through an Internet service provider. - Page 178 To set up e-mail alerts: In the navigation bar, click Advanced. Select the “Send e-mail notifications” check box. If you clear this option, e-mail notifications will not be sent, and all the related fields on this page appear dimmed. However, if you previously entered information on this page, that information is retained so that you can easily re-enable e-mail notifications later.
- Page 179 For information about changing the network settings, refer to “Changing the network settings” on page 167.
-
Page 180: Upgrading The Firmware
Upgrading the firmware The Firmware page displays the current version of the firmware that is installed on your storage system. It also allows you to upgrade it if newer firmware becomes available. Caution: When you upgrade the firmware, the storage system restarts. - Page 181 To upgrade the firmware: In the navigation bar, click Advanced. In the left pane, click Firmware. In the Firmware file text box, enter the path and file name for the firmware package (such as D:\fs-altos - 2.0-b2026.pkg) or click Browse and select the file from the displayed list. In the Administrator password text box, enter the password that you use for logging in to the IPStor Express Manager.
-
Page 182: Connecting An External Device
Connecting an external device You can connect up to five USB or eSATA external devices to the storage system. When you plug an external device into the storage system, the storage system automatically detects it and adds that device to the External Devices page. External devices are identified by the names usbdisk1, usbdisk2, usbdisk3, usbdisk4, usbdisk5, or esatadisk1. - Page 183 To connect a USB storage device: Connect a USB storage device to any of the USB ports on the storage system. The storage system automatically detects it and adds the device to the External Devices list.
- Page 184 The USB storage device will be identified by the names usbdisk1, usbdisk2, usbdisk3, usbdisk4, or usbdisk5 in the Shared Folders page. If you want to unplug a external device from the storage system, you must first use the IPStor Express Manager to disconnect it. Refer to next section for more information.
-
Page 185: Disconnecting An External Device
Disconnecting an external device The External Devices page displays a list of all external devices (USB or eSATA storage device) that are currently attached to the storage system, including the type of device it is, the manufacturer, and the name. External devices are identified by the names usbdisk1 to usbdisk5 and esatadisk1. - Page 186 To disconnect a USB storage device: In the navigation bar, click Advanced. In the left pane, click External Devices. In the external devices list, select the device(s) that you want to disconnect. Click Disconnect. When the confirmation message displays, click OK. You can now unplug the external device.
-
Page 187: Changing The System Settings
Changing the system settings The System page displays the settings that you specified when you initially configured the storage system, such as the storage system name, and the current date and time. In local authentication mode, you can change any of these settings at any time. - Page 188 Make the desired changes: To change this The storage system name The system date, time, or time zone Network Time Protocol (NTP) server name or IP address The administrator name or password Click Apply. When the confirmation message displays, click OK. 4 Managing the storage system Do this In the Storage system name text box, enter the...
-
Page 189: Changing The Network Settings
Changing the network settings The Network page displays the network settings that were set when you initially configured the storage system. (Only the first Ethernet port was configured during setup. The second uses its default settings unless you change them here.) You can change these settings at any time. - Page 190 Make the desired changes: To change this The workgroup to which the storage system belongs The IP address(es) used by the storage system The IP address of the gateway 4 Managing the storage system Do this In the Workgroup name text box, enter the name of the workgroup.
- Page 191 To change this Do this The DNS server to If your network includes a DNS server, and if the first port on the storage system uses a specified IP address rather than obtaining one from the DHCP server, enter the primary IP address in the Preferred DNS server text boxes and the secondary IP address in the Alternate DNS server text boxes.
- Page 192 To change this The packet size for transferring data The FTP settings The UPnP settings Click Apply. When the confirmation message displays, click OK. Note: If you changed the IP address of the storage system, you must now access the IPStor Express Manager using the new IP address.
-
Page 193: Enabling Link Aggregation
Enabling link aggregation Link aggregation is a computer networking term which describes using multiple network cables or ports in parallel to increase the link speed and redundancy for higher availability. IPStor Express Manager features link aggregation. This option appears when you have installed a PCI Express network card to the storage system and the network cable on the PCI Express network card is connected to an IEEE 802.3ad compliant switch. -
Page 194: Reconfiguring Your Storage System Disks
Reconfiguring your storage system disks The Disks page displays information about all the HDDs that are currently installed in your storage system. To reconfigure the storage system disks: Caution: Changing the disk configuration will delete all user information and all data on all the disks. Before you do this, have all the users disconnect from all shared folders and remove protection from all disks. - Page 195 In the left pane, click Disks. In the Administrator password text box, enter your password for logging in to the IPStor Express Manager. Click Reconfigure Disks. When the confirmation message displays, click OK. The Disk Configuration page displays with various options, depending on the number of HDDs that are currently installed in the system.
- Page 196 Note: You can expand the amount of disk space allocated for shared folders later (as long as free disk space is available), but you cannot reduce it without reconfiguring your disks and losing all your data. If you plan to back up computer disks to your storage system, it is recommended that you use the minimum amount of space for shared folders, back up all the computer disks that you plan to protect, and then expand the space allocated for shared folders.
-
Page 197: Viewing System Status Information
CPU and disks, the IP address of the gateway (which you can change as described in “Changing the network settings” on page 167), the IP address(es) of the DNS servers in your network, the network settings of your ports (several of which you can change as described in “Changing the network settings”... -
Page 198: Viewing The Disk S.m.a.r.t. Status Information
4 Managing the storage system Viewing the disk S.M.A.R.T. status information When you click Advanced in the navigation bar and click S.M.A.R.T. in the left pane, the S.M.A.R.T. monitor system for the storage system’s HDDs launches, allowing you to view the S.M.A.R.T. information of each HDD. -
Page 199: System Cleanup
System Cleanup From the System Cleanup screen, you can remove the clients and disks that are no longer used. To remove a client: In the navigation bar, click System cleanup. Select the client name. Click Delete Client. To remove a disk and free storage space: In the navigation bar, click System cleanup. -
Page 200: Updating The Bios
Updating the BIOS The BIOS page displays the current version of the BIOS that is installed on your storage system. It also allows you to upgrade it if newer BIOS becomes available. For additional security, you must enter your administrator password in order to upgrade the firmware. - Page 201 To upgrade the BIOS: In the navigation bar, click Advanced. In the left pane, click BIOS Update. In the BIOS file text box, enter the path and file name for the BIOS package (such as D:\xxx.flh) or click Browse and select the file from the displayed list.
-
Page 202: Logging Out Of The Ipstor Express Manager
Logging out of the IPStor Express Manager When you have finished using the IPStor Express Manager, it is recommended that you log out to ensure that unauthorized individuals do not make changes to the storage system. To log out: In the navigation bar, click Log Out. When the confirmation message displays, click OK. -
Page 203: Shutting Down The Storage System
Shutting down the storage system To shut down the storage system, you can press the power button on the unit itself, or you can shut the system down remotely using the IPStor Express Manager. To ensure that you don’t shut down the system accidentally, you must enter your administrator password to do this. - Page 204 To shut down the storage system using the IPStor Express Manager: In the navigation bar, click Advanced. In the left pane, click Shut Down. In the Administrator password text box, enter the password for logging in to the IPStor Express Manager. Click Shut Down.
-
Page 205: Working With Shared Folders
5 Working with shared folders Accessing shared folders Once you have added users and created shared folders (as described in “Adding users” on page 128 and “Enabling and disabling an account” on page 28), the users need to perform some simple steps to be able to access those folders. -
Page 206: Windows Users
Windows users If you are using Windows, you have two options for accessing shared folders: • Using My Computer/Windows Explorer to map a drive letter to the shared folder • Using the Storage System Console to map a drive letter to the shared folder. - Page 207 For example, if your storage system’s IP address is 192.168.0.101 and the shared folder name is Photos, you would enter the following: \\192.168.0.101\Photos Note: You can use the storage system name only if your computer is in the same subnet as the storage system, if you added the storage system’s IP address and name to your local hosts file, or if you manually registered the name with a DNS server in your network.
- Page 208 To access a shared folder using the Storage System Console: Start the Storage System Console. Refer to “Start the Storage System Console” on page 36. In the left pane, select the name of the storage system that you want to access (for example, Altos-easyStore). Note: If you connect a storage system to the network after the Storage System Console has already scanned it, or if you change the IP address of the storage system, you must click Discover...
- Page 209 In the left pane, double-click the name of the storage system that contains the shared folders that you want to access. The storage system name expands to display all the available shared folders. Notes: All shared folders appear in the left pane. However, you can •...
-
Page 210: Linux Users
In the left pane, select the shared folder that you want to access, then click Map Drive Letter. The Map Network Drive dialog box displays: The exact appearance of this dialog box varies, depending on your operating system. In the Drive list, select the drive letter that you want to assign to the shared folder. -
Page 211: Mac Users
Mount the desired shared folder by entering the following command: mount storage_system:/nas/NASDisk-00002/folder /my_directory where storage_system is the IP address of the storage system, folder is the name of the shared folder, and my_directory is the name of the directory that you created in step 1. If you included a full path when creating the directory, be sure to include the full path with this command (for example, mount storage_system:/nas/NASDisk-00002/folder /mnt/my_directory). -
Page 212: Operating Systems
as both the user name and password. An icon with the name of the shared folder is created on the desktop. Repeat steps 1 through 4 for each shared folder that you want to access. To access the shared folder, double-click the icon on the desktop. To access a shared folder on a Mac running other Mac operating systems For information about accessing a shared folder using NFS on a Mac... -
Page 213: Shared Quota Management
Shared Quota Management A shared quota management system is available to place manageable restrictions on storage used by users. The administrator can specify the user quota (size unit is MB) when creating a CIFS user and limits how much space is allocated to this new user on every shared folder respectively. -
Page 214: Accessing Shared Folders Using Ftp
Accessing shared folders using FTP If you enabled the storage system to act as an FTP server (as described in “Changing the network settings” on page 167), all Windows and Mac OS X users can use a Web browser to access the public folder. Note: Even if you changed the access rights to the public folder (for example, to prevent a particular user from accessing it altogether or to limit a user to read-only access), all existing... -
Page 215: Disconnecting From Shared Folders
Disconnecting from shared folders If you need to reconfigure the disks in your storage system or shut it down for any reason, all users should disconnect from the shared folders to ensure that the process proceeds smoothly. You might also want to have users disconnect from the shared folders if you want to change their access rights, since otherwise the change will not take effect until the user shuts down the computer. -
Page 216: Linux Users
Linux users To disconnect from a shared folder using Linux: Unmount the desired shared folder by entering the following command: my_directory umount / my_directory where For example, if you mounted the shared folder using the following command: mount 192.168.0.101:/nas/NASDisk-00002/public /my_directory you would unmount it using the following command: umount /my_directory If you included a longer path when mounting the shared folder... -
Page 217: Protecting Local Data Or Files
6 Protecting local data or files Even if most of your data is stored and protected on your storage system, your operating system files, applications, and many other files still reside on each individual computer in your network. If one of those local disks fails, it can take many hours to re-install and reconfigure the operating system and applications on a new or repaired HDD, and some files might be completely lost. -
Page 218: Setting Up Filesafe Express For The First Time
Setting up FileSafe Express for the first time After you have installed the FileSafe Express, follow the procedures below to set up the program. If you have not installed FileSafe Express, refer to “Installing FileSafe Express and SAN Disk Manager” on page During setup, FileSafe Express connects to the selected IPStor Express Storage System and creates a repository. - Page 219 Click the appropriate option: you can either select an IPStor Express Storage System on your network or you can manually enter the IP address, then click Next. Hover on hints to see more information Note: You can move your mouse over the word “Hint”, located in the lower left of the window, to see additional details.
- Page 220 Important: If you do not have a user account, you can create an account for yourself using the IPStor Express Manager. For more information on how to create a user account “Adding users” on page 128. Select the “Encrypt backed up data” option if you want to create a secret phrase that will generate an encryption key to encrypt all of your backed-up data.
- Page 221 Or, select the “Do not encrypt backed-up data” option if you do not wish to use this feature, then click Next. When you choose to encrypt data, your credentials - user name and password (secret phrase, if any), are sent to the IPStor Express Storage System for authentication.
-
Page 222: Logging In To Filesafe Express
Logging in to FileSafe Express On your computer, click Start > Programs > FalconStor > FileSafe Express > FileSafe Express Console. Click the appropriate option: you can either select an IPStor Express Storage System on your network or you can manually enter the IP address, then click Next. - Page 223 Enter the same user name and password that you entered during Setup, then click Log in. If you do not wish to log in every time you launch FileSafe Express (if there is no need to secure your computer against use by others), you can click the “Log in automatically”...
-
Page 224: Activating Your Filesafe Express License
Activating your FileSafe Express license You must enter a license key code the first time you launch FileSafe Express. To activate your FileSafe Express license: On your computer, click Start > Programs > FalconStor > FileSafe Express > FileSafe Express Console. Enter a license key code to complete activation, then click OK. - Page 225 You are now ready to use FileSafe Express. The FileSafe Express icon appears in the System Tray and the FileSafe Express console window displays...
-
Page 226: Configuring The Filesafe Express Backup Settings
Configuring the FileSafe Express backup settings To configure the FileSafe Express backup settings: On the FileSafe Express Console window, click the Settings tab. Select from the following backup modes. • Continuous • Scheduled • Manual Click Save. 6 Protecting local data or files... -
Page 227: Backing Up Files To Your Storage System
Backing up files to your storage system To backup files to your storage system: On the FileSafe Express Console window, click the Computer tab. In the left pane, select the folder that contains the files you want to backup. In the right pane, select the files you want to backup. Click Save. -
Page 228: Restoring Your Backup Files
Restoring your backup files To restore your backup files: On the FileSafe Express Console window, click the Vault tab. Select the item(s) you want to restore in the Backups panel or Version panel, then click Restore. In the Restore Settings dialog box, indicate whether you want to restore files to their original location or choose another destination. -
Page 229: Deleting Backups
Deleting backups To delete backups: On the FileSafe Express Console window, click the Vault tab. To delete backup files or folders, select the item(s) you want to delete, then click Delete. Deleting backup files or folders from the storage system repository causes all of its backups to be lost permanently. -
Page 230: Viewing Backup Log Report
Viewing backup log report To view backup log report: On the FileSafe Express Console window, click the Dashboard tab. Click the Reports tab. To see details for any backup job, select a backup job, then click Details. To remove reports, select the reports you wish to remove, then click Delete. -
Page 231: Optimizing Filesafe Express Performance
Optimizing FileSafe Express performance To optimize FileSafe Express performance: On the FileSafe Express Console window, click the Settings tab. Click the Options tab. Set the processor and bandwidth throttling settings. • Normal — The CPU throttle is always set at Middle and throttling for bandwidth is 128 kbps. - Page 232 6 Protecting local data or files...
-
Page 233: Using San Disk Manager
7 Using SAN Disk Manager Note: In this guide the term “storage server” refers to “storage system” or “server” and the term “virtual disk” refers to “iSCSI disk” on the storage system. SAN Disk Manager is a utility that is automatically installed with FileSafe Express. -
Page 234: Starting San Disk Manager
Starting SAN Disk Manager Once SAN Disk Manager has been installed, you can access it in two ways: • Via the Start menu Click Start > Programs > FalconStor > SAN Disk Manager. • Via Computer Management (1) Right-click My Computer, then click Manage. (2) In the navigation tree, expand Storage. -
Page 235: Adding A Storage System
Adding a storage system Once you add a storage system to SAN Disk Manager, it automatically appears in the list of available storage servers when you subsequently create a virtual disk (as described in “Creating an iSCSI virtual disk” on page 218). -
Page 236: Changing The Storage System Protocol Settings
Open SAN Disk Manager (as described in “Starting SAN Disk Manager” on page 212). In the navigation tree, expand SAN Disk Manager and click Storage Servers. In the right pane, right-click the storage system whose protocol settings you want to change and click Protocol Settings. - Page 237 In the Local adapter list, select the local mechanism that you want to use to communicate with the storage system. If you select Default, SAN Disk Manager uses the first detected iSCSI HBA. If no HBA is detected, the Microsoft iSCSI Initiator is used instead.
-
Page 238: Viewing The Storage System Properties
Open SAN Disk Manager (as described in “Starting SAN Disk Manager” on page 212). In the navigation tree, expand SAN Disk Manager and click Storage Servers. In the right pane, double-click the storage system whose properties you want to view. -
Page 239: Removing A Storage System
Open SAN Disk Manager (as described in “Starting SAN Disk Manager” on page 212). In the navigation tree, expand SAN Disk Manager and click Storage Servers. In the right pane, right-click the storage system that you want to remove and click Remove Server. -
Page 240: Creating An Iscsi Virtual Disk
In the navigation tree, expand SAN Disk Manager, right-click Disks, and click New Disk. In the Servers list, select the storage system where you want to create the new virtual disk. In the Disk size text box, type the number of MBs that you want to allocate for the new virtual disk. - Page 241 If you’re using the iSCSI protocol, by default SAN Disk Manager • uses the first detected iSCSI HBA to communicate with the storage system. If no HBA is detected, the Microsoft iSCSI Initiator is used by default. To change this setting, click the Advanced button next to the iSCSI protocol, select the desired mechanism from the list, and then click OK.
-
Page 242: Expanding An Iscsi Virtual Disk
Expand Disk. Note: If the disk that you want to expand does not appear in the right pane, click Storage Servers in the navigation tree and make sure that the storage system appears in the right pane. If it doesn’t, add it (as described in “Adding a storage system”... -
Page 243: Viewing The Iscsi Virtual Disk Properties
Viewing the iSCSI virtual disk properties For any normal virtual disks, you can view the properties of that disk, including the following information: • The number of the virtual disk as it appears in Disk Management • The size of the virtual disk •... -
Page 244: Deleting An Iscsi Virtual Disk
Deleting an iSCSI virtual disk Most virtual disks can be deleted to free disk space on the storage system for other uses. Caution: When you delete a virtual disk, all the data associated with that disk is deleted. To delete an iSCSI virtual disk: Open SAN Disk Manager (as described in “Starting SAN Disk Manager”... -
Page 245: Filtering The Events
Filtering the events Although you can easily sort the displayed events by clicking the column headings, you can also filter the list so that the right pane displays only events that occurred on specific dates, only specific kinds of events, and/or only events with certain words in their description. To filter the events list: Open SAN Disk Manager (as described in “Starting SAN Disk Manager”... - Page 246 Only events that contain this text in their description will be listed. Note: The specified text must match the description exactly. For example, if you type add new server, events that contain the phrase add a new server will not be included. Click OK.
-
Page 247: Adding Or Changing A License
Adding or changing a license Using SAN Disk Manager, you can add a license for any host application that uses IMA. You can also add a license for the advanced options of SAN Disk Manager. Note: Even if you successfully add a license for a host application using SAN Disk Manager, you might not be able to use that license. - Page 248 In the License key code text boxes, type or paste the following license keycode for licensing the application: L8FCPNPG7L842BR4A990PFUEW Although the key code is presented as five separate text boxes, if you copied the entire 25-character key code, you can paste it in the first text box, and it will be appropriately divided among all the text boxes.
-
Page 249: Activating A License
Activating a license Most host applications require their license to be activated (that is, it must be registered with the # license activation server). If your computer has an Internet connection, the license is activated as soon as you enter your key code and click OK. However, if your Internet connection was temporarily down or if your computer has no Internet connection, your license was not activated. - Page 250 In the right pane, right-click the license that you want to activate and click Online Activation. The license is activated, and the Activated column displays Yes. To activate a license without an Internet connection: If your license wasn’t activated because your computer has no Internet connection, you must obtain a signature file using another computer that does have both an Internet connection and e-mail.
- Page 251 13 Click Import Signature File. 14 On the Open dialog box, browse to the location where the returned signature file exists and double-click it. 15 When the confirmation message appears, click OK. The license is activated, the Offline Activation dialog box closes, and you can continue to use your host application.
-
Page 252: Removing A License
Removing a license If you remove a license for a host application, that application will no longer appear in the right pane when you click Licenses, but as long as it is installed it will still appear in the right pane when you click Host Applications. -
Page 253: Configuring The Storage System
8 Configuring the storage system This chapter provides instructions on how to configure the storage system hard disk drive and install a PCI Express network card. -
Page 254: Configuring The Hard Disk Drive
Configuring the hard disk drive The storage system supports up to four 3.5-inch hot-swappable SATA hard disk drives (HDDs). Disk configurations The storage system supports various types of disk configurations, including RAID (redundant array of independent disks), a disk subsystem that can increase performance, provide data protection, or both. - Page 255 • RAID 5 — Like RAID 0, RAID 5 offers increased performance by distributing the data across multiple HDDs. But unlike RAID 0, RAID 5 also offers data protection. If your storage system has three HDDs of equal size, two thirds of each HDD are used for data, and the remaining third contains the parity information needed to reconstruct either of the other two.
-
Page 256: Removing Hard Disk Drives Or Responding To Disk Failure
Removing hard disk drives or responding to disk failure The effect of removing HDDs from your storage system or disk failure varies, depending on the disk configuration you chose when you configured the system and the current state of the existing disks. In a linear configuration, when you remove a HDD or a HDD fails, the data associated with that HDD is no longer available, but the data on all the other disks remains available. - Page 257 • If the indicator is YELLOW, removing the HDD or HDD failure will cause RAID degradation, but you will still be able to access all the data. • If the indicator is RED, removing the HDD or HDD failure will cause the entire RAID to fail.
-
Page 258: Responding To Raid Degradation
Caution: Reconfiguring your disks will delete all the data on your storage system. Responding to RAID degradation When HDD removal/failure causes RAID degradation, the Disk Change Notification page displays when you access the IPStor Express Manager or refresh the browser window. 8 Configuring the storage system... - Page 259 To respond to RAID degradation: On the Disk Change Notification page, take the appropriate action: • Click Scan to scan the storage system again and update the information on the page. • Click Shut Down to re-install the same disk or install a new disk After the storage system shuts down, install the disk and then restart the system.
- Page 260 8 Configuring the storage system [3] Open the front door. (2) Remove the HDD carrier. [1] Press the HDD carrier latch. [2] Pull the lever. [3] Slide the HDD carrier from the chassis.
- Page 261 (3) Re-install the HDD to the storage system. [1] With the lever still extended, slide the carrier all the way into the drive bay. [2] Use the lever to push the carrier until it docks into place, then close the lever. [3] Close the door of the storage system.
-
Page 262: Responding To Raid Failure
Responding to RAID failure When HDD removal/failure causes the entire RAID to fail, the Disk Change Notification page displays when you access the IPStor Express Manager or refresh the browser window. To respond to RAID failure: On the Disk Change Notification page, take the appropriate action: •... -
Page 263: Swapping Hard Disk Drives
• Click Reconfigure Disks to reconfigure the storage system using the available disks. Caution: Reconfiguring the disks deletes all user information and all data on all the disks. Follow step 2 of the previous section. Swapping hard disk drives If you are using RAID 5 + spare or RAID 10, you can move the HDDs from one slot to another whether or not the storage system is running. -
Page 264: Replacing A Failed Hard Disk Drive
Replacing a failed hard disk drive Follow steps 1 and 2 of the "Removing hard disk drives or responding to disk failure"section. Remove the HDD from the carrier. (1) Gently pry open the left side rail, as shown. (2) Remove the drive from the carrier. Install the new disk into the HDD carrier. - Page 265 Install the new HDD to the storage system. (1) With the lever still extended, slide the carrier all the way into the drive bay. (2) Use the lever to push the carrier until it docks into place, then close the lever. (3) Close the door of the storage system.
-
Page 266: Adding A Hard Disk Drive
Adding a hard disk drive The effect of adding HDDs to your storage system varies, depending on the disk configuration you chose when you configured the system and the current state of the existing disks. In a linear configuration, you can add a new disk at any time, and data can be written to that disk as soon as it is added. - Page 267 To add HDDs in to a linear or normal RAID configuration: Caution: HDDs are formatted before they are added to the storage system. Make sure that you back up any important files that are on the HDD before you add it to storage system. Formatting a drive deletes all files on the HDD.
- Page 268 (2) Remove the HDD carrier. [1] Press the HDD carrier latch. [2] Pull the lever. [3] Slide the HDD carrier from the chassis. (3) Install the new HDD to the HDD carrier. [1] Insert the new drive into the right side of the carrier aligning the pins into the HDD’s mounting holes.
- Page 269 (4) Install the HDD carrier. [1] With the lever still extended, slide the carrier all the way into the drive bay. [2] Use the lever to push the carrier until it docks into place, then close the lever. [3] Close the door of the storage system. Add the HDD to a linear or normal RAID configuration.
- Page 270 (1) Access the IPStor Express Manager or refresh the browser window. The Disk Change Notification page displays. (2) In the Disk Change Notification page, click Add New Disk. If the information on this page is not correct, click Scan to scan the storage system again and update the page.
- Page 271 (3) After clicking Add New Disk, the Add New Disk page displays. (4) Select from the following actions: - Click Add to add the HDD to a linear configuration or use it as a spare for a normal three-disk RAID5 configuration. The Disks page indicates the current state of the disk configuration.
- Page 272 To add HDDs in to a degraded RAID configuration: Caution: HDDs are formatted before they are added to the storage system. Make sure that you back up any important files that are on the HDD before you add it to storage system. Formatting a drive deletes all files on the HDD.
-
Page 273: Installing A Pci Express Network Card
Installing a PCI Express network card The onboard expansion slot supports installation of a PCI Express network card. After installing the PCI Express network card, you can connect to another switch or router to allow additional computers to connect to the storage system or you can connect to a IEEE 802.3ad- enabled switch and set up the storage system for network teaming to provide failover protection, increased bandwidth throughput aggregation, and balancing of traffic among team members. -
Page 274: Network Teaming
Installing a PCI Express network card to setup network teaming To install a PCI Express network card to setup network teaming: Turn off the system and all the peripherals connected to it. Unplug all cables from the power outlets. Place the system on a flat, stable surface. Observe the ESD precautions on page 251 when handling a system component. - Page 275 (3) Slide the slot bracket out. Install the PCI Express network card. (1) Align the PCI Express network card to the slot. (2) Insert the PCI Express network card until it is properly seated in the slot. (3) Close the slot cover. (4) Secure the card with the screw removed earlier.
- Page 276 Replace the system cover. Reconnect the power cord. 10 Set up the system for network teaming or link aggregation. (1) Connect the network cable. (2) Connect the network cable to the network card, then connect the other end of the network cable to a IEEE 802.3ad-enabled switch.
-
Page 277: Network Connection
Installing a PCI Express network card to increase network connection To install a PCI Express network card to increase network connection: Perform steps 1 to 8 of the previous section. Connect the network cable to the network card, then connect the other end of the network cable to a switch. - Page 278 8 Configuring the storage system...
-
Page 279: Troubleshooting
This chapter describes a list of possible situations that may arise during the use of your storage system. If you are unable to resolve problems on your own, contact your dealer or local Acer representative for assistance. First steps checklist •... -
Page 280: Viewing The System Log
Viewing the system log The System Log page displays a list of events that have occurred on the storage system. Reviewing this list can help you identify and resolve any problems that you might encounter. To view event information: In the navigation bar, click Advanced. In the left pane, click System Log. -
Page 281: Recovering Or Restoring The Storage System
Recovering or restoring the storage system You can restore the storage system to its factory default after a system failure. To recover or restore the storage system: Power off the system. Remove all hard disk drives. Refer to “Removing hard disk drives or responding to disk failure”... - Page 282 Click Next. The End User Software License Agreement page displays. If you agree to the terms, select the “I accept the license agreement” check box, then click Next. The Host Name page displays. 9 Troubleshooting...
- Page 283 Click Next to accept the default storage system name (Altos- easyStore), or enter whatever name you prefer and then click Next. The Date/Time page displays. The storage system name can be up to 15 characters long and can include letters, numbers, and hyphens. Specify the current date, time, and time zone, then click Next.
- Page 284 By default, if your network has a DHCP server, the storage system obtains its IP address from that server. If your network does not have a DHCP server, or if the storage system is directly attached to your computer, the default IP address and subnet mask are used.
- Page 285 11 Install the HDDs, do so one at a time, then click Scan after each action. Note: It is strongly recommended that you install all the HDDs that you want to use in the storage system at this time, since changing the number of HDDs later can require disk reconfiguration and possible data loss.
- Page 286 The Disk Space Distribution page displays. 13 Click Next to accept how the disk space will be proportioned for shared folders and backups (only 1 GB will be allocated for shared folders). If you want to allocate more space for shared folders, select “Specified disk space”, enter the number of gigabytes to allocate for shared folders (the minimum is 1 GB), then click Next.
- Page 287 The Firmware and Administrator page displays. Note: You can expand the amount of disk space allocated for shared folders later (as long as free disk space is available), but you cannot reduce it without reconfiguring your disks and losing all your data. If you plan to back up computer HDDs to your storage system, it is recommended that you use the minimum amount of space for shared folders, back up all the computer HDDs that you plan to...
- Page 288 15 Enter the password for logging in to the IPStor Express Manager, then click Finish. 16 Click OK when the Setup information confirmation prompt appears. Once the configuration is complete, the system restarts. 17 After the storage system reboots, you will be directed to the Select Registration Method page.
-
Page 289: Specific Problems And Corrective Actions
Specific problems and corrective actions This section provides general information about common problems that you might have with your storage system and steps you can take to resolve them. Can’t access the IPStor Express Manager. This can occur if you attached the network cable after powering on the storage system. - Page 290 I forgot the password for logging in to the IPStor Express Manager. You can reset the storage system to use its original administrator user name (admin) and password (storage) by pressing the reset pinhole on the storage system. Note: This also resets the storage system to its original network settings.
- Page 291 Users cannot access the shared folders. • Make sure the storage system is powered on, connected to the network, and operating properly. • If the domain administrator has set user accounts with the property "User must change password at next logon", the user may encounter problems in mapping to the share before the password is changed.
- Page 292 Windows users can’t access shared folders using the Console unless their computers are on the same subnet as the storage system. If using the Console does not work, try accessing the shared folders using My Computer/Windows Explorer (as described on page 184). •...
- Page 293 • Make sure the specified user name and password have sufficient privileges for browsing the Active Directory tree. • If you specified an organizational unit name, make sure that it exists on the Active Directory tree, that its name is no longer than 256 characters and does not contain a forward slash (/), that it contains no more than 100 subunits, and that its name is preceded by a forward slash (such as /Sales).
- Page 294 The storage system is not distributing IP addresses. Make sure that Enable DHCP server is selected on the Network page (as described in“Changing the network settings” on page 167), and that the starting and ending IP addresses are valid. The first three digit groups of both the starting IP address and ending IP address must be the same.
- Page 295 Index accessing Linux users Mac users Windows users Active Directory authentication mode Active Directory properties modify adding degraded RAID linear or normal RAID administrator password 165– 166 administrator user name alerts 155– 157 authentication mode backup log backups deleting managing Before ccessing CIFS users, see users...
- Page 296 adding changing changing the membership removing guest account disable guest user hard disk drive adding 244, 245, configurations hard disks, see disks Host applications hotplug indicator installing the software FileSafe Express and SAN Disk Manager iSCSI initiator Storage System Console introduction IPStor Express Manager access...
- Page 297 Disks Events filtering events Host Applications Licenses menu bar Navigating navigation tree pane removing a storage system Starting Storage Servers toolbar viewing storage system properties viewing virtual disk properties window Server Adding Changing the protocol Managing server...
- Page 298 disk configurations IP address 167, 175, logging in name 165– 166 package contents performance 175, restoring backup files shutting down shutting down remotely storage status system status 175, troubleshooting storage system disks reconfiguring subnet mask 175, System system BIOS update system cleanup system events system LED indicators...
Need help?
Do you have a question about the Altos easyStore M2 and is the answer not in the manual?
Questions and answers