Advertisement
Manual version: APW102-20191215
H3C LSQM1SDNB0 SDN automation module
1 Identifier
The module identifier LSQM1SDNB0 is in the upper right corner of the front panel.
2 About the module
The LSQM1SDNB0 is an SDN automation module built with server components required for
ADCampus solutions. Plug and play, it supports fully automated deployment at small and
medium-sized campus networks. It can deliver controller, authentication, and address assignment
functions, eliminating the need for installing physical servers.
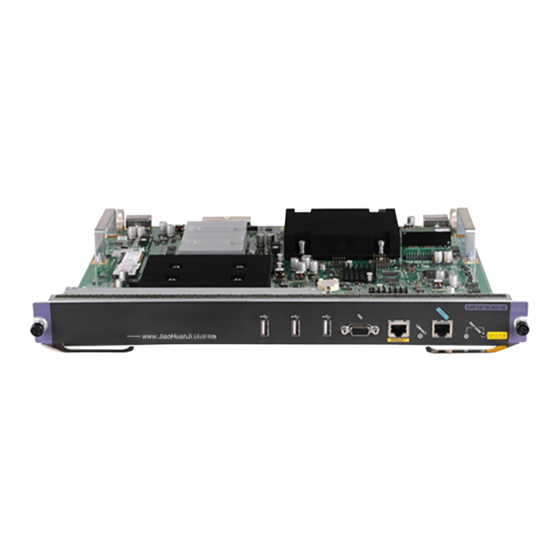
Figure 1 LSQM1SDNB0 front panel
(1) USB ports (3 in total)
(3) Management Ethernet port
(5) Console port (CONSOLE)
(7) Ejector lever
3 Specifications
Table 1 Module specifications
Item
Hard disk
Memory
Dimensions (H × W × D)
Weight
Power consumption
Hot swapping
Ports
Ambient temperature
(2) VGA connector
(4) Management Ethernet port LED (LINK/ACT)
(6) Shutdown LED and button (SHUTDOWN)
(8) Captive screw
Specifications
480GB SSD
Two memory slots
Standard configuration: 64 GB (two 32GB memory bars)
40 × 399 × 355 mm (1.57 × 15.71 × 13.98 in)
3.40 kg (7.50 lb)
102 to 124 W
Not supported
•
3 × USB2.0 ports (used by technical support for debugging only)
•
1 × VGA connector
•
1 × 10/100/1000BASE-T management Ethernet port
•
1 × console port (used by technical support for debugging only)
•
Operating: 0°C to 45°C (32°F to 113°F)
•
Storage: –40°C to +70°C (–40°F to +158°F)
i
BOM: 3123A1VF
Advertisement
Table of Contents

Related Manuals for H3C LSQM1SDNB0


Summary of Contents for H3C LSQM1SDNB0
- Page 1 BOM: 3123A1VF H3C LSQM1SDNB0 SDN automation module 1 Identifier The module identifier LSQM1SDNB0 is in the upper right corner of the front panel. 2 About the module The LSQM1SDNB0 is an SDN automation module built with server components required for ADCampus solutions.
- Page 2 Manual version: APW102-20191215 BOM: 3123A1VF Item Specifications • Operating: 5% RH to 95% RH, noncondensing Ambient humidity • Storage: 5% RH to 95% RH, noncondensing NOTE: • To verify the compatibility of the card with the software release you are using, see the release notes.
- Page 3 Manual version: APW102-20191215 BOM: 3123A1VF Installing the module Face the front panel of the device. Remove the filler panel from the target slot. This example installs the module in slot 2 on an S7506E switch. Place the module on a workbench with its component side facing up. Open the ejector levers of the module.
- Page 4 Manual version: APW102-20191215 BOM: 3123A1VF 6 Software upgrade For information about upgrading the software, see the release notes for the module. Copyright © 2019 New H3C Technologies Co., Ltd. The information in this document is subject to change without notice.
Need help?
Do you have a question about the LSQM1SDNB0 and is the answer not in the manual?
Questions and answers