Table of Contents
Advertisement
Quick Links
Advertisement
Table of Contents

Related Manuals for AUDAC MERO2


Summary of Contents for AUDAC MERO2
- Page 1 MERO2 User & Installation Manual www.audac.eu...
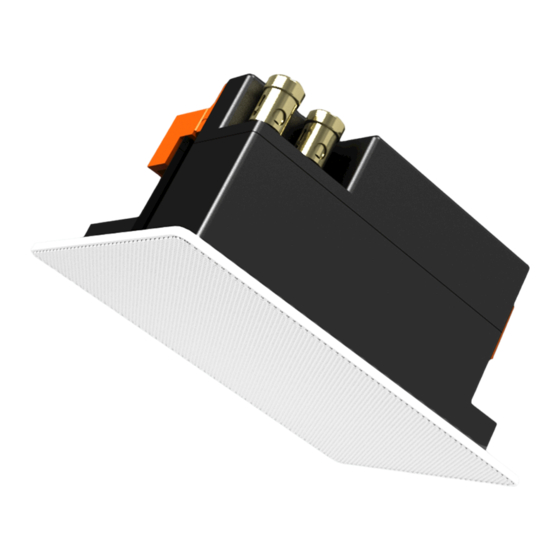
- Page 3 The selection of high-grade materials in combination with accurate acoustics craftmanship makes the MERO speakers superior in their class. The Ultra-compact size enables the MERO2 smoothly integrate into any interior like no other loudspeaker. The outer dimensions only measure only 146 x 98 mm and the built-in depth which doesn’t exceed 70 mm allows installation in any surface while being unobtrusive.
- Page 4 Precautions READ FOLLOWING INSTRUCTIONS FOR YOUR OWN SAFETY • ALWAYS KEEP THESE INSTRUCTIONS FOR FUTURE REFERENCE. NEVER THROW THEM AWAY • ALWAYS HANDLE THIS UNIT WITH CARE • CLEAN ONLY WITH DRY CLOTH • HEED ALL WARNINGS AND FOLLOW ALL INSTRUCTIONS •...
-
Page 5: Caution - Servicing
CAUTION • USE CABLES OF THE RIGHT GAUGE TO CONNECT THE LOUDSPEAKER • USE CABLES WITH CLEAR COLOUR CODING INDICATING THE POLARITY AND MAINTAIN THE SAME POLARITY THROUGHOUT THE WHOLE SYSTEM. • ONLY USE THE CORRECT AMPLIFIER OUTPUT VOLTAGE AND IMPEDANCE. EXCEEDING THESE LIMITS COULD CAUSE FIRE OR OTHER FAILURES. -
Page 6: Installation Procedure
Installing the MERO Introduction The MERO speakers feature a quick-fixing mechanism, which allows quick and easy installation of the loudspeakers in only a few minutes. The installation of the MERO speakers requires a minimum amount of installation skills. Before the loudspeaker is installed, the location whereto it will be mounted should be carefully checked to make sure the surface can support the weight of the speaker and no lines for water, gas, electricity or other supplies are crossing this point. - Page 7 4) Connect the loudspeaker connection cable to the gold plated spring clamp connectors. Press the button of the corresponding terminal down and insert the connection cable. After releasing the button, the cable is connected to the loudspeaker. The Red terminal indicates positive (+) pole and the Black terminal indicates the negative (-) pole.
-
Page 8: Additional Information
Additional Information Technical specifications RMS Power 10 Watt Max. Power 20 Watt Nominal impedance 8 Ohm Sensitivity (1W / 1m) 83 dB Sound pressure (Max W / 1m) 93 dB Frequency response (±3 dB) 120 Hz - 20 kHz Drivers 2”...
Need help?
Do you have a question about the MERO2 and is the answer not in the manual?
Questions and answers