
Related Manuals for POLMAR DIGITAL WORK PMR446


Summary of Contents for POLMAR DIGITAL WORK PMR446
- Page 1 Pmr446 aNaLoGIco/DIGItaLe aNaLoG/DIGItaL Pmr446 traNsceIVer manuale d’uso/User’s manual Importato e distribuito da Polmar srl...
- Page 2 Le note sopraesposte sono relative agli accessori originali Polmar, se qualcuno di questi non dovesse regolarmente fun- zionare, rivolgetevi ad un rivenditore Polmar. Se usati accessori prodotti da altre Aziende, la Polmar non può garantiire l'operatività e la sicurezza del ricetrasmettitore.
-
Page 3: Table Of Contents
sommario Funzionalità Selezione canali analogici/digitali Informazioni pertinenti la sicurezza Scansione Funzionalità principali Indicazione scansione conoscere l’apparecchio Funzione Lone Worker (attivabile via software) Installare la batteria Avviso di fuori-portata (attivabile via software) Rimuovere la batteria Selezione modalità accensione Installare e rimuovere fermaglio cintura Non trasmette Installare un microfono/auricolare esterno Stato occupato ignorato... -
Page 4: Funzionalità Principali
Funzionalità principali Dotazione La confezione comprende: clip da cintura, pacco batteria • Frequenze: agli ioni di litio, adattatore, caricabatteria, 6 viti e manua- Banda digitale: 446.103125~446.196875 MHz (16 canali); le utente. Banda analogica: 446.00625~446.09375 MHz (8 canali). • Annunciatore vocale in inglese. • Batteria Li-ion 7.4 V 1800 mAh. -
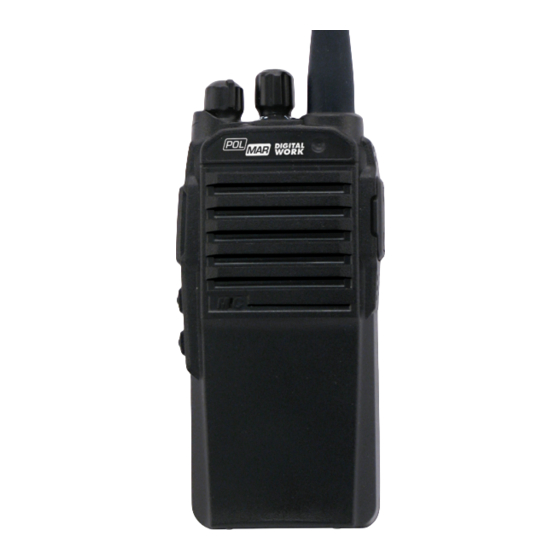
Page 5: Conoscere L'apparecchio
conoscere l’apparecchio 1 Antenna 2 LED 3 Manopola volume 4 Cambio canale 5 PTT 6 KEY1 7 KEY2 8 MIC 9 Uscita auricolare esterno 10 Ingresso microfono esterno 11 Batteria 12 Foro laccetto 13 Clip da cintura 14 Blocco batteria... -
Page 6: Installare La Batteria
Installare la batteria rimuovere la batteria Installare la batteria sul dorso della radio, come rappre- Premere il blocco batteria (P1), poi spingerla verso il bas- sentato in figura. so, a rimuoverla dal ricetrasmettitore (P2). -
Page 7: Installare E Rimuovere Fermaglio Cintura
Installare e rimuovere fermaglio cintura Volendo, fissare la clip tramite le due viti 3x6 in dotazione, vedi figura. Rimuovere Note 1. Quando si installa la clip, non usate alcun tipo di colla per bloccare le viti, si rischia di danneggiare il guscio. Installare 2. Il fermaglio da cintura va preventivamente rimosso per poter estrarre la batteria. -
Page 8: Installare Un Microfono/Auricolare Esterno
Installare un microfono/auricolare esterno ricarica Installare il microfono/auricolare come segnalato in figura. Il pacco batteria non è fornito completamente carico, pri- ma d’utilizzarlo eseguite un completo ciclo di carica. Il pacco batteria non raggiunge la capacità di carica quan- do nuovo o non utilizzato per oltre due mesi. La capacità di carica nominale si raggiunge dopo 3 - 5 cicli completi di carica / scarica. - Page 9 2. Inserite l’adattatore in una Note presa di rete. • Assicuratevi che i poli batteria entrino in contatto con i terminali base carica. • Quando la spia è di colore verde si è completata la carica della batteria. Il colore rosso segnala che sta avanzando il ciclo di carica.
-
Page 10: Uso Base
Uso base annunci vocali Le seguenti funzioni vengono segnalate da annuncio vo- cale in inglese: accensione Per accendere la radio ruotate in verso orario la manopola 1. Accensione. regolazione volume. 2. Prima dello spegnimento per tensione batteria bassa. 3. Avviso tensione batteria bassa: quando la tensione A conferma viene emessa la nota “di”, se l’annunciatore batteria è... -
Page 11: Funzionalità
Funzionalità scansione Per attivare la scansione premete il tasto scansione (pre- mere brevemente il tasto [sK2]). Premuto brevemente attiva o disattiva la funzione VOX Premere ancora brevemente il tasto [sK2] per terminarla. Premuto a lungo, emette un tono di Indicazione scansione chiamata (attiva solo in banda analogica). -
Page 12: Funzione Lone Worker (Attivabile Via Software)
Funzione Lone Worker (attivabile via software) Non trasmette Dopo aver attivato questa funzione, trascorso il periodo di 1. Tensione bassa: la batteria è sotto i 6.2 V. tempo impostato in modo inoperoso, il ricetrasmettitore 2. Tensione alta: la batteria supera i 9.0 V. passa in allarme. -
Page 13: Soluzione Dei Problemi
soluzione dei problemi Problema soluzione Nessuna reazione all’accensione. Il pacco batteria è scarico. Sostituitelo o ricaricatelo. Il pacco batteria potrebbe essere stato malamente applicato. Riprovate. Impossibile comunicare con altri membri dello Verificate che la frequenza ed i CTCSS / DCS che voi usate siano gli stesso gruppo. stessi degli altri membri del vostro gruppo. Potreste essere troppo lontani dagli altri membri del gruppo. Verifica- te se siete entro la portata. -
Page 14: Specifiche Tecniche
Specifiche tecniche Generali Frequenza Digitale: 446.103125 – 446.196875 MHz/Analogica: 446.00625 – 446.09375 MHz. Canali 16 (banda digitale) / 8 (banda analogica). Spaziatura canali digitale 6.25 kHz / analogica 12.5 kHz Modulazione FM (Banda analogica) Temperatura lavoro -10 °C / +55 °C Tensione alimentazione 7.4 V Assorbimento a riposo (stand by) - Page 15 ricevitore Sensibilità <0.25 μV (12dB, S/N) Soglia squelch ≤0.16 μV Resa audio ≥800 mW Assorbimento RX ≤300 mA Distorsione audio <6%...
-
Page 16: Safety Information For User
Then contact local Polmar dealers. attention: All tips above apply to accessories of your Polmar transceiver. If any device can not work normally, please contact local Polmar dealers. If you use any accessories made by other companies, Polmar Company does not guarantee the operability and safety... - Page 17 sommario Functions Analog/Digital channel selection safety information for user Scanning Features Scanning Indication Know the radio Lone Worker (via software activation) Install the battery Auto-contact (via software activation) Disassembling of battery Power On Mode Selection Install and take off the belt clip No Transmitting Install external microphone Busy State Ignored...
-
Page 18: Features
Features equipment • Frequency: The package includee: li-ion battery pack, adapter, charger, Digital bands: 446.103125~446.196875 MHz (16 ch); 6 2.6 screws, belt clip, italian/english user manual. analog bands: 446.00625~446.09375 MHz (8 ch). • English voice to quote number. • 7.4 V 1800 mAh Li-ion battery. • Channel step: analog 12.5kHz / digital: 6.25 kHz • RF Power: 500 mW. -
Page 19: Know The Radio
Know the radio 1 Antenna 2 Indicator light 3 Volume Knob 4 Channel switch 5 PTT 6 KEY1 7 KEY2 8 MIC 9 External speaker input 10 External MIC input 11 Battery 12 Hang rope hole 13 Belt clip 14 Battery fixed buckle... -
Page 20: Install The Battery
Install the battery Disassembling of battery Install the batter along the rear case of radio properly as Press the fixed buckle of the battery (P1), then push following pictures show. down the battery off the transceiver (P2). -
Page 21: Install And Take Off The Belt Clip
Install and take off the belt clip If necessary, fix the belt clip with two screws (3x6) as picture shows. Disassembly Note 1. W hen installing the belt clip, do not use any glue to fix screws,otherwise, it will damage the housing. Install 2. Take off the belt before disassembling the battery. -
Page 22: Install External Microphone
Install external microphone charging Install the microphone as picture shows. The battery pack is not fully charger when finished, and please charge it before using. The battery can not reach the normal capacity for the first time charging after purchasing or storing it more than two months. However, it will return the normal capacity after charging and discharging repeatedly 3-5 times. Charging steps as below 1. - Page 23 2. Connect the power with AC adaptor. Note: 1. Please make sure the battery connect with the touch- ing piece of the charging terminal. 2. Green light indicates power on or the battery is full. Red light indicates the charging just beginning. Charge in power-off mode, the indicate red light is on, and it is off when finish charging.
-
Page 24: Basic Functions
Basic Functions matically power off or lower battery. 3. Low battery alert: Alarm or Voice prompts (if have) when battery voltage is lower than 6.2 V. Power on Turn the power switch clockwise / volume control knob to Voice report turn on the radio. -
Page 25: Functions
Functions scanning Press Scanning key [sK2] to active and press again to quit. When pressed, it activates/disactivates VOX scanning Indication function Green indicator shines during transceiver scanning, when stop scanning, green light goes off and will light again When held for some seconds, it emits a call tone (on analog band only) once receives signal. -
Page 26: Lone Worker (Via Software Activation)
Lone Worker (via software activation) No transmitting After active this function, transceiver can alarm and re- 1. Low voltage: battery voltage is lower than 6.2 V. garded as normal alarm if there is no operation within 2. High Voltage: battery voltage is higher than 9.0 V. setted time. -
Page 27: Troubleshooting
troubleshooting trouble solution No reaction when power-on The battery pack has been exhausted. Please change a new battery or recharge the battery. The battery pack may be not installed correctly. Please install it again. Unable to talk with other members in the same Please check the frequency and CTCSS/DCS you use are the same as group other members use in the same group. -
Page 28: Specification
Specification General Frequency Digital: 446.103125 – 446.196875 MHz/Analog: 446.00625 – 446.09375 MHz. Channel 16 (digital band) / 8 (analog band) Channel Spacing Digital 6.25 kHz / Analog 12.5 kHz Modulation FM (analog band) Working Temperature -10 °C / +55 °C Voltage 7.4 V Standby Current... - Page 29 receiver Sensitivity <0.25 μV (12dB, S/N) Squelch Sensitivity ≤0.16 μV Audio Power ≥800 mW RX current ≤300 mA Audio distortion <6%...
-
Page 30: Tabella Dei Canali Digitali/Analogici
tabella dei canali digitali/analogici / Digital/analog channels chart Digitali/ Digital analogici/ analog Frequenza/ Frequency (mHz) Frequenza/ Frequency (mHz) codici ctcss/ctcss codes 446.103125 446.00625MHz no CTCSS tone 446.109375 446.01875MHz no CTCSS tone 446.115625 446.03125MHz no CTCSS tone 446.121875 446.04375MHz no CTCSS tone 446.128125 446.05625MHz no CTCSS tone... - Page 31 Informazioni sull’utilizzo degli apparati Pmr446 Si fa presente che, secondo quando indicato dalla nota Questo simbolo, aggiunto al numero di serie, indica 101C del vigente Piano Nazionale Ripartizione Frequenze, che l’apparato risponde pienamente ai requisiti della emanato con Decreto 13 novembre 2008, l’utilizzo degli Direttiva Europea delle Radio e Telecomunicazioni apparati: 1999/05/EC, per quanto concerne i terminali radio.
- Page 32 Hereby Polmar srl, declares that this apparatus brand Polmar, mod. Digital Work is in com- pliance with the essential requirements and other relevant provisions of Directive 1999/5/CE. Por medio de la presente Polmar srl declara que el Polmar Digital Work cumple con los re- quisitos y cualesquiera otras disposiciones aplicables o exigibles de la Directiva 1999/5/CE.
- Page 33 ministero Pt - Ispettorato territoriale per regione aBrUZZo e moLIse LIGUrIaGenova - Via G.M. Saporiti,7 - 16134 toscaNa Sulmona - Via Polo, 35 - 67039 Tel. 010 217380 - Fax 010 211575 Firenze - via Pellicceria, 3 - 50123 Dr. Mele Giuseppe Dr. Cocco Antonello Tel. 0864 210522 - Fax 0864 210310 LomBarDIa Tel. 055218111 - Fax 055-288359 Milano - Via Principe Amedeo, 5 - 20121...
- Page 34 Modello Model tecniche della stessa senza determinare dei danni. Il rivenditore e la Polmar srl si riservano di verificare le condizioni di appli- Data di acquisto (allegare copia dello scontrino o fattura)/ Purchase Date (enclose copy of receipt or invoce) cabilità...
- Page 35 INFORMAZIONE AGLI UTENTI USER INFORMATION Ai sensi dell’art. 13 del decreto legislativo 25 luglio 2005, In accordance with art. 13 of the Legislative Decree of 25th n. 15”Attuazione delle Direttive 2002/95/CE, 2002/96/CE July 2005, no. 15 ”Implementation of Directives 2002/95/ e 2003/108/CE, relative alla riduzione dell’uso di sostanze EC, 2002/96/EC and 2003/108/EC, relative to reduction of pericolose nelle apparecchiature elettriche ed elettroniche,...
- Page 36 Importato e distribuito da Polmar srl info@polmar-radio.com • www.polmar-radio.com...
Need help?
Do you have a question about the DIGITAL WORK PMR446 and is the answer not in the manual?
Questions and answers