Advertisement
Quick Links
Advertisement

Subscribe to Our Youtube Channel
Related Manuals for Hi Sharp HS-6IN1-T067B7


Summary of Contents for Hi Sharp HS-6IN1-T067B7
- Page 1 HD Analogue Camera_ Manual...
-
Page 2: Table Of Contents
Contents SAFETY PRECAUTIONS .............. 3 Specification .................. 4 Product contents ................5 Product overview ................. 6 Dimension..................7 COC (control over coaxial) function ........8 OSD Menu ..................9 Connection .................. 10... -
Page 3: Safety Precautions
SAFETY PRECAUTIONS Please read before using The lightning flash with arrowhead symbol, within an equilateral triangle, is intended to alert the user to the presence of insulated dangerous Voltage within the product’s enclosure that may be sufficient magnitude to constitute risk of electrical shock to persons. The exclamation point within an equilateral triangle is intended to alert the user to the presence of important operation and maintenance (servicing) instructions in the literature accompanying the appliance. -
Page 4: Specification
Specification Image unit 1/2.8” SONY IMX335 Resolution 4MP / 5MP Video Output AHD / CVI / TVI / CVBS Synchronization Internal S/N Ratio More than 50 dB ( AGC OFF) Electronic Shutter Auto 1/60 (1/50) ~ 1/50,000 sec Min. Illumination 0.01Lux Board Lens: 3.6 mm / 4 mm / 6 mm Lens Type... -
Page 5: Product Contents
Product contents This model is available in two brackets, with different bracket accessories. Bracket 1 Item Figure Trapping Screw × 3 Anchor × 3 Bracket Item Figure Trapping Screw × 5 Anchor × 3... -
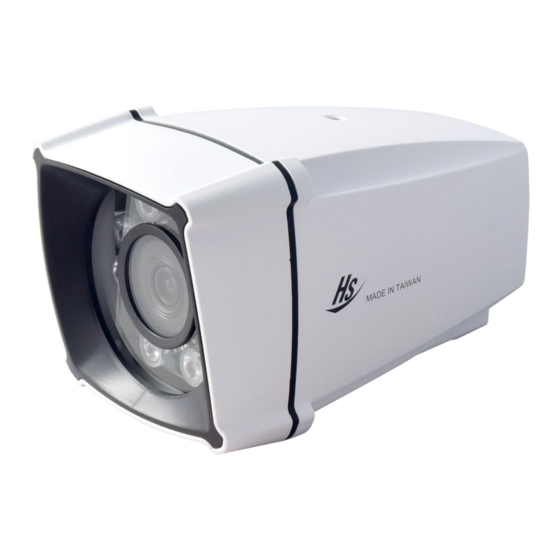
Page 6: Product Overview
Product overview Item Description Item Description Power cable (DC 12 V± 10%) Lens ① ⑤ BNC cable Bracket ② ⑥ OSD button ③ Camera ④... -
Page 7: Dimension
Dimension Unit : mm... -
Page 8: Coc (Control Over Coaxial) Function
COC (control over coaxial) function ① Enable the channel which you want to configure, and choose COC (control over coaxial) function under PTZ Protocol page. ② Click the right button of the mouse, choose PTZ Control. ③ Click ” Iris + “ to open OSD menu. Icon Description Open the OSD menu of camera / Enter... -
Page 9: Osd Menu
OSD Menu Notice : ”(xxx)”means (default value) 1.AE BRIGHTNESS 1~20 (12) EXPOSURE MODE GLOBE,BLC,FLC (GLOBE) LEVEL 1~9 (1) ※This item can be adjust when you choose BLC or FLC. RETURN 2.AWB MODE ATW,MWB (ATW) RGAIN 1~127 (65536) BGAIN 1~127 (65536) RETURN 3.DAY-NIGHT MODE... -
Page 10: Connection
Connection Bracket Step 1. Lock the screws to fix the bracket. Step 2. Make sure the connection is tightened. Step 3. Lock the last screws to install bracket completely. ※NOTICE : If necessary, please install 3 anchors before the first step. - Page 11 Bracket Step 1. Lock the screw to fix the camera. Step 2. Loosen the screw to adjust the bracket. Step 3. Make sure the connection is tightened. Step 4. Lock the screws to install bracket completely. ※NOTICE : If necessary, please install 3 anchors before the fourth step.
- Page 12 Connect BNC cable and power cable after installing bracket completely. BNC cable Power cable 85-B7T067-A502G-A...
Need help?
Do you have a question about the HS-6IN1-T067B7 and is the answer not in the manual?
Questions and answers