Table of Contents
Advertisement
Quick Links
Advertisement
Table of Contents

Related Manuals for CAS S2000JR


Summary of Contents for CAS S2000JR
-
Page 2: Table Of Contents
CONTENTS PRECAUTIONS ........... 4 PREFACE ............6 OVERALL VIEW ..........6 DISPLAY & KEYBOARD ........7 OPERATIONS ............ 11 I. Programming Mode ........11 ......12 Chapter 1. Basic Operation ... 15 Chapter 2. PLU Saving & Calling-up ....19 Chapter 3. -
Page 3: Precautions
PRECAUTIONS... -
Page 5: Preface
PREFACE Thank you for the purchasing CAS S2000 Jr. This series have been designed with CAS reliability, under rigid quality control and with outstanding performance. Your specialty departments can enjoy with CAS product. We hope that CAS product meets your needs. -
Page 6: Display & Keyboard
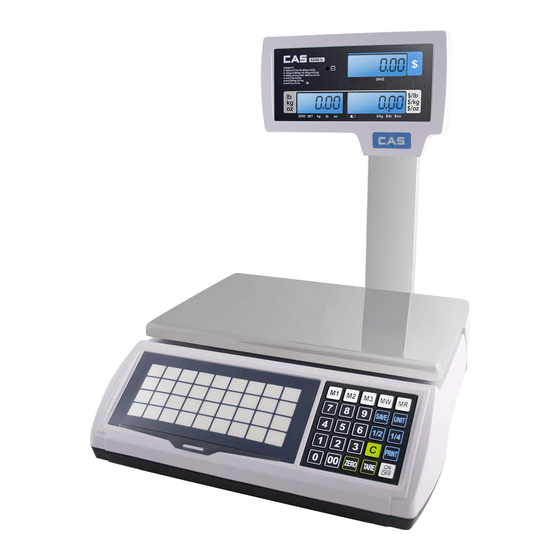
DISPLAY & KEYBOARD ■ S2000 Jr. LCD TYPE : Front Display ■ S2000 Jr. LCD TYPE : Rear Display ■ S2000 Jr. VFD TYPE : Front Display ■ S2000 Jr. VFD TYPE : Rear Display... - Page 7 ■ S2000 Jr. – M LCD TYPE : Front Display Table : Symbols on Display SYMBOLS DESCRIPTION To adjust zero Tare on Low battery warning Back light on Charge status...
- Page 8 ■ KEYBOARD ■ PLUS – M Direct PLU Key pad...
- Page 9 Table: Key Functions KEYS FUNCTIONS To input all of numerical data Direct PLU keys To save PLU To call up PLU Used to prevent the auto clearing of uni t price and weight both To clear data To set zero To set or clear tare value To turn on &...
-
Page 10: Operations
OPERATIONS . Programming Mode Chapter 1. Basic Operation Turning the scale on / off Turning backlight on / off(Option in LCD version only) Zero function Tare function – One Time tare – Successive tare – Preset tare Chapter 2. PLU Saving & Calling-up Saving unit price on PLU Saving tare weight on PLU Saving valid date set on PLU(Option) - Page 11 Receipt Date format setting Samples of Print format...
-
Page 12: Chapter 1. Basic Operation
Chapter 1. Basic Operation a. Turning the scale on / off ① Press ON/OFF key to turn on. ② Press ON/OFF key to turn off(LED, VFD Version). Press ON/OFF key for a few sconds to turn OFF(LCD Version) b. Turning backlight on/off(Option in LCD version only) ①... - Page 13 ① Press ZERO key to set zero point.
- Page 14 d.Tare function Tare means the weight of container. You may use tare function when you weigh an item with container and measure only the weight of item. ■ One time tare ① Place a container on the platter. ② Press TARE key to set zero point. Ex) 200g of tare.
- Page 15 ④ Press TARE key again to set zero. ③ After weighing item remove all of the container from the platter.
- Page 16 ■ Preset tare ② Press TARE key to set tare. ① Press appropriate numeric keys. Ex) 10g ③ Press TARE key again to set zero.
-
Page 17: Chapter 2. Plu Saving & Calling-Up
Chapter 2. PLU Saving & PLU Calling-up a. Saving unit price on PLU This section explains how to save unit price in PLU Number of PLU Range Remarks PLU Name 1~200 ① Press numeric key to input unit price you wish ②... - Page 18 Ex) 0.100...
- Page 19 c. Saving valid date set on PLU This section explains how to save valid date in PLU. You can input the valid date. Range is 0 ~ 999. Valid date Packed on date Sell by date Remarks 07.12.11 (Today) (No print) 07.12.11 (Today) 07.12.11(Today) 07.12.11(Today)
- Page 20 e. Saving PLU name ● C key is to input, save a character, and move to next character (or byte). ● TARE key is to move next programming menu. ① Input appropriate ASCII codes to save the PLU ② Press TARE key to exit to normal name.
- Page 21 f. Calling up a PLU ■ Indirect PLU ① To call up indirect PLU saved press ② To go back to nomal weighing mode appropriate numeric keys (address) and MR key press C key Ex) PLU 10 ■ Direct PLU ②...
-
Page 22: Chapter 3. User's Set-Up Mode
Chapter 3. User’s Set-up Mode This section explains how to set up the following functions. Functions Options Remarks 1. Auto power-off NO / 10 / 30 / 60 When backlight option selected in 2. LCD Backlight On/OFF OFF / ON / 3 / 5 / 10 LCD version only 3. - Page 23 Options Description Remarks No auto power-off. 10 (minutes) Auto power-off in 10 minutes when no use. 30 (minutes) Auto power-off in 30 minutes when no use. 60 (minutes) Auto power-off in 60 minutes when no use. ① Select an option you wish to have by using TARE key.
- Page 24 ① Press ZERO key to move next function setting, ② Use TARE key to select one of backlight auto backlight on/off power-off option or backlight on/off Ex) Select 5 seconds auto power-off option.
- Page 25 c. Brightness control (Option in LCD version only) This section explains how to set brightness level (1~7) ① Press ZERO key to move next function setting, backlight brightness. ② Press TARE key to select brightness. (1~7) d. Low battery backlight auto off function (Option in LCD version only) This section explains how to set backlight auto off.
- Page 26 e. Suspend mode function (Only LED version) This section explains how to set a time to suspend mode. Table : Options Description Remarks No suspend mode. 20(seconds) Suspend mode in 20 seconds when no use. 40(seconds) Suspend mode in 40 seconds when no use. 60(seconds) Suspend mode in 60 seconds when no use.
- Page 27 ① Press ZERO key to move next function setting, selecting the printer PLUS ② Select the printer you’re using with ER by Pressing TARE key. Ex) DEP- 50...
-
Page 28: Chapter 4. Formatting Printing Receipt
Chapter 4. Formatting printing receipt This chapter explains how to set the receipt format in the following fields. To set into “Printing format Setup mode” Press ON/OFF key pressing and holding C key. Options Description Remarks Maximum 1,2 line / 24 To input characters you wish to have on the receipt HEADER characters, 3 line / 16... - Page 30 ON/OFF key under the scale power off. wish to have. “1” on the “Unit Price” display represents that you Ex) CAS. are ready to input the first character. ③ To save it and go next header line press TARE ④ Using ASCII code you can input appropriate data key.
- Page 31 ⑤ To save it and go next header line press TARE ⑥ Using ASCII code you can input appropriate data key. on Header 2. Ex) THANK YOU c. Receipt currency (unit) setting ① Initial currency (unit) display status. ② Using ASCII code you can input appropriate character or currency symbols on unit.
- Page 32 d. Receipt DATE setting ① To save it and go to “Initial DATE display” status ② Just input appropriate weekday you wish to have, press TARE key. using numeric key. Ex) 0(Monday) ~ 6(Sunday) ③ Press C key to go to next “Month” ④...
- Page 33 ⑦ Press C key to go to next “Year” setting. ⑧ Just input appropriate year you wish to have, not using ASCII code. Ex) Year 2009 e. Receipt TIME setting ② Just input appropriate time you wish to ① Press C key to go to next “Hour” have, not using ASCII code.
- Page 35 ⑥ Just input a number according to below table. setting. Number Date format Year / Month / Date Date / Month / Year Ex) Press “1” to use DD/MM/YY print format ● If you press C or T(TARE) key you cas automatically go to nomal weighing mode.
- Page 36 g. Samples of Print format ■ DEP Printer...
-
Page 37: Sales Mode
. Sales Mode Chapter 5. Sales Transaction Sales with free price (hand pricing) Sales using PLU direct PLU indirect PLU Chapter 6. Daily Total Sales Calling up daily total sales data Deleting daily total sales data... -
Page 38: Chapter 5. Sales Transaction
Chapter 5. Sales Transaction PLUS may make sales transaction either with free price or with PLU. a.Sales with free price (hand pricing) This section explains how to make sales transaction with free price (hand pricing). ② Remove the item from the platter. ①... - Page 39 ③ If you press PRINT key add this transaction to ④ Remove the item from the platter. daily total amount and number of sales data, unit- ※ i price & total-price window is clear. connected printer, sale transaction data will printed out.
-
Page 40: Chapter 6. Daily Total Sales
Chapter 6. Daily Total Sales a. Calling up daily total sales data ② Press ∑ key again to call up daily total sales. ① Press ∑ key for 3 seconds until “dtP” Ex) daily total amount of sales=444.99, message shows up. ④... - Page 41 b. Deleting daily total sales data ② Press ∑ key again to call up daily ① Press ∑ key for 3 seconds until “dtP” total sales. message shows up. Ex) daily total amount of sales=444.99, ③ Press C key to delete “daily total sales” data.
-
Page 42: Ascii Code
Table: ASCII Code HIGH ORDER LOW ORDER ‘ ˝ & ´ ¥ < > Picture1: Alphabet location on the keyboard... -
Page 43: Error Messages
The “Err 0” occurs when scale is not stable. Remove unstable facts. The “Err 1” occurs when a current zero “Err 1” point Please call your CAS dealer. has shifted from the last span calibration. “Err 3” The “Err 3” is an overload error. -
Page 44: Specification
Table: SPECIFICATION MODEL S2000 Jr. Dual Interval Dual Interval Dual Interval CAPACITY Max 3/6kg Max 6/15kg Max 15/30kg e = 1/2g e = 2/5g e = 5/10g S2000 Jr. : 5 / 6 / 6 (Weight/Unit Price/Total Price) DISPLA Y S2000 Jr. - Page 45 ※ No tice : specifications are subject to change for improvement without notice. MEMO...
- Page 46 MEMO...
- Page 47 MEMO...
Need help?
Do you have a question about the S2000JR and is the answer not in the manual?
Questions and answers