Table of Contents
Advertisement
Quick Links
Advertisement
Table of Contents

Subscribe to Our Youtube Channel
Related Manuals for Atag VA61313KT


Summary of Contents for Atag VA61313KT
- Page 1 User Manual Dishwasher VA61313KT...
-
Page 2: Table Of Contents
CONTENTS Safety information Before first use Safety instructions Daily use Product description Hints and tips Control panel Care and cleaning Programmes Troubleshooting Settings Technical information Subject to change without notice. SAFETY INFORMATION Before the installation and use of the appliance, carefully read the supplied instructions. -
Page 3: Safety Instructions
Do not change the specification of this appliance. • The operating water pressure (minimum and maximum) • must be between 0.5 (0.05) / 8 (0.8) bar (MPa) Obey the maximum number of 13 place settings. • If the supply cord is damaged, it must be replaced by the •... - Page 4 • Connect the mains plug to the mains mains socket. Contact the Authorised socket only at the end of the Service Centre to replace the water installation. Make sure that there is inlet hose. access to the mains plug after the installation.
-
Page 5: Product Description
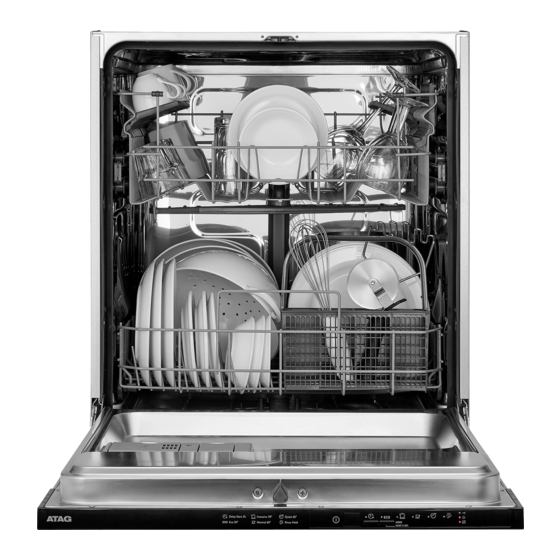
PRODUCT DESCRIPTION Upper spray arm Rinse aid dispenser Lower spray arm Detergent dispenser Filters Cutlery basket Rating plate Lower basket Salt container Upper basket Air vent CONTROL PANEL On/off button Indicators Programme indicators Programme button... -
Page 6: Programmes
Delay button Indicators Indicator Description End indicator. Rinse aid indicator. It is always off while the programme operates. Salt indicator. It is always off while the programme operates. PROGRAMMES Programme Degree of Programme Consumption values soil phases Type of load Dura‐... -
Page 7: Settings
Information for test institutes Write down the product number (PNC) that is on the rating plate. For all the necessary information for test performance, send an email to: info.test@dishwasher-production.com SETTINGS Programme selection mode and How to enter user mode user mode Make sure the appliance is in programme When the appliance is in programme selection mode. - Page 8 German de‐ French de‐ mmol/l Clarke de‐ Water softener grees (°dH) grees (°fH) grees level 23 - 28 40 - 50 4.0 - 5.0 28 - 35 19 - 22 33 - 39 3.3 - 3.9 23 - 27 15 - 18 26 - 32 2.6 - 3.2 18 - 22...
-
Page 9: Before First Use
How to deactivate AirDry Make sure the appliance is in user mode. 1. Press the programme button twice. • The indicators • The indicator flashes. 2. Wait until the indicators are off. The indicator still flashes. • The indicator shows the current setting: off = AirDry is During the drying phase, the... -
Page 10: Daily Use
How to fill the rinse aid 2. Put 1 litre of water in the salt container (only for the first time). dispenser 3. Fill the salt container with 1 kg of salt (until it is full). 4. Carefully shake the funnel by its CAUTION! Only use rinse aid handle to get the last granules inside. - Page 11 Using the detergent Starting a programme 1. Keep the appliance door ajar. 2. Press the on/off button to activate the appliance. Make sure that the appliance is in programme selection mode. 3. Press the programme button repeatedly until the indicator of the programme you want to select starts flashing.
-
Page 12: Hints And Tips
Cancelling the delay start End of the programme Press and hold the programme button When the programme is completed the until the appliance is in programme indicator is on. selection mode. 1. Press the on/off button or wait for the When you cancel the delay start, you have appliance to switch to standby mode. -
Page 13: Care And Cleaning
1. Set the highest level of the water • Put light items in the upper basket. softener. Make sure that the items do not move. 2. Make sure that the salt and rinse aid • Make sure that the spray arms can containers are full. - Page 14 5. Make sure that there are no residues of food or soil in or around the edge of 1. Turn the filter (B) counterclockwise the sump. and remove it. 6. Put back in place the flat filter (A). Make sure that it is correctly positioned under the 2 guides.
-
Page 15: Troubleshooting
Internal cleaning CAUTION! An incorrect position of the filters can cause • Carefully clean the appliance, including bad washing results and the rubber gasket of the door, with a damage to the appliance. soft damp cloth. • If you regularly use short duration Cleaning the spray arms programmes, these can leave deposits of grease and limescale inside the... - Page 16 Problem and alarm code Possible cause and solution The appliance does not fill with water. • Make sure that the water tap is open. • The end indicator flashes 1 time in‐ • Make sure that the pressure of the water supply termittently.
- Page 17 the problem occurs again, contact an Refer to "Before first use", Authorised Service Centre. "Daily use", or "Hints and For alarm codes not described in the tips" for other possible causes. table, contact an Authorised Service Once you have checked the appliance, Centre.
-
Page 18: Technical Information
Problem Possible cause and solution Traces of rust on cutlery. • There is too much salt in the water used for washing. Refer to "The water softener". • Silver and stainless steel cutlery were placed together. Avoid to put silver and stainless steel items close togeth‐ There are residues of deter‐... - Page 19 Capacity Place settings Power consumption Left-on mode (W) Power consumption Off-mode (W) 0.50 1) Refer to the rating plate for other values. 2) If the hot water comes from alternative source of energy, (e.g. solar panels, aeolian energy), use the hot water supply to decrease energy consumption.
- Page 20 When contacting the service department, have the complete type number to hand. You will find the addresses and phone numbers of the service organisation on the guarantee card. 156919310-A-312017...
Need help?
Do you have a question about the VA61313KT and is the answer not in the manual?
Questions and answers