Table of Contents
Advertisement
Quick Links
Avaya L129 Headset Quick
Reference Guide
©
Avaya L129 Headset
Thank you for purchasing the Avaya L129 Headset. Read
the instructions carefully before using this product, and
retain them for future reference.
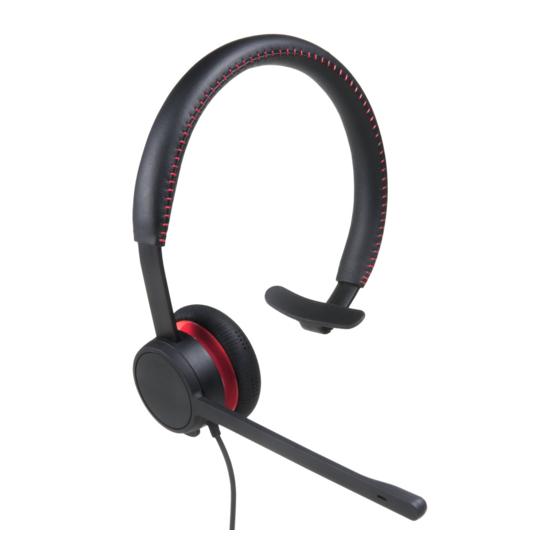
Part overview
1
2
3
4
1– Headband
2– Speaker
3– Microphone
4– Smart release
Features
• Rotating microphone boom arm that can be worn on
the left or right side
• Adjustable headband and microphone that provides
a customized fit
• High resolution audio
• Smart release connector
Release 1
• Bluetooth (only when connected to Avaya L100
May 2020
Touch Controller with Bluetooth)
2018-2020, Avaya Inc.
All Rights Reserved.
Connecting the headset to a phone
or a personal computer
Plug the connector cable into your phone or personal
computer.
You can use one of the following connector cables:
• 3.5mm for personal computers and smart phones
• RJ9 for deskphones
• USB with Bluetooth for personal computer and
some deskphone models
• USB without Bluetooth for personal computer and
some deskphone models
Smart release connector
The Avaya L129 Headset has a magnetic smart release
option. With this option, you can disconnect and re-
connect the headset to your phone or personal computer.
Supervisory cable
The supervisory cable connects two headsets with a
smart release connector for supervision purpose. The
connector is attached to the lower part of a cord. One side
of the cord is unmuted, so you can use it for speaking and
listening. The other side of the cord is muted, so you can
only use it for listening.
Call control functionality
To use this functionality on the headset, you need support
for at least one of the following smart release connectors:
• Avaya L100 Controller
• Avaya L100 Touch Controller
• Avaya L100 Touch Controller with Bluetooth
Bluetooth
The headset has built-in Bluetooth for pairing the headset
with a mobile device. When the headset is not paired with
a mobile device, the Bluetooth status remains off
You require Avaya L100 Touch Controller with Bluetooth to
use the Bluetooth functionality with the headset.
Pairing the headset with a mobile
device
1. On the Avaya L100 Touch Controller, press and hold
the Bluetooth logo for 5 seconds.
.
1
Advertisement
Table of Contents

Related Manuals for Avaya L129


Summary of Contents for Avaya L129
- Page 1 Features Smart release connector • Rotating microphone boom arm that can be worn on The Avaya L129 Headset has a magnetic smart release the left or right side option. With this option, you can disconnect and re- Avaya L129 Headset Quick connect the headset to your phone or personal computer.
- Page 2 You can control different functions of the headset with the Avaya L100 Touch Controller, which provides the following touch functions: Adjusting the headband All Avaya corded headsets have a flexible and adjustable headband. 1. Place the headband on your head. You can place the speaker with microphone on your left or right ear as per your own comfort.
- Page 3 Play/Pause key to play, pause, and continue the media Enabling and disabling the key lock You can lock and unlock all keys on the Avaya L100 Touch Controller. When key lock is enabled and you receive or make a call, then the key lock function gets disabled and reverts back to the previous state after you hang up.
- Page 4 CompatibilityMatrix/Index.aspx. computer and mobile device Care and safety information On the Avaya L100 Touch Controller, press and hold the Bluetooth logo for 2 seconds. • To avoid damage to hearing, do not listen at high You can hear a beep and the Bluetooth logo turns volume for a prolonged period.
Need help?
Do you have a question about the L129 and is the answer not in the manual?
Questions and answers