Advertisement
Avaya L119 Headset Quick
Reference Guide
Avaya L119 Headset
Thank you for purchasing the Avaya L119 Headset. Read
the instructions carefully before using this product, and
retain them for future reference.
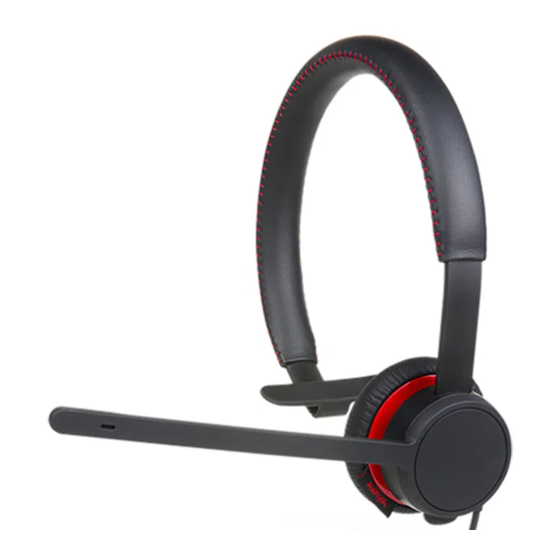
Part overview
1
2
3
4
1– Headband
2– Speaker
3– Microphone
4– RJ9 Connector
Features
• Rotating microphone boom arm that can be worn on
the left or right side
• Adjustable headband and microphone that provides
a customized fit
• High resolution audio
Release 1
Connecting the headset to a phone
Issue 1
December 2018
Plug the RJ9 connector into the phone.
©
2018, Avaya Inc.
All Rights Reserved.
Wearing the headset
For best audio experience, place the headset on your
left ear.
Adjusting the headband
All Avaya corded headsets have a flexible and adjustable
headband.
1. Place the headband on your head.
You can place the speaker with microphone on your
left or right ear as per your own comfort.
2. Adjust the headband for a comfortable fit.
Positioning the microphone
For optimal sound quality, position the bendable boom
arm in front of your mouth at a distance of 2–3 cms.
1
Advertisement
Table of Contents

Related Manuals for Avaya L119


Summary of Contents for Avaya L119
- Page 1 Plug the RJ9 connector into the phone. © 2018, Avaya Inc. All Rights Reserved. Avaya L119 Headset Thank you for purchasing the Avaya L119 Headset. Read the instructions carefully before using this product, and retain them for future reference. Part overview Wearing the headset...
- Page 2 Rotate the boom arm as required up to maximum 270°. Headset compatibility To check the compatibility of the headset with other products, see http://support.avaya.com/ CompatibilityMatrix/Index.aspx. Care and safety information • To avoid damage to hearing, do not listen at high volume for a prolonged period.
Need help?
Do you have a question about the L119 and is the answer not in the manual?
Questions and answers