Table of Contents
Advertisement
Quick Links
Advertisement
Table of Contents

Subscribe to Our Youtube Channel
Related Manuals for AVer DL10


Summary of Contents for AVer DL10
- Page 1 DL10 User Manual...
- Page 2 Federal Communications Commission Statement NOTE: This equipment has been tested and found to comply with the limits for a Class A digital device, pursuant to part 15 of the FCC Rules. These limits are designed to provide reasonable protection against harmful interference when the equipment is operated in a commercial environment.
- Page 3 © 2022 AVer Information Inc. All rights reserved. All rights of this object belong to AVer Information Inc. Reproduced or transmitted in any form or by any means without the prior written permission of AVer Information Inc. is prohibited. All information or specifications are subject to change without prior notice.
- Page 4 WARNING To reduce the risk of fire or electric shock, do not expose this appliance to rain or moisture. Warranty will be void if any unauthorized modifications are done to the product. Do not drop the camera or subject it to physical shock. ...
- Page 5 More Help For FAQs, technical support, software and user manual download, please visit: Headquarters Download Center: https://www.aver.com/download-center Technical Support: https://www.aver.com/technical-support USA Branch office Download Center: https://www.averusa.com/education/support Technical Support: https://averusa.force.com/support/s/contactsupport Europe Branch office Download Center: https://www.avereurope.com/download-center Technical Support: https://www.avereurope.com/technical-support...
- Page 6 Tel: +81 (0) 3 5989 0290 テクニカル・サポート: Support.EDU.JP@aver.com Vietnam Branch Office Công ty TNHH AVer Information (Việt Nam) Tầng 5, 596 Nguyễn Đình Chiểu, P.3, Quận 3, Thành phố Hồ Chí Minh 700000, Việt Nam Tel: +84 (0) 28 22 539 211...
-
Page 7: Table Of Contents
Contents Package Contents ................1 Camera Mount Suggestions (Optional Accessories) ....1 Product Introduction ................. 2 Overview ..................2 LED Indicator ................2 Pan and Tilt Angle ................ 3 Dimension ..................3 Cable Fixing Plate Installation ............4 Device Connection ............... 5 Connections ................. - Page 8 If there is DHCP environment ..........13 Or if you want to configure by yourself ........ 13 Web Setup ................. 14 Use the AVer IPCam Utility to Find the Camera ......14 Make a Connection to the Camera via Browser ......15 Live View ................... 16 Snapshot ................
- Page 9 Preset .................. 28 Exposure ................29 Image Process ..............29 System ................32 FAQ ....................35 Specification** ................37...
-
Page 10: Package Contents
Package Contents Power Adapter (1.2 m/3.93 ft) Camera Unit Cable Fixing Plate Cable Ties (x3) Power Cord (1.83 m/6.00 ft) M2 x 4mm Screws USB Cable Quick Start Guide Remote Control (x2) (1.5 m/4.92 ft) 1/4”-20, L=7.5mm User Manual* Warranty Card* Screw *Only for Japan Camera Mount Suggestions (Optional Accessories) -
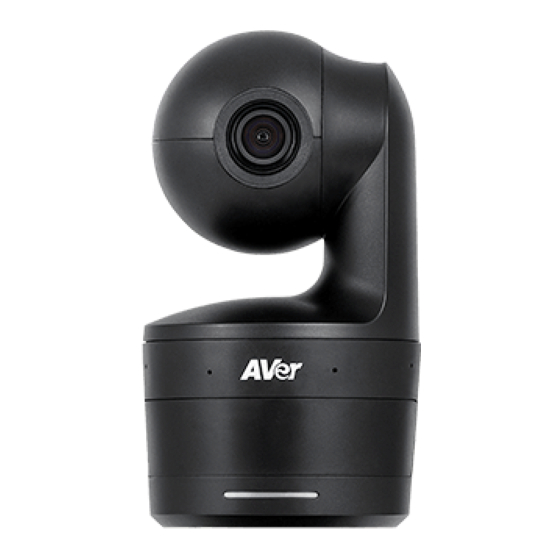
Page 11: Product Introduction
Product Introduction Overview 5 6 7 8 9 (1) Camera Lens (4) LED Indicator (7) Ethernet Port (2) Built-in Microphones (5) Audio In* (8) DC Power Jack (3) IR Sensor (6) USB Port (9) Kensington Lock *Line input level: 1Vrms (max) *Mic input level: 50mVrms (max);... -
Page 12: Pan And Tilt Angle
Pan and Tilt Angle ±90° ±170° Dimension... -
Page 13: Cable Fixing Plate Installation
Cable Fixing Plate Installation 1. Secure the cable fixing plate to the camera with two M2 x 4 mm screws in the package. Use 3 cable ties in the package to secure 2. Plug in cables. the cables and cable fixing plate. -
Page 14: Device Connection
Device Connection CaptureShare Laptop/Desktop (Management/Presentation) Microphone Audio Input Monitor/TV (Display) Lecture Capture System (Record) DL10 Tracking Camera Web Application PTZ Management (Remote Management) -
Page 15: Connections
Connections Audio cable Microphone Power adaptor Power cord USB cable Laptop RJ-45 cable Desktop Power outlet Network... -
Page 16: Audio Input Connection
Audio Input Connection Connect the audio device for audio receiving. [Note] Line input level: 1Vrms (max) Mic input level: 50mVrms (max); Supplied voltage: 3.3V Because video conferencing software such as Google Hangouts (Windows), Skype (Mac), or Teams (Windows and Mac) can automatically adjust volume, the user might experience randomly unstable volume while using the camera. -
Page 17: Ceiling Mount Installation (Optional)
Ceiling Mount Installation (Optional) Use two M2 x 4mm screws (in the DL camera package) to secure the cable fixing plate (in the DL camera package) to the camera. Plug in cables. Use 3 cable ties (in the DL camera package) to secure the cables and cable fixing plate. -
Page 18: Wall Mount Installation (Optional)
Wall Mount Installation (Optional) Use two M2 x 4mm screws (in the DL camera package) to secure the cable fixing plate (in the DL camera package) to the camera. Plug in cables. Use 3 cable ties (in the DL camera package) to secure the cables and cable fixing plate. - Page 19 After assembling the L-mount brackets, use the screws specified below (not included) to secure the lower part of L-mount brackets onto the wall. [Note] For cement wall: M4 x 20mm self-tapping screws (x2) + plastic conical anchor For wooden wall: M4 x 20mm self-tapping screws (x2) Pass the cables through the hole on the L-mount brackets and connect the cables to their corresponding connection ports.
-
Page 20: Camera Setup Recommendations
Camera Setup Recommendations Angle A: less than 30˚ Height B: 2~2.5 m from floor, 2 m is suggested. Distance C: 1.5~5 m Distance between the camera and tracking target (presenter): Optical zoom ratio ability Upper body size Full body size 3 m (9.84 ft) 5 m (16.4 ft) -
Page 21: Remote Control
It will be on when pressing other (2) Remote Control LED buttons. Open and exit the OSD menu. (3) Menu [Note] DL10 does not support OSD menu. Switch from presenter to another (4) Switch presenter. Turn on auto tracking. -
Page 22: Hot Key
(17) Camera Select selected, the CAM button LED will be on when pressing other buttons. If only one AVer camera is connected, then the default is CAM1. Hot Key Press certain button on remote control to perform hot key function. -
Page 23: Web Setup
Web Setup Connect the camera from a remote site through the Internet. Use the AVer IPCam Utility to Find the Camera To find the IP address of your cameras, you can execute the IPCam Utility installer. Follow the below steps to find the IP address of the camera. -
Page 24: Make A Connection To The Camera Via Browser
Make a Connection to the Camera via Browser Open the browser and enter the IP address of the camera. The PC/laptop requires an internet access. After connecting to the camera, enter the user account and password (default is admin/admin) to log in Web. -
Page 25: Live View
Live View In live view, the user can make a snapshot, set up camera control (zoom in/out, camera direction control, pan/tilt speed, focus), view preset, and tracking control (on, off, tracking mode). Snapshot Select the camera button to make a snapshot and download the file to local storage. -
Page 26: Pan-Tilt-Zoom Control
Pan-Tilt-Zoom Control To operate the PTZ Camera motion, use to adjust the camera view position and use to zoom. Select to go back to default position. Manual Pan-Tilt Speed Adjustment Adjust the speed of manual Pan-Tilt. [Note] The max manual pan speed is 100°/sec. The max manual tilt speed is 100°/sec. -
Page 27: Focus
Focus Switch to auto (AF) or manual (MF) focus. The manual focus use “+” and “–” to adjust focus. Select “+” to adjust focus to the far end and focusing on a far subject; select “-” to adjust focus to near end and focusing on a near subject. -
Page 28: Tracking Control
Tracking Control Enable/disable tracking function, select tracking mode, and operate one-click tracking function. Tracking mode (refer to Tracking Settings section for setup) Presenter: Camera will start tracking when object enters the tracking point. [Note] Tracking point under presenter mode: default set is preset 1. -
Page 29: Settings
Settings Tracking Settings Enable/disable tracking function, set up tracking mode, operate one-click tracking function and pan/tilt/zoom the camera. [Note] Tracking will be off when activating pan/tilt/zoom or go to preset point. Tracking Control Enable/disable tracking function, select tracking mode, operate one-click tracking function (refer to Tracking Control section), and pan/tilt/zoom the camera. -
Page 30: Presenter
Presenter Select the “Presenter” tab in Tracking Settings interface. Camera will start tracking when object enters the tracking point. 1. Use to adjust the camera to tracking point. 2. Then, select Save to Preset 1 to save the tracking point. 3. - Page 31 6. Effective Tracking Area: When Effective Tracking Area function is on, camera only tracks around the selected area. Check the box to turn on the Effective Tracking Area function then click Set to configure the targeted area in the live view. Move the upper left corner and the lower right corner of the red solid frame to define the targeted area.
-
Page 32: Zone
Zone Select the “Zone” tab in Tracking Settings interface. Set up 2 to 4 block areas for the camera. Each block is corresponding to one preset position. Camera will switch between preset positions when the presenter enters different blocks. 1. Select the “Number of block” (2, 3, or 4). - Page 33 2. Select the block and set the preset positions in order (preset 6 to preset 9). Use to move the camera to desired position and select “Save” to save the preset position. And, a snapshot of the preset image will show at corresponding image display box.
-
Page 34: Hybrid
Repeat the steps above to configure Preset 11-13. Leave some space between Preset 10 to 13, as each preset point zone is meant to center on the content of the teaching gadget, such as the whiteboard and the projector screen. DL10 Tracking Camera Zone Zone... - Page 35 Secondly, determine how the camera tracks the presenter. Tracking Sensitivity: sets the sensitivity level of tracking. Move bar to set the value. The current value is displayed at upper right corner. Time of Return to Tracking Point: sets the idle time for camera return to tracking point. Move bar to set the value.
-
Page 36: Camera Settings
Camera Settings Camera Control Select Settings ( ) > Camera Settings > Camera Control. You can navigate the camera to the desired angle with its PTZ function. Auto Focus Modes: Select . Find the two modes below in the AF Mode drop-down list. AF Trigger after PTZ (Default): After the camera pans, tilts, or zooms in/out, the auto ... -
Page 37: Preset
Preset Set up preset position and view preset position. 1. Select the “Preset” tab in Camera Settings interface. 2. Use , and to adjust camera view position. 3. Enter preset position number (0~255) in Save Preset column and select “Save” to save the position. -
Page 38: Exposure
Select the “Exposure” tab in camera settings interface. Set up the exposure type - Full Auto or Manual and relevant settings. [Note]: Iris Level configuration is not supported on DL10. Image Process Select the “Image Process” tab in camera settings interface. - Page 39 3 types of video modes can be selected and each one only supports single function, Stream Only: Supports RTSP/RTMP only. USB Only (factory default): Supports USB port output only; not compatible with AVer PTZ Management and PTZ Control Panel. Please switch to the other two modes if necessary.
- Page 40 RTSP Security for user to set a security key number for streaming. Connecting to DL10 via RTSP On your media applications such as VLC, PotPlayer, or QuickTime, you can connect to DL10 by entering the following RTSP URL: “rtsp://IP address of DL10/live_st1”.
-
Page 41: System
The system information of camera is displayed in this page, including Model Name, IP Address, Serial Number, MAC Address, and Firmware Version. Upgrade firmware: follows below steps to upgrade the firmware. 1. Download the newest firmware from: Global: https://www.aver.com/download-center USA: https://www.averusa.com/education/support Europe: https://www.avereurope.com/download-center 2. - Page 42 Factory Default: clears all values and resets the camera back to factory default values. Login: the default login name and password are admin/admin. To change the login name and password, enter the new login name and password and select the “Change” button. ...
- Page 43 Showing 4 switches the camera’s shooting angle between the presenter’s Full Body and Upper Body.
-
Page 44: Faq
Can I pan, tilt, zoom, and set preset point when tracking is on? Yes, but tracking will be off when activating pan/tilt/zoom or go to preset point. Any value will be auto saved and shifted when going to the preset point? Yes, preset point value: PTZ, exposure, shutter, ev, brightness, gain, slow shutter, white balance, focus, focus position, digital zoom, R&B gain. - Page 45 - USA Branch office: https://www.averusa.com/education/support - Europe Branch office: https://www.avereurope.com/download-center You can launch and upgrade the camera firmware via the camera webpage. In addition, we also provide an automatic and manual firmware update via AVer software, including AVer PTZ Management and AVer CaptureShare.
-
Page 46: Specification
Specification** Camera Image Sensor 1/2.8” CMOS Effective Picture Elements 2 Megapixels USB: 1080P60 (max) Output Resolutions RTSP: 1080P60 (max) Minimum Illumination 0.5 Lux (IRE50, F2.0, 30 FPS) S/N Ratio > 50dB Gain Auto, Manual TV Line 800 (Center/Wide) 1/4 s to 1/10,000 s (60Hz) Shutter Speed 1/3 s to 1/10,000 s (50Hz) Exposure Control... - Page 47 Noise Reduction 2D/3D NR Image Effect Noise Reduction (2D/3D), Flip, Mirror, WDR Power Frequency 50 Hz, 60 Hz Noise Suppression AI Auto Tracking Functions Tracking Modes Presenter Mode, Zone Mode, Hybrid Mode Gesture Control Yes (Tracking On/Off, Full/Upper Body) Privacy Protection Mechanisms Protection Modes Privacy Mode, Sleep Mode Sleep Mode...
- Page 48 Maximum SPL 129 dB SPL at 0.5 meter General Power Requirement AC100 - 240V to DC12V 2A or above Power Consumption PoE+ NA (LAN) Dimensions (W x D x H) 92.39 mm x 94.44 mm x 164.00 mm Net Weight 745 g Application Indoor...
- Page 49 Exposure/White Balance/Picture Network Configuration DHCP, IP Address, Gateway, Subnet mask, DNS Software Tools AVer CaptureShare (via USB, via IP with virtual camera) Single Camera Control AVer PTZ Control Panel (via IP) AVer OBS Plugin for PTZ Cameras (via IP) Multi-Camera Control and...
Need help?
Do you have a question about the DL10 and is the answer not in the manual?
Questions and answers