
Subscribe to Our Youtube Channel
Related Manuals for emerio BH-216560.1


Summary of Contents for emerio BH-216560.1
- Page 1 BH-216560.1 Bathroom Heater (EN) Badheizung (DE) Radiateur pour salles de bains (FR) Termoventilatore da bagno (IT)
- Page 2 Content – Inhalt – Teneur – Contenuto Instruction manual – English ..................- 2 - Bedienungsanleitung – Deutsch ................- 15 - Mode d‘emploi – Français ..................- 29 - Manuale d'istruzioni – Italiano ................. - 43 - - 1 -...
-
Page 3: Instruction Manual - English
Instruction manual – English FOR YOUR OWN SAFETY 1. Read and save these instructions. Attention: pictures in the IM are for reference only. 2. This appliance can be used by children aged from 8 years and above and persons with reduced physical, sensory or mental capabilities or lack of experience and knowledge if they have been given supervision or instruction concerning use of the appliance in a safe way and... - Page 4 10. This appliance is intended to be used in household and similar applications. 11. Do not leave your home while the appliance is in use. Ensure that the switch is in OFF (0) position. Always unplug the appliance when not in use. Do not pull the cord to unplug the heater.
- Page 5 Caution, hot surface. WARNING!! Please do not touch surface while in use. The temperature of accessible surfaces may be high when the appliance is operating. 24. Regarding the information pertaining to the installation, please refer to the below paragraph of the manual. - 4 -...
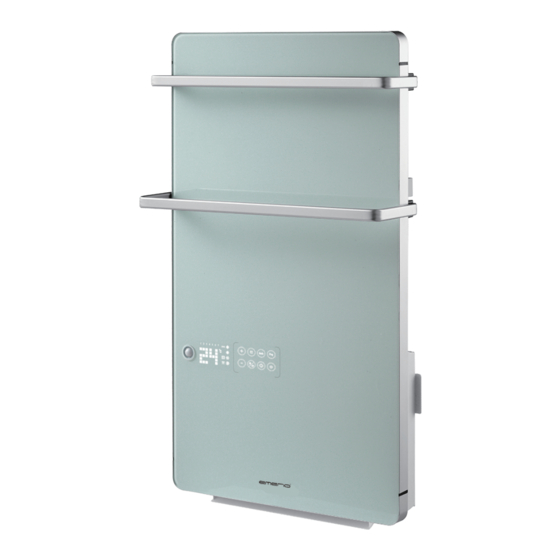
- Page 6 BH-216560.1 PARTS DESCRIPTION Heating panel Power switch Body sensor LED display and control panel Towel racks Air outlet of PTC heating Temperature sensor LED display and control panel Value increase Value decrease Timer button Panel heating / window open detection button...
- Page 7 WALL MOUNTING Choose a wall where has enough space and is suitable to install the appliance. Use the enclosed template to mark the holes to be drilled on the wall. Then drill 4 holes Φ6 each into the wall. Insert the plastic expansion bolts into the holes. Fix the wall bracket to the two upper holes using two ST4X35 screws - 6 -...
- Page 8 Fasten the two Z-brackets to the back of the heater with two M4X8 screws. Insert the smaller towel rack into the provided brackets (higher position) and screw it tight with four M4X16screws. Follow the same way to fix the larger towel rack to the brackets in lower position with four M4X16 screws.
- Page 9 Fix the Z-brackets to the wall with two ST4X35 screws. The screws should fit into the two previously drilled lower holes. Wipe the surface of the appliance with a soft cloth. The appliance is ready for operation. OPERATION Plug the appliance into an appropriate electrical outlet. Power on the appliance by pressing the power switch to position “I”.
- Page 10 Power setting Power Icon Display Function PTC heating high power 1800W Room heating PTC heating low power 1100W Room heating Panel Heating 200W Towel heating Full power 1800W + 200W = 2000W Room heating +towel heating PTC heating (1800W): Touch button to turn on the appliance.
- Page 11 00:00- 24:00 Anti-frost: the appliance keeps the room temperature at default 5℃ to prevent frost. Comfort: the comfortable level is achieved by setting power and temperature upon need. (Refer to above power and temperature setting). The set power and temperature will be used for all comfort mode. Note: the power and temperature can only be adjusted in comfort mode.
- Page 12 working and recover to initial display in 5 seconds. Long touch button “+” or “–” at the same time for 3 seconds again could cancel child lock function. Window Open Detection Function: In any working mode, long touch button for 3 seconds to activate window open detection,icon flashes on the screen.
- Page 13 To return your used device, please use the return and collection systems or contact the retailer where the product was purchased. They can take this product for environmental safe recycling. Emerio Switzerland AG Oberneuhofstrasse 1 6340 Baar...
- Page 14 ERP information (EN) Supplier: Emerio Switzerland AG Oberneuhofstrasse 1 6340 Baar Switzerland Declare that the product detailed below: Information requirements for electric local space heaters Model identifier(s): Item Symbol Value Unit Item Unit Heat output Type of heat input, for electric storage...
- Page 15 Emerio Switzerland AG Contact details Oberneuhofstrasse 1 6340 Baar Switzerland Satisfies the requirement of the Council Directives: COMMISSION REGULATION (EU) No 2015/1188 of 28 April 2015 and Amending COMMISSION REGULATION (EU) 2016/2282 implementing Directive 2009/125/EC of the European Parliament and of the Council with regards to...
-
Page 16: Bedienungsanleitung - Deutsch
Bedienungsanleitung – Deutsch ZU IHRER SICHERHEIT 1. Lesen und bewahren Sie diese Anleitungen auf. Achtung: Die Bilder in der Bedienungsanleitung dienen nur zur Veranschaulichung. 2. Dieses Gerät kann von Kindern ab 8 Jahren und von Personen mit eingeschränkten physischen, sensorischen oder geistigen Fähigkeiten oder ohne Erfahrung und/oder Wissen benutzt werden, wenn diese durch eine für ihre Sicherheit zuständige Person beaufsichtigt werden oder... - Page 17 verlassen können; es sei denn, sie werden konstant beaufsichtigt. 9. Wenn die Netzanschlussleitung dieses Gerätes beschädigt wird, muss sie durch den Hersteller oder seinen Kundendienst oder eine ähnlich qualifizierte Person ersetzt werden, um Gefährdungen zu vermeiden. 10. Dieses Gerät ist für den Gebrauch in Haushalten und ähnlichen Anwendungsbereichen vorgesehen.
- Page 18 dem Boden befindet. 21. WARNUNG: Das Heizgerät darf nicht benutzt werden, wenn die Glasplatte beschädigt ist. Bedeutet " Nicht abdecken ". Vorsicht – heisse Oberfläche. WARNUNG! Bitte berühren Sie während des Gebrauchs nicht die Oberfläche. Die Temperatur der zugänglichen Oberflächen kann sehr hoch sein, wenn das Gerät in Betrieb ist.
- Page 19 BH-216560.1 BEZEICHNUNG DER EINZELTEILE Heizelement Hauptschalter Personensensor LED-Display und Bedienfeld Handtuchhalter Luftauslass des PTC-Heizelements Temperatursensor LED-Display und Bedienfeld Wert erhöhen Wert verringern Timer-Taste Taster für Flächenheizung / Fenstererkennung Modus-Taste Betriebsschalter für das PTC-Heizelement Programmtaste für den UP-Modus Ein/Standby-Taste Symbol für hohe / niedrige PTC-Heizstufe 10.
- Page 20 WANDMONTAGE Eine Wand zur Gerätemontage auswählen, die genug Platz bietet und geeignet ist. Mit der beigefügten Schablone die Bohrlöcher an der Wand anzeichnen. Anschließend 4 Löcher mit je Φ 6 mm Durchmesser in der Wand bohren. Die Kunststoffdübel in die Bohrlöcher stecken. Wandhalterung mit zwei ST4X35 Schrauben an den oberen beiden Löchern anschrauben.
- Page 21 Die beiden Z-Halterungen mit zwei M4X8 Schrauben auf der Rückseite des Heizgeräts anschrauben. Den kleineren Handtuchhalter in die vorgesehenen Halterungen einsetzen (obere Position) und mit vier M4X16 Schrauben befestigen. Ebenso den größeren Handtuchhalter mit vier M4X16 Schrauben an den Halterungen unten befestigen. Die beiden Handtuchhalter können nach oben und nach unten versetzt werden.
- Page 22 Die Z-Halterungen mit zwei ST4X35 Schrauben an der Wand anschrauben. Die Schrauben sollten in die beiden zuvor gebohrten unteren Löcher passen. Die Oberfläche des Geräts mit einem weichen Tuch abwischen. Das Gerät ist nun betriebsbereit. BETRIEB Gerät an eine geeignete Steckdose anschließen. Zum Einschalten den Hauptschalter auf Position „I“ stellen. Das Display und das Bedienfeld leuchten 10 Sekunden lang auf.
- Page 23 die Stunde und danach die Minute. Anschließend wird wieder die aktuelle Temperatur angezeigt. Heizstufe einstellen Leistung Angezeigtes Funktion Symbol Hohe PTC-Heizstufe 1800 W Raumheizung Niedrige PTC-Heizstufe 1100 W Raumheizung Flächenheizung 200 W Handtuchheizung Maximalleistung 1800 W + 200 W = 2000 Raumheizung + Handtuchheizung PTC-Heizung (1800W): Die Taste...
- Page 24 00:00- 06:00- 17:00- 06:00 17:00 24:00 00:00- 24:00 00:00- 06:00- 22:00- 06:00 22:00 24:00 00:00- 24:00 Frostschutz: Das Gerät hält eine Solltemperatur von 5 °C im Raum, um Frost zu vermeiden. Komfort: Für die Komfortstufe werden Leistung und Temperatur nach Bedarf eingestellt. (Siehe die Erläuterungen zu den Leistungs- und Temperatureinstellungen oben).
- Page 25 Timer-Einstellung Die Taste im Modus P1 zweimal schnell berühren, um die Timer-Einstellung zu aktivieren. Die Symbole & blinken. Mit "+" oder "-" einen Timer zwischen 0 und 24 einstellen. Den Wert 5 s lang eingestellt lassen. Timer-Einstellung wird übernommen. Display werden abwechselnd Umgebungstemperatur und der rückwärts gezählte Timer angezeigt.
- Page 26 REINIGUNG UND PFLEGE Filter Den Filter nach etwa 150 Betriebsstunden reinigen. Die ST3X10Schrauben mit einem Schraubendreher vom Filter lösen. Danach den linken und rechten Filter entfernen. Den Filter anhand der Bezugslinie (siehe Zeichnung unten) wieder montieren. Den Filter bis zum Anschlag hineinschieben. Heizgerät Immer den Gerätestecker vor dem Reinigen aus der Steckdose ziehen und das Gerät vollständig abkühlen lassen.
- Page 27 Wiederverwertung von Ressourcen zu fördern. Nutzen Sie zur Rückgabe Ihres Altgeräts bitte die Rückgabe- und Sammelsysteme oder wenden Sie sich an den Händler, bei dem Sie dieses Gerät erworben haben. Dieser kann das Gerät umweltschonend entsorgen. Emerio Switzerland AG Oberneuhofstrasse 1 6340 Baar...
- Page 28 ERP-Informationen (DE) Lieferant: Emerio Switzerland AG Oberneuhofstrasse 1 6340 Baar Switzerland Erklärt für das im Folgenden beschriebene Produkt: Erforderliche Angaben zu elektrischen Einzelraumheizgeräten Modellkennung(en): Angabe Symb Wert Einheit Angabe Einheit Wärmeleistung Nur bei elektrischen Speicher-Einzelraumheizgeräten: Art der Regelung der Wärmezufuhr (bitte eine Möglichkeit auswählen)
- Page 29 Nein Heizbeginns mit Betriebszeitbegrenzung mit Schwarzkugelsensor Nein Kontaktangaben Emerio Switzerland AG Oberneuhofstrasse 1 6340 Baar Switzerland Erfüllt die Anforderung der Richtlinien des Rates: VERORDNUNG (EU) Nr. 2015/1188 DER KOMMISSION vom 28. April 2015 und Anpassung der VERORDNUNG (EU) 2016/2282 DER KOMMISSION zur Durchführung der Richtlinie 2009/125/EG des Europäischen Parlaments und des Rates im Hinblick auf die Festlegung von Anforderungen an die...
-
Page 30: Mode D'emploi - Français
Mode d‘emploi – Français PRÉCAUTIONS DE SÉCURITÉ 1. Lisez et conservez ces instructions. Attention: les images incluses dans le manuel d'instructions servent de référence seulement. 2. Cet appareil peut être utilisé par des enfants âgés d'au moins 8 ans et par des personnes ayant des capacités physiques, sensorielles ou mentales réduites ou dénuées d’expérience ou de connaissance, s'ils (si elles) sont correctement surveillé(e)s ou si des instructions relatives à... - Page 31 personnes incapables de quitter le local seules, à moins qu'une surveillance constante ne soit prévue. 9. Si le câble d'alimentation est endommagé, il doit être remplacé par le fabricant, son service après vente ou des personnes de qualification similaire afin d'éviter un danger.
- Page 32 21. AVERTISSEMENT : N’utilisez pas le radiateur si le panneau en verre est endommagé. Signifie "NE PAS COUVRIR" . Attention, surface chaude. Avertissement!! Veuillez ne pas toucher la surface pendant l’utilisation. La température des surfaces accessibles peut être élevée lorsque l'appareil est en fonctionnement.
- Page 33 BH-216560.1 DESCRIPTION DES PIÈCES Panneau chauffant Interrupteur d’alimentation Capteur corporel Affichage LED et panneau de commande Porte-serviettes Sortie d’air du chauffage PTC Capteur de température Affichage LED et panneau de commande Bouton + Bouton - Bouton de réglage de la minuterie Bouton de chauffage du panneau/détection de fenêtre ouverte...
- Page 34 FIXATION AU MUR Choisissez un mur où il y a suffisamment d’espace et qui convient pour installer l’appareil. Utilisez le gabarit fourni pour marquer les endroits où percer les trous sur le mur. Puis percez 4 trous (Φ6 mm) dans le mur. Insérez les chevilles à expansion en plastique dans les trous. Fixez le support mural dans les deux trous supérieurs à...
- Page 35 Fixez les deux équerres en Z à l’arrière du radiateur à l’aide de deux vis M4X8. Insérez le plus petit porte-serviettes dans les supports fournis (position haute) et vissez-le fermement à l’aide de quatre vis M4X16. Répétez cette procédure pour fixer le plus grand porte-serviettes aux supports (position basse) à...
- Page 36 Fixez les équerres en Z au mur à l’aide de deux vis ST4X35. Les vis doivent s’insérer dans les deux trous inférieurs percés précédemment. Essuyez la surface de l’appareil avec un chiffon doux. L’appareil est prêt à l’emploi. FONCTIONNEMENT Branchez l’appareil sur une prise électrique adaptée. Mettez l’appareil en marche en basculant l’interrupteur d’alimentation en position «...
- Page 37 Remarque : l’appareil reviendra automatiquement à l’affichage initial si aucune opération n’est effectuée dans les 10 secondes pendant le réglage. Comment vérifier l’heure actuelle : appuyez une fois sur le bouton . L’heure actuelle apparaî t sur l’affichage, d’abord les heures puis les minutes, puis la température actuelle apparaî t de nouveau sur l’affichage.
- Page 38 Les modes P1, P2, P3, P4, P5 sont des programmes prédéfinis pour un réglage rapide. Mode de fonctionnement Jour de la Mode semaine Antigel Confort Antigel Confort Antigel Confort Antigel 00:00- 24:00 00:00- 06:30- 08:30- 17:00- 22:30- 06:30 08:30 17:00 22:30 24:00 00:00-...
- Page 39 Détecteur de présence Le détecteur de présence n’est actif qu’en mode confort dans le mode UP. Si après 15 minutes de fonctionnement en mode confort, le détecteur de présence ne détecte pas de mouvement dans la salle de bains, il se désactivera. Si un mouvement est détecté dans le temps défini, il se remettra en marche, en suivant le programme hebdomadaire établi.
- Page 40 Réinitialisation aux paramètres d’usine Pendant le fonctionnement, appuyez simultanément et rapidement sur deux fois pour réinitialiser l’appareil aux paramètres d’usine. SYSTÈME DE SÉCURITÉ L’appareil possède un système de sécurité qui désactive automatiquement l’appareil s’il est en surchauffe. ⚫ En cas de surchauffe, éteignez l’appareil, débranchez sa fiche de la prise électrique et laissez-le refroidir ⚫...
- Page 41 Pour recycler votre produit, utilisez les réseaux de collecte de votre région ou prenez contact avec le revendeur du produit. Ce dernier pourra vous aider à le recycler. Emerio Switzerland AG Oberneuhofstrasse 1 6340 Baar...
- Page 42 Informations ERP (FR) Fournisseur: Emerio Switzerland AG Oberneuhofstrasse 1 6340 Baar Switzerland Déclare que le produit désigné ci-dessous : Exigences d'informations applicables aux dispositifs de chauffage décentralisés électriques Référence(s) du modèle : Caractéristique Symbole Valeur Unité Caractéristique Unité Puissance Type d'apport de chaleur, pour les...
- Page 43 Option contrôle à distance Contrôle adaptatif de l'activation Limitation de la durée d'activation Capteur à globe noir Coordonnées Emerio Switzerland AG de contact Oberneuhofstrasse 1 6340 Baar Switzerland Satisfait aux exigences des Directives du Conseil : Règlement (UE) n° 2015/1188 de la Commission du 28 avril 2015 et amendé par le règlement (UE) n°...
-
Page 44: Manuale D'istruzioni - Italiano
Manuale d'istruzioni – Italiano INFORMAZIONI PER LA SICUREZZA DEGLI UTENTI 1. Leggere e conservare queste istruzioni. Attenzione! Le immagini contenute nel manuale sono esclusivamente a scopo di riferimento. 2. Questo dispositivo può essere utilizzato da bambini dagli 8 anni in su e da persone con ridotte capacità fisiche, sensoriali o mentali o che non abbiano la necessaria esperienza e conoscenza se hanno ricevuto adeguate istruzioni per utilizzare il dispositivo in maniera sicura e... - Page 45 9. Se il cavo di alimentazione è danneggiato, farlo sostituire dal produttore, dal servizio assistenza o personale qualificato per evitare pericoli. 10. Questo apparecchio è destinato all’uso domestico e applicazioni similari. 11. Non uscire di casa mentre l’unità è in funzione. Accertarsi che l’interruttore sia in posizione OFF (0).
- Page 46 Significa "NON COPRIRE!“ Attenzione! Superficie calda. AVVERTENZA! toccare superficie mentre l'apparecchio è in funzione. La temperatura delle superfici accessibili può essere elevata quando l'apparecchio è in funzione. 24. Per quanto riguarda le informazioni che riguardano l’installazione, far riferimento al paragrafo di seguito del manuale.
- Page 47 BH-216560.1 DESCRIZIONE DELL'APPARECCHIO Pannello riscaldante Interruttore di alimentazione Sensore di presenza Display LED e pannello di controllo Barre porta-asciugamani Apertura di uscita dell'aria Sensore della temperatura Display LED e pannello di controllo Pulsante di aumento del valore Pulsante di diminuzione del valore...
- Page 48 FISSAGGIO ALLA PARETE Selezionare una parete dotata di spazio sufficiente e idonea al fissaggio dell'apparecchio. Usare la dima inclusa per contrassegnare la posizione dei fori sulla parete. Praticare 4 fori da Φ6 nella parete. Inserire i tasselli in plastica nei fori. Fissare la staffa a parete ai due fori superiori usando due viti ST4X35.
- Page 49 Fissare le due staffe a Z sul retro dell'apparecchio con due viti M4X8. Inserire la barra porta-asciugamani più piccola nelle apposte staffe (posizione superiore) e serrarla con quattro viti M4X16. Procedere allo stesso modo per fissare la barra porta-asciugamani più grande nella posizione inferiore con quattro viti M4X16.
- Page 50 Fissare le staffe a Z alla parete con due viti ST4X35. Le viti devono essere inserite nei due fori inferiori praticati nella parete. Pulire le superfici dell'apparecchio con un panno morbido. Ora l'apparecchio è pronto per l'uso. UTILIZZO Collegare l'apparecchio a una presa di corrente adatta. Accendere l'apparecchio portando l'interruttore di alimentazione in posizione "I".
- Page 51 Nota: se non viene premuto alcun pulsante entro 10 secondi, il giorno e l'ora torneranno ai valori iniziali. Per visualizzare l'ora corrente, premere una volta il pulsante ; sul display appariranno prima l'ora e poi i minuti, quindi nuovamente la temperatura corrente. Impostazione della potenza Potenza Indicatore...
- Page 52 Le modalità P1, P2, P3, P4 e P5 sono predefinite per un'impostazione rapida. Giorno Funzione Modali della tà Antigelo Comfort Antigelo Comfort Antigelo Comfort Antigelo settimana 00:00- 24:00 00:00- 06:30- 08:30- 17:00- 22:30- 06:30 08:30 17:00 22:30 24:00 00:00- 07:30- 10:00- 12:00- 14:00-...
- Page 53 Nota: ciascun passaggio deve essere completato entro 2 minuti; in caso contrario, l'impostazione verrà annullata. Sensore di presenza Il sensore di presenza è attivo esclusivamente durante la funzione comfort in modalità UP. Se dopo 15 minuti di funzionamento in funzione comfort il sensore di presenza non rileva alcun movimento nel bagno, l'apparecchio si arresterà.
- Page 54 SISTEMA DI SICUREZZA L’unità è dotata di un sistema di sicurezza che spegne automaticamente l’unità in caso di ⚫ surriscaldamento. Se l’unità si surriscalda, rimuovere la spina dalla presa elettrica, premere i pulsanti per spegnere l’unità e ⚫ lasciarla raffreddare per almeno 30 minuti. Inserire la spina nella presa elettrica e accendere il termoventilatore.
- Page 55 Per restituire il dispositivo utilizzato, servirsi dei sistemi di restituzione e raccolta o contattare il proprio rivenditore autorizzato dove il prodotto è stato acquistato. Il rivenditore autorizzato si occuperà dello smaltimento sicuro del prodotto. Emerio Switzerland AG Oberneuhofstrasse 1 6340 Baar Switzerland...
- Page 56 Informazioni ERP (IT) Il fornitore: Emerio Switzerland AG Oberneuhofstrasse 1 6340 Baar Switzerland dichiara che il prodotto descritto di seguito Informazioni obbligatorie per gli apparecchi per il riscaldamento d'ambiente locale elettrici Identificativo del modello: Dato Simbolo Valore Unità Dato Unità...
- Page 57 Sì funzionamento con termometro a globo nero Contatti Emerio Switzerland AG Oberneuhofstrasse 1 6340 Baar Switzerland è conforme ai requisiti fissati dalle seguenti direttive: REGOLAMENTO (UE) N. 2015/1188 DELLA COMMISSIONE del 28 aprile 2015 e REGOLAMENTO (UE) N.
Need help?
Do you have a question about the BH-216560.1 and is the answer not in the manual?
Questions and answers