Advertisement
Quick Links
Installation & Operating Instructions
CiBO+, UKCA and CE models
Please make a note of your product details for
future use:
Date Purchased:_________________________
Model Number:__________________________
Serial Number:__________________________
Dealer:_________________________________
_______________________________________
IS 782 ECN 4729
Page 1 of 38
Advertisement

Subscribe to Our Youtube Channel
Related Manuals for Lincat Cibo+ UKCA


Summary of Contents for Lincat Cibo+ UKCA
- Page 1 Installation & Operating Instructions CiBO+, UKCA and CE models Please make a note of your product details for future use: Date Purchased:_________________________ Model Number:__________________________ Serial Number:__________________________ Dealer:_________________________________ _______________________________________ IS 782 ECN 4729 Page 1 of 38...
-
Page 2: Table Of Contents
WARNING! This symbol is used whenever there is a risk of personal injury. CAUTION! This symbol is used whenever there is a risk of damaging your Lincat product. NOTE: This symbol is used to provide additional information, hints and tips. -
Page 3: Warnings And Precautions
KEEP THIS MANUAL FOR FUTURE REFERENCE This manual contains important safety and installation-operation instructions. All users/operators should be required to read this manual before operating the oven. Failure to follow the instructions contained in this manual may cause injury or death, damage to the oven and will void the warranty. - Page 4 Microwave heating of beverages can result in delayed eruptive boiling, therefore care must be taken when handling the container. The contents of feeding bottles and baby food jars must be stirred or shaken and the temperature checked before consumption in order to avoid burns. We recommend that the oven is not used for heating these products.
- Page 5 Do not cook directly on the glass base. Use a Teflon or similar lining sheet. Do not use metal tools to clean the glass base. Do not hit the glass base. Never use any metal, one-use plastics or aluminium foil in this oven unless Lincat approved.
-
Page 6: Technical Data
Technical Data and Specifications External Dimensions, Weight and Power Height (mm) Width (mm) Depth (mm) 665 + 60 handle Weight (kg) 52.0 Power rating 3kW, 13A @230V Internal oven cavity dimensions Height (mm) Width (mm) Depth (mm) IS 782 ECN 4729 Page 6 of 38... -
Page 7: Installation And Commissioning
Technical Pictures Installation and Commissioning This appliance must be earthed. An equipotential bonding terminal is provided to allow cross bonding with other equipment. If replacing the plug connect the terminals as follows: Green and Yellow wire Earth Blue wire Neutral N Brown wire Live IS 782 ECN 4729... - Page 8 Supply cords shall be oil resistant, sheathed flexible cable not lighter than ordinary polychloroprene or equivalent elastomer sheathed cord (code 60245 IEC 57) Install this appliance on a level surface ensuring all vents are unobstructed. Ensure that the surface is capable of safely supporting the weight of the appliance. Any partitions, walls or furniture must be of non-combustible material.
-
Page 9: Cleaning
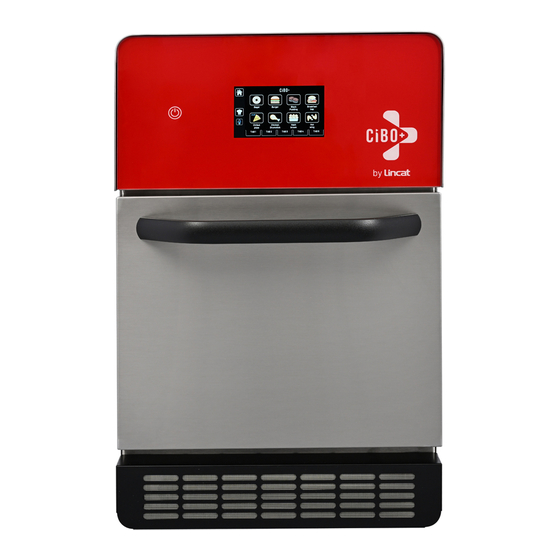
What’s in the box? CiBO+ oven This Instructions Manual IS782 Quick Start Guide xxx Recipe book Cleaning Guide xxx Loading Paddle LT05 Teflon Tray CIBO/TT Teflon Sheet TFS05 Oven Cleaner OC01 (CiBO Sparkle) Oven Shield OS01 Air filter grill GR68 Accessories, Consumables and Codes Magnetic Loading Paddle Holder LTH01... - Page 10 General layout Fig 2 (Front View) A – Door Handle B – Touchscreen display C – On/Off button, Press and hold for 3 seconds D – Air filter, must always be fitted when the oven is switched on E – USB port (behind air filter) To access the USB port, remove the air filter.
- Page 11 Fig 3 (Rear View) F – Air Outlet, do not block G – Limit thermostat H – Mains supply I – Stand-off spacer Only qualified or trained personnel should use this appliance. Quick start guide – Switching on Make all the relevant safety checks and ensure the oven is clean and empty before proceeding.
- Page 12 The Home screen CiBO+ Tri Heat Cooking technology CiBO+ has three heat sources – a twin oven element with power ratings of 500 and 1,500W, a 1000W output microwave magnetron and a 700W heated base element. Not all the heat sources are powered on at same time (the controller prevents this) and power is always limited to less than 13 amps, allowing a standard 13A plug to be used.
- Page 13 ECO. This is displayed in the bottom left corner if ECO mode is selected in the settings. It can be used to reduce electricity consumption during quiet periods The home screen shows the first 8 recipes in the first group. Four more groups are selectable across the bottom of the screen.
- Page 14 When the set oven temperature is reached the oven will beep, the screen will go green and the oven is ready to be loaded with product. Place the food in the oven and touch the “Play” button. The oven will cook the food to the selected recipe, the screen will go red and beep to tell you it is complete.
- Page 15 Touch “Stop” and carefully remove the food from the oven. There is an auto-stop / reset to ready option in the settings menu. IS 782 ECN 4729 Page 15 of 38...
- Page 16 Settings Copying and moving recipes From the Home screen, touch Recipe Manager to be presented with the Recipe Manager screen. This screen allows you to copy / move and edit recipes. Copy Touch the copy button and select the recipe to copy. Then select the position to copy the recipe to, this can be in any Group.
- Page 17 Recipe editing This is a typical recipe. To rename the group, touch the Group name (Snacks) on the right hand title bar and use the keyboard to edit the title. Accept your changes with the “Tick”. Touch the Save icon. Touch the Home icon to return to the Home screen. To rename a recipe, touch the recipe name (Chicken Wings) on the top title bar and use the keyboard to edit the title.
- Page 18 To change the oven temperature settings of a Group From a selected recipe, touch the temperature figures (bottom right side) and you will be presented with the Temperature adjustment screen (above). Touch the temperatures you wish to change and adjust them with the slider bar. Touch the Save icon and the Home icon to return to the Home screen.
- Page 19 To edit individual recipes From the Recipe Manager touch the recipe icon you wish to edit. The Recipe editing screen consists of 4 rows of cooking stages (not all will need to be used for most recipes), with 3 columns to set Microwave Power, Fan Speed and Time. Touch any of the numerals and they will become orange, to change them, edit with the slider bar.
- Page 20 To change a recipe icon Recipe icons can be selected from a library to complement the product being cooked. To change a recipe icon, touch Recipe Manager and then the Recipe icon to be changed. Touch on the icon image in the top right corner to open the icon library. Select your new icon, touch Save and then Home icon to return to the Home page to see the new recipe icon.
- Page 21 This is the settings screen showing the five sub categories. Touch the relevant arrow to advance to the next level. Temperature and Control Auto Preheat. If this is set the oven will start to heat as soon as the oven is switched on and on the home screen.
- Page 22 Measurement units. Touch to cycle between Celsius and Fahrenheit Magnetron Energy delay. Selecting this adds a 5 second delay to the recipe start to compensate for the time needed for the magnetron to heat and start emitting microwaves. ECO Settings. See explanation on next page. Auto Preheat settings Enable Turns the Auto Preheat on and off.
- Page 23 ECO settings Eco allows you to save energy during quiet periods by reducing the temperature of the oven. Enable. Turns ECO on and off Set Temperature. Sets the temperature the oven reduces to after no cooking activity within the Timeout time Timeout Time.
- Page 24 Settings – Sound and Display Sound and Display settings allows the user to configure volumes and screen appearance to their preference. Volume – Touch volume to toggle the level of the warning buzzer. Buzzer Reset Time – Touch the time to adjust the duration of the buzzer time. It is set to sound every 10 seconds for the duration of this time.
- Page 25 Settings – Test and Diagnostics (Engineer Utility) These are a series of utilities for checking the health of the oven. They are not needed on a day to day basis but are used to diagnose and test the various components within the oven.
- Page 26 Element test This indicates the status of the elements and thermocouples, a tick meaning they are working correctly a cross indicates a potential issue. Touch to retest the components and refresh the indicators. Touch to return to the previous menu IS 782 ECN 4729 Page 26 of 38...
- Page 27 Motor test This screen allows the three different motors to be tested. Press to start a motor Press to stop a motor The Oven fan and Case cooling fan motors are speed controlled and pressing the numbers alllows the spped to be varied. This can be both felt and heard as the speed is increased and decreased.
- Page 28 Microwave test This screen is used by service engineers to verify the performance of the magnetron componentry The AC Supply range is used to set the magnetron supply. Over 225V ac is high and under 225V is low. Temperatures This screen is used by service engineers to check the temperatures of the various components in the oven.
- Page 29 Energy and Datalog This shows both energy consumption and also counts the number of door operations. In order to use it the time and date need to be set in the Datalog setup screen. Touch the relevant parameter and use the slider to adjust. Once correct confirm with the save button.
- Page 30 PIN will be needed each time the settings screens are entered. You can disable the PIN by entering the PIN settings screen and selecting no PIN and confirm by entering the PIN number. A master PIN number is available for the Lincat Service desk should the PIN ever be forgotten lost.
- Page 31 From the Software and Data screens you can access and update the versions of software and hardware you are using, upload and download recipes including those from another CiBO+, set your preferred screen appearance and set the appropriate language. IS 782 ECN 4729 Page 31 of 38...
- Page 32 Hardware Revision – shows the installed hardware Revision VFD Firmware Version – Shows the current VFD Version. Updates will be issued by Lincat when there is an enhancement to be made to the oven. The general sequence is to always update the display hardware first.
- Page 33 Recipe Control This function provides the facility to upload, download and delete recipes which allows recipes to be moved between different CiBO+ ovens. Import recipe – Ensure the USB stick is inserted into the port behind the lower air grill. Touch the Arrow.
- Page 34 Software and Data – Images and Themes This is where you can load updated recipe icons and set your preferred screen appearance. Load Recipe Icons – Ensure the USB connection is made. Touch the Right arrow to import recipe icon set. Remove the USB stick, fit the dust cap and replace the grill. Load Theme –...
- Page 35 If it’s an element or thermocouple error you can re-run the test to confirm. Try re-starting the oven by powering off for 10 seconds at the plug and then restarting. It the fault persists call Lincat Service. IS 782 ECN 4729...
-
Page 36: Servicing, Maintenance And Component Replacement
Do not use a water jet or steam cleaner, and do not immerse this appliance. The oven should be cleaned regularly with Lincat Sparkle (OC01) oven cleaner and all food deposits removed. When cool clean with warm water and mild detergent, do not use tools or abrasive materials. - Page 37 Monday to Friday, 08:30 to 17:00. GUARANTEE This oven has a 2 year warranty fulfilled by Lincat in the UK or your dealer outside of the The guarantee is in addition to, and does not diminish your statutory or legal rights.
- Page 38 The guarantee does not cover: • Accidental damage, misuse or use not in accordance with the manufacturer’s instructions • Consumable items. • Damage due to incorrect installation, modification, unauthorised service work or damage due to scale, food debris build-up, etc. •...
Need help?
Do you have a question about the Cibo+ UKCA and is the answer not in the manual?
Questions and answers