
Related Manuals for Micromeritics Smart VacPrep


Summary of Contents for Micromeritics Smart VacPrep
- Page 1 ™ MART NTELLIGENT ACUUM AMPLE REPARATION YSTEM NSTALLATION NSTRUCTIONS AND HECKLIST 067-42870-02 June 2022 (Rev A)
- Page 2 Copyright The software described in this manual is furnished under a license agreement and may be used or copied only in accordance with the terms of the agreement. ____________________________________________________________________________ Copyright © 2014 - 2022. Micromeritics Instrument Corporation. All rights reserved.
- Page 3 MICROMERITICS shall not be liable for consequential or other type damages resulting from the use of any of its products other than the liability stated above. This warranty is in lieu of all other warranties, express or implied, including but not limited to, the implied warranties of merchantability or fitness for use.
- Page 4 The company has R&D and manufacturing sites in the USA, UK, and Spain, and direct sales and service operations throughout the Americas, Europe, and Asia. Micromeritics systems are the instruments-of-choice in more than 10,000 laboratories of the world’s most innovative companies and prestigious government and academic institutions.
- Page 5 Norcross, GA / USA / 30093-2901 Phone: 1-770-662-3636 Fax: 1-770-662-3696 www.Micromeritics.com Instrument Service or Repair Phone: 1-770-662-3666 International: Contact your local distributor or call 1-770-662-3666 Service.Helpdesk@Micromeritics.com Micromeritics Application Support Support@Micromeritics.com Smart VacPrep Installation Instructions and Checklist 067-42870-02 (Rev A) — June 2022...
-
Page 6: General Safety
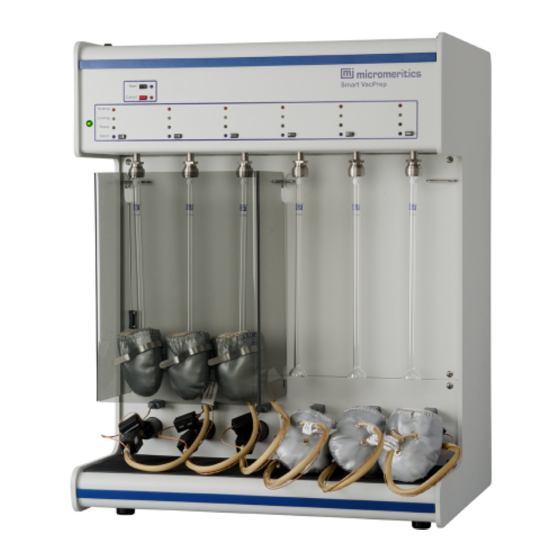
When lifting or relocating the instrument, use proper lifting and transporting devices for heavy instruments. Ensure that sufficient personnel are available to assist in moving the instrument. The Smart VacPrep weighs approximately 32 kg (70 lb). Always pay attention to the safety instructions provided on each label affixed to the instrument and do not alter or remove the labels. - Page 7 General Safety NTENDED The Smart VacPrep degasser is an advanced six-port system that utilizes vacuum to prepare samples by heating and evacuation. Each of the ports may be operated independently. Samples may be added or removed from degas ports without disturbing the treatment of other samples undergoing preparation.
- Page 8 EFUP (for example, battery modules) and are marked to reflect such. The Environmentally Friendly Use Period is valid only when the product is operated under the conditions defined in the product manual. Smart VacPrep Installation Instructions and Checklist viii 067-42870-02 (Rev A) — June 2022...
-
Page 9: About This Manual
About this Manual BOUT THIS ANUAL The following can be found on the Micromeritics web page (www.Micromeritics.com). Parts and Accessories Error Messages Vacuum Pump Guide (PDF) The following symbols or icons indicate safety precautions and/or supplemental information and may appear in this manual: NOTE —... -
Page 10: Table Of Contents
6 Installation Checklists 6 - 1 Exceptions 6 - 3 Signatures 6 - 4 Final Documentation 6 - 4 Smart VacPrep 067 EU Declaration of Conformity DoC - 1 Smart VacPrep Installation Instructions and Checklist 067-42870-02 (Rev A) — June 2022... -
Page 11: Overview
1 Overview VERVIEW This document contains procedures for installing and verifying the operation of the Smart VacPrep degasser. Use these installation instructions and checklists to ensure that installation procedures are completed properly. It is recommended that installation procedures be performed in the order presented in this document. -
Page 12: Safe Servicing
1 Overview ERVICING Do not modify this instrument without the authorization of a Micromeritics service per- sonnel. To ensure safe servicing and continued safety of the instrument after servicing, service personnel should be aware of the following risks: Product specific risks that may affect service personnel: Electrical. -
Page 13: Power
Power OWER The Smart VacPrep is designed to operate with line voltage of 100/120/230/240VAC ±10, 50/60 Hz through a standard wall receptacle. Noise-free power of the correct voltage and frequency, with a safety earth ground, should be available through a standard wall receptacle. There should be a minimum 15A rated breaker @ 100/120 VAC and a minimum 7.5A @ 240 VAC. -
Page 15: Smart Vacprep Hardware Installation
NSTALLATION ET THE OLTAGE The Smart VacPrep voltage setting is housed in a compartment adjacent to the power connector on the back of the unit. 1. Use a flat head screwdriver to gently pry open the cover of the compartment. -
Page 16: Connect Ethernet Cable
2. Plug the other end of the shielded Ethernet cable into the Ethernet port on the computer. Connectivity for the 067 Smart VacPrep is different. The 067 Smart VacPrep must be connected using an Ethernet switch. To connect the 067 Smart VacPrep to the... - Page 17 Connect Ethernet Cable Do not use the uplink port when using an Ethernet switch. Smart VacPrep Installation Instructions and Checklist 2 - 3 067-42870-02 (Rev A) — June 2022...
-
Page 19: Software Update
2. Click Next on the Welcome window. 3. On the Select Task window, select Add or Modify Smart VacPrep, then click Next. Smart VacPrep Installation Instructions and Checklist 3 - 1 067-42870-02 (Rev A) — June 2022... - Page 20 3 Software Update 4. On the Configure the Smart VacPrep window, enter a serial number for each installed Smart VacPrep unit. The serial number is located on the identification label near the power switch. Click Next. 5. On the Completing the Setup window, select the Create a desktop icon to place a shortcut on the desktop workspace.
-
Page 21: Start The Application
Start the Application TART THE PPLICATION To start the application, either click the application shortcut on the desktop OR select the application from the Windows program list. Smart VacPrep Installation Instructions and Checklist 3 - 3 067-42870-02 (Rev A) — June 2022... -
Page 23: Gas Connections
500 psi (3500 kPa) on the high-pressure gauge. Contaminants absorbed to the walls of the cylinder will desorb as the pressure decreases. Ensure the gas cylinder is closed before connecting to the analyzer. Smart VacPrep Installation Instructions and Checklist 4 - 1 067-42870-02 (Rev A) — June 2022... - Page 24 Observe the pressure on the high pressure gauge. d. If pressure drops, repair the leak. 6. Connect the gas line to the regulator. a. Connect the gas line to the regulator connector. Smart VacPrep Installation Instructions and Checklist 4 - 2 067-42870-02 (Rev A) — June 2022...
-
Page 25: Connect A Regulator And A Gas Line To A Gas Cylinder
Open the gas cylinder shut-off valve and flow gas for 10 to 30 seconds. c. Close the gas cylinder shut-off valve and allow regulator pressure to go to zero. Smart VacPrep Installation Instructions and Checklist 4 - 3 067-42870-02 (Rev A) — June 2022... -
Page 26: Connect The Backfill Gas And Evacuate The Gas Line
Do not exceed 5 psi regulator pressure when backfilling sample tubes. If the gas pressure is greater than the recommended maximum of 5 psig (35 kPag), the sample tube could be ejected from the fitting or broken. Smart VacPrep Installation Instructions and Checklist 4 - 4 067-42870-02 (Rev A) — June 2022... -
Page 27: Degas A Sample
Edit. a. Enter the degas conditions for each degas station to be used. b. Click Save. c. On the Smart VacPrep unit, press the Select button for each port then press the Start button. Smart VacPrep Installation Instructions and Checklist 5 - 1 067-42870-02 (Rev A) —... -
Page 29: Installation Checklists
Install the components of the vacuum pump. Check the pump voltage setting. Connect the vacuum pump to analyzer. Power ON the vacuum pump switch (if applicable). Power ON the analyzer. Smart VacPrep Installation Instructions and Checklist 6 - 1 067-42870-02 (Rev A) — June 2022... - Page 30 6 Installation Checklists Modify the Analyzer Software Evaluation Initial / Date Procedure Code Modify the application software. Start the application. Does the Smart VacPrep operate properly? Smart VacPrep Installation Instructions and Checklist 6 - 2 067-42870-02 (Rev A) — June 2022...
-
Page 31: Exceptions
Exceptions XCEPTIONS Explain the procedures that were categorized as Fail or No. Comment Initial / Date Procedure Smart VacPrep Installation Instructions and Checklist 6 - 3 067-42870-02 (Rev A) — June 2022... -
Page 32: Signatures
Service Support Center in Norcross, GA, USA. After completing the installation process, representatives of Micromeritics who install analyzers are required to send the following documents to Micromeritics for inclusion in the customer's analyzer history:...
Need help?
Do you have a question about the Smart VacPrep and is the answer not in the manual?
Questions and answers