Advertisement
Quick Links
ProBuilder 36/42 Ember-Glo Light Kit (MV / GSB2)
Compatibility
•
ProBuilder 36CF
Packing List
•
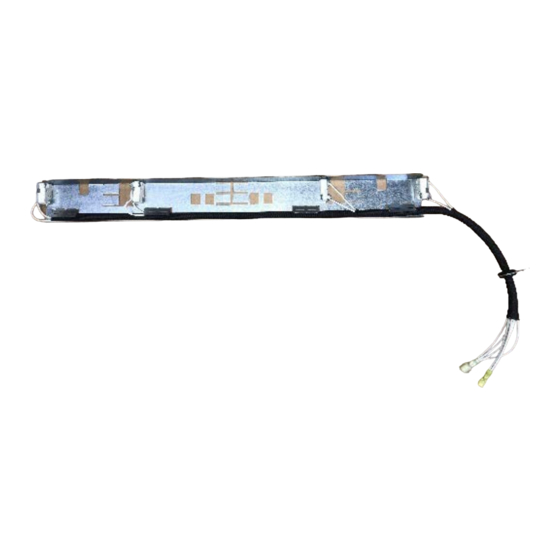
Light Assembly with Wire Leads & Seal Plate
•
Rheostat Assembly
•
(4) Halogen Bulbs
•
Ember Glass
•
(2) 8-32 X 3/8" screws
Tools Required
•
11/32" Nut Driver/Wrench
•
1/4" Nut Driver/Wrench
Page 1 of 9
SKU# 94400897
•
•
•
•
•
17602033 - Printed 8/28/18
ProBuilder 42CF
Power Harness
(2) 8-32 KEPS nuts (use 11/32" nut driver)
Molex Dummy Plug (used only on MV
appliances without a blower)
(1) can of paint
© Travis Industries, Inc.
Advertisement

Subscribe to Our Youtube Channel
Related Manuals for Travis Industries ProBuilder 36


Summary of Contents for Travis Industries ProBuilder 36
- Page 1 ProBuilder 36/42 Ember-Glo Light Kit (MV / GSB2) SKU# 94400897 Compatibility • • ProBuilder 36CF ProBuilder 42CF Packing List • • Light Assembly with Wire Leads & Seal Plate Power Harness • • Rheostat Assembly (2) 8-32 KEPS nuts (use 11/32” nut driver) •...
-
Page 2: Installation Notes
ProBuilder 36/42 Ember-Glo Light Kit (MV / GSB2) SKU# 94400897 Installation Notes Install The Blower First The blower is installed at the back of the fireplace. If using, we recommend installing it first so its installation does not interfere with the light wiring. - Page 3 ProBuilder 36/42 Ember-Glo Light Kit (MV / GSB2) SKU# 94400897 6. Remove the cover plate on the right side of the firebox floor (Discard the cover plate. Keep the screws for reinstallation). Leave the gasket it place. Remove Cover – Leave gasket 7.
- Page 4 ProBuilder 36/42 Ember-Glo Light Kit (MV / GSB2) SKU# 94400897 9. Allign the (2) holes in the back of the light assembly with the (2) LOWER holes on the front of the grate assembly. Secure the assembly to the burner housing using the included screws.
- Page 5 ProBuilder 36/42 Ember-Glo Light Kit (MV / GSB2) SKU# 94400897 11. Reinstall the media tray and skirt. 12. Locate the “Power In” wires connected to the junction box on the right side of the firelace. The wires are white and have large white Molex connectors at the end. Connect the male Molex connecter, on the harness included with this kit, to the Molex connector labeled “Lights”.
- Page 6 ProBuilder 36/42 Ember-Glo Light Kit (MV / GSB2) SKU# 94400897 14. Disconnect the dashboard from the fireplace (4 screws hold it in place) and place it face down in front of the fireplace. NOTE The rheostat shown in the picture above operates the blower. If a blower is not being installed on your fireplace, the blower rheostat will not be present on the dashboard.
- Page 7 ProBuilder 36/42 Ember-Glo Light Kit (MV / GSB2) SKU# 94400897 16. Connect the two wires from the rheostat to the wires labeled “rheostat” on the wire harness (polarity does not matter). 17. Reinstall the dashboard onto the fireplace. 18. Install the logs (see installation manual for details).
-
Page 8: Rock Wool Placement
ProBuilder 36/42 Ember-Glo Light Kit (MV / GSB2) SKU# 94400897 • Lightly fog the ember glass with the black touch-up paint provided. Check the appearance with the lights on and add additional paint, as needed, for a realistic glowing ember appearance. -
Page 9: Bulb Replacement
ProBuilder 36/42 Ember-Glo Light Kit (MV / GSB2) SKU# 94400897 Bulb Replacement • Remove the screen and glass assemblies (see appliance manual for details). • Remove the media tray skirt (see step 4). NOTE: Take care not to disturb the ember bed media on the media tray when removing and replacing the media tray skirt.
Need help?
Do you have a question about the ProBuilder 36 and is the answer not in the manual?
Questions and answers