
Related Manuals for Hologic Acessa ProVu


Summary of Contents for Hologic Acessa ProVu
- Page 1 Acessa ProVu System User’s Guide PL-01-0040 ® Release Date: 2/5/2021 USER’S GUIDE CO 20-131 Revision: C...
-
Page 2: Table Of Contents
Environmental and EMI Warnings Tissue 5.3. Warnings During Electrosurgical Device Ex-Vivo Studies 12.1. Ex-Vivo Studies 5.4. Warnings Specific to the Acessa ProVu 12.2. Representative Ablation Shape per System Deployment 5.5. Warnings Concerning Acessa ProVu System 12.3. Results from Ex-Vivo Bovine Liver Studies Guidance Accuracy 5.6. - Page 3 18.4. Compliance to Safety and Performance 14.6.1. Final safety findings (key endpoints) Standards 14.6.2. Study Strengths and Weaknesses Trouble Shooting Potential Risks of Acessa ProVu System 30 19.1. Faults, Alerts, and Errors Patient Counseling 19.2. Fault/Alert Code Table Care and Maintenance Glossary of Symbols and Product Graphics 17.1.
-
Page 4: Introduction
The Acessa Guidance System feature is an advanced electromagnetic spatial tracking system designed to calculate the position and orientation of sensors within a defined volume. The sensors are embedded in the tip of the Acessa ProVu Handpiece and the Acessa ProVu Transducer with Sensor, so that the system can determine the position and orientation to each other within the patient’s abdominal cavity and display an animated image on a monitor. - Page 5 Acessa ProVu System User’s Guide PL-01-0040 ® CO 20-131 Revision: C...
-
Page 6: Contraindications
Acessa ProVu System’s guidance system is not intended for diagnostic use. • The Acessa ProVu System’s guidance system may not be used to guide the tip of the Handpiece once the tip has penetrated the uterine serosa. Ultrasound visualization must be used during fibroid penetration and treatment. -
Page 7: Environmental And Emi Warnings
The Transducer should not be used to manipulate the bowel during the procedure due to the risk of bowel injury. • ONLY Acessa Health Inc. accessories may be attached to and used with the Acessa ProVu System. The Acessa ProVu System is not compatible with any other RF devices or electro-magnetic guidance devices. -
Page 8: Use
Do not drop the Field Generator or subject it to impact. Physical damage to the Field Generator may alter its calibration and contribute to inaccurate guidance. Do not place the Acessa ProVu System closer than 1m from the Field Generator. To do so may affect the tracking •... -
Page 9: Precautions
(MRI) scanner, as they may become magnetized and affect system functionality. • Mains power quality should be that of a typical commercial or hospital environment. If the user of the Acessa ProVu System requires continued operation during power mains interruptions, it is recommended that the Console be powered from an uninterruptible power supply. -
Page 10: Sterilization And Safety Checks
Sterilize the Transducer in accordance with the recommended process in the Instructions for Use accompanying the • Acessa ProVu Transducer with sensor. Ensure that the cable interconnections are clean and dry prior to use. Clean and sterilize the Handpiece Cable in accordance with the recommended process in the Instructions for Use •... -
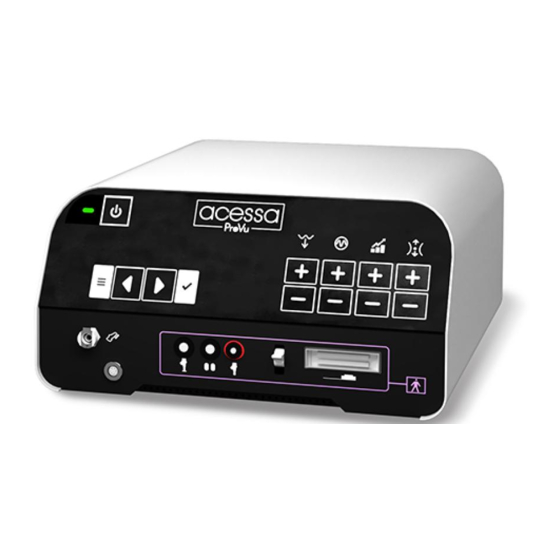
Page 11: Rear Panel
Acessa ProVu System User’s Guide PL-01-0040 ® Check Button Used to accept the current menu item. Ultrasound Depth Adjustment Pressing the + (up) or – (down) buttons will adjust the Depth or magnification of the ultrasound image. The supported ultrasound depths are: 3cm, 4cm, 5cm, 6cm, 7cm, 8cm, and 9cm. Ultrasound Frequency Adjustment Pressing the + (up) or –... -
Page 12: Setting Up The Acessa Provu System
Pads placement. • Apply the Pads per the figure below. The Pads must be used with the Acessa ProVu System. The entire surface area of the Pads must be reliably attached to the patient’s body. -
Page 13: Energizing The System
• light up and turns green. The user should also note that the internal fan starts at the same time. The computer boot sequence progresses through POST and finishes at the Acessa ProVu splash screen. • If POST failed, an Error screen will display. Turn the Console off and then turn it on again. If POST fails again, contact Customer Service at Acessa Health Inc. -
Page 14: Accessory Connections
Acessa ProVu System User’s Guide PL-01-0040 ® Next, the User Interface screen will appear and start with the selection of the OR layout. See figure below: Layout 4 Layout 1 Layout 3 Layout 2 The four options are: Layout 1: Monitors are at the patient’s right, surgeon is on the patient’s left. The left side shows Guidance, •... -
Page 15: User Interface
Acessa ProVu System User’s Guide PL-01-0040 ® User Interface 10.3. Upper Left: Deployment, Ablation, Coag Center Top: Expected Ablation Size Upper Right: Ultrasound Settings Center Middle: Proximity Meter Lower Left: Menu Selections Lower Center: Pad Temperatures Lower Right: Acessaory Connections CO 20-131 Revision: C... -
Page 16: Menu Setttings
Acessa ProVu System User’s Guide PL-01-0040 ® Menu Setttings 10.4. • Access menu settings when the Menu button is pressed or there are any alert messages. Display 3D Ablation Sound Coag Mode Cage Mode Level Layout Level Display Mode – Switch between Ultrasound plus Guidance mode or full Ultrasound only mode on screen. •... -
Page 17: Pad Temperatures
Coag can still be done if a pad temp reaches 44°C. 10.9. The Acessa ProVu Guidance System Feature The Guidance System feature allow the physician to see the Ultrasound Transducer and the Handpiece shaft images in •... - Page 18 Acessa ProVu System User’s Guide PL-01-0040 ® Position lines: On the 3D view, if • the trajectory is “in front of” the ultrasound plane, yellow lines will appear. trajectory “behind” the ultrasound plane, blue lines will appear. The spacing of these lines does not represent specific distance measurement.
-
Page 19: Procedure Planning
Acessa ProVu System User’s Guide PL-01-0040 ® Expected 3D Ablation Cage. The software can optionally display a visual indicator of the expected ablation volume at • the end of the handpiece, shown in orange. This volume guide provides the user with a 3D visual reference for physical dimensions to further assist in electrode array placement. -
Page 20: Operation Of System During Coag
Acessa ProVu System User’s Guide PL-01-0040 ® When the temperature gets to 95°, a tone will sound signifying that target temp has been reached. The the timer will begin to count up. When it reaches the correct time, a “Finished” tone will be heard. Once the tone is heard, press the foot pedal (yellow) to stop the RF energy. -
Page 21: Special Considerations: General Ablation Procedures
Acessa ProVu System User’s Guide PL-01-0040 ® 11. Special Considerations: General Ablation Procedures 11.1. Highly Vascularized Tissue If all connections are verified to be correct and desired temperatures continue to not be obtainable, the electrode arrays may have been deployed into a highly vascular area. Consider withdrawing the electrode arrays (if deployed) into the Handpiece and then rotating or repositioning the Handpiece. -
Page 22: Results From Ex-Vivo Bovine Liver Studies
Acessa ProVu System User’s Guide PL-01-0040 ® 12.3. Results from Ex-Vivo Bovine Liver Studies The system uses a power control mode for ablating target zones less than 1.5 cm in diameter. The electrode array is not deployed when using power control mode and the ablation time is 1 minute or less. The following table shows the average ablation zone and the recommended times at 0.0 deployment using an ex-vivo bovine liver at 15 W power. -
Page 23: Study Design
Acessa ProVu System User’s Guide PL-01-0040 ® Study Design 13.1. This prospective, multicenter, longitudinal, single-arm, paired-comparison, interventional study was designed to evaluate the efficacy and safety of radiofrequency ablation (RFA) treatment of symptomatic uterine fibroids with the Acessa System. All study subjects who underwent uterine fibroid ablation with the Acessa System were expected to continue to participate in the study for 36 months following the procedure. -
Page 24: Fibroid Symptoms And Characteristics Reported At Baseline - All Subjects
Acessa ProVu System User’s Guide PL-01-0040 ® Fibroid Symptoms and Characteristics Reported at Baseline – All Subjects 13.4. As required by the protocol, all 137 of the subjects reported menorrhagia at baseline and that they had experienced 3 or more heavy periods in the last 6 months. Other than menorrhagia, dysmenorrhea (51.1%), backache (44.5%), increased abdominal girth (43.8%), and pelvic pressure (43.8%) were the most commonly reported fibroid-related symptoms at baseline. -
Page 25: Results Of The Pivotal Study
Acessa ProVu System User’s Guide PL-01-0040 ® Types and Number of Fibroids Treated in the Study Variable N = 135 Number of fibroids treated per patient 1 to 29 Mean number of fibroids treated per patient Median number of fibroids treated per patient Number of total fibroids treated within the study Intramural Subserosal... -
Page 26: Efficacy
Acessa ProVu System User’s Guide PL-01-0040 ® Adverse Events Classified as Possibly, Probably, or Definitely related to the Device – Pelvic Abscess, serosal colon injury, lower abdominal pain superficial uterine serosal burn and post-procedural hemorrhage were each reported as single adverse events for a total device-related adverse event rate of 3.6%. -
Page 27: Ufs-Qol Scores
Acessa ProVu System User’s Guide PL-01-0040 ® Percent Change From Baseline in Total Uterine and Fibroid Volume at 3 and 12 Months Post treatment Based on Preoperative and Postoperative MRI Assessments Month 3 Month 12 -10% -20% -16% Uterine Volume -30% -25% Fibroid Volume... -
Page 28: Eq-5D Health State Score
Acessa ProVu System User’s Guide PL-01-0040 ® EQ-5D Health State Score 13.12. The EQ-5D score ranges from 0 to 100. An increase in the score post treatment indicates less disease burden. EQ-5D Scores at Baseline and at 3, 6, 12, 24, and 36 Months Post Treatment Baseline Month 3 Month 6... -
Page 29: Postmarket Surveillance Study - Trust (Treatment Results Of Uterine Sparing Technologies)
Acessa ProVu System User’s Guide PL-01-0040 ® 14. Postmarket Surveillance Study – TRUST (Treatment Results of Uterine Sparing Technologies) 14.1. Summary of the Post-Approval Study Methods 14.1.1. Study Objective The study objectives were to compare the rates of acute and near-term serious complications in the Acessa subjects to the acute and near-term treatment-related serious adverse event rates of the pivotal (pre-market) study. -
Page 30: Results
Acessa ProVu System User’s Guide PL-01-0040 ® Summary of the Post-Approval Study Results 14.6. 14.6.1. Final safety findings (key endpoints) There were no significant differences between the acute serious events arising from the procedures performed by the investigators in the pivotal study compared to those of the investigators in the postmarket surveillance study. -
Page 31: Study Strengths And Weaknesses
West Asian 0 (0.0%) 15. Potential Ris ks of Acessa ProVu System Known risks associated with radiofrequency ablation of fibroids include: skin burn, mild intra-operative bleeding, transient urinary retention or urinary tract infection, adhesion formation, post-procedural discomfort (cramping, pelvic pain), and transient amenorrhea: •... -
Page 32: Patient Counseling
Use of the Acessa ProVu System offers a minimally invasive, low-risk technique to ablate fibroids while sparing the uterus. The system and the procedure provides benefits such as a reduction or elimination of uterine fibroid related symptoms, which includes menorrhagia, dysmennorrhea, dyspareunia, urinary frequency, and pressure pain, and return to normal activities. -
Page 33: Guidance And Manufacturer's Declaration
Accessories Rated Voltage The AcessaProVu accessories are rated for the maximum peak output voltage as indicated. Only Acessa accessories are to be used with the Acessa ProVu System . Fuses Two 7.0 Amp 250 volt fuses (in the Power Entry Module on rear panel) Dimensions 16.5”... - Page 34 Acessa ProVu System User’s Guide PL-01-0040 ® Guidance and manufacturer’s declaration – Electromagnetic Emissions Emissions test Compliance Electromagnetic environment - guidance take mitigation measures, such as relocating or re-orienting the equipment. If the system is operated within the electromagnetic environment listed in the Guidance and manufacturer’s declaration –...
- Page 35 Acessa ProVu System User’s Guide PL-01-0040 ® Guidance and manufacturer’s declaration – Radiofrequency Electromagnetic Immunity Immunity IEC 60601 test level Compliance Electromagnetic environment - guidance test level IEC 61000-4-3 80 MHz to 2.7 GHz transmitter in watts (W) according to the transmitter manufacturer and d is the recommended separation distance in meters (m).
-
Page 36: Technical Characteristics
Acessa ProVu System User’s Guide PL-01-0040 ® 18.3. Technical Characteristics Coagulation Mode Output at Various Settings into Various Loads Coagulation Mode 60.0 50.0 40.0 30.0 20.0 10.0 1000 1500 2000 Resistance Approximate peak coag voltage vs. load resistance at all levels (“coag level” per the user interface). Note: The load for coag will increase as the affected tissue cauterizes and dries. -
Page 37: Compliance To Safety And Performance Standards
ProVu System User’s Guide PL-01-0040 ® Compliance to Safety and Performance Standards 18.4. The Acessa ProVu System has been tested to the following standards: Reference Number Title Medical devices – Application of risk management to medical devices (ISO 14971:2007, ISO 14971:2007... - Page 38 Acessa ProVu System User’s Guide PL-01-0040 ® Audible Condition Visual Alert Solution Alert Ultrasound Transducer (or sleeve) is "Connect UT (or Sleeve)" Connect UT (or Sleeve) unplugged Ultrasound Transducer (or sleeve) sensor UT tracking signal lost" 1. Check transducer or sensor cable or cable is defective.
- Page 39 Acessa ProVu System User’s Guide PL-01-0040 ® Audible Condition Visual Alert Solution Alert Pad contact resistance high during "RF output ended, high pad A high pad contact resistance was ablation contact resistance" detected. 1. Check the pads to ensure that they are in good contact with the patient.
-
Page 40: Glossary Of Symbols And Product Graphics
Acessa ProVu System User’s Guide PL-01-0040 ® 20. Glossary of Symbols and Product Graphics 20.1. Symbols Standard Standard Symbol Symbol Title Symbol Symbol Symbol Symbol Title/ Description Reference /Description Reference Number Number Alternating Current / To indicate on Recycle: Electronic IEC 60417- the rating plate that the equipment is EN 50419... -
Page 41: Product Graphics Glossary
20.2. Product Graphics Glossary Product Icon Icon Name Description Port to connect Dual Foot Pedal Cable to Acessa ProVu System Dual Foot Pedal Port Console Port to connect Acessa ProVu Handpiece cable to Acessa Handpiece Port ProVu System Console... -
Page 42: Warranty Statement
21. Warranty Statement Every Model 7100 Acessa ProVu System sold by Acessa Health Inc. carries a 1-year manufacturer’s warranty from the date of sale. Acessa Health Inc. hereby guarantees that the product is free from any defect in material and workmanship.
Need help?
Do you have a question about the Acessa ProVu and is the answer not in the manual?
Questions and answers