Table of Contents
Advertisement
Quick Links
M99
Arterial Puncture Wrist
Instruction
manual
Arterial Puncture Wrist Dark tone
Movie Site
English Site
https://youtu.be/5TVn4bw3Kkw
Production supervision
Dr. Hiroshi Koyama,
Medical Director, General Internal Medicine National
Hospital Organization Kyoto Medical Center
Arterial Puncture Wrist Light tone
Advertisement
Table of Contents

Related Manuals for Kyoto Kagaku M99


Summary of Contents for Kyoto Kagaku M99
- Page 1 Production supervision Dr. Hiroshi Koyama, Arterial Puncture Wrist Medical Director, General Internal Medicine National Hospital Organization Kyoto Medical Center Instruction manual Arterial Puncture Wrist Dark tone Arterial Puncture Wrist Light tone Movie Site English Site https://youtu.be/5TVn4bw3Kkw...
-
Page 2: Table Of Contents
Caution Do not mark on the model and other components with pen nor leave printed materials contacted on surface. Ink marks on the models cannot be removed. Arterial Puncture Wrist Instruction manual Contents Introduction ● Manufacturer’s Note DOs and DON’Ts Before You Start ● ... -
Page 3: Introduction
Manufacturer s note ’ Introduction DOs and DON’Ts Manufacturer s note ’ Radial artery puncture is a common approach for blood collection and arterial line placement. This innovative simulator is designed to provide training in arterial puncture with true-to-life feeling. Any use not in accordance with the enclosed instructions is strongly discouraged. - Page 4 Manufacturer s note ’ Introduction DOs and DON’Ts DOs and DONʼTs DONʼTs ●Operate the system under the designated ●Do not disassemble or open electric or circumstances precision components Power input: AC100V~240V plus or minus 10%, 50Hz/60Hz Do not open up or disassemble the housing for electric parts Temperature range: between 0 degrees C and 40 degrees C or precision components.
-
Page 5: Before You Start
Do not attempt to take apart or remodel the product. This could lead to re hazards, electrocution This is to avoid to re hazards and electro and injuries. Please contact your local cution. distributor or Kyoto Kagaku CO.,LTD for repairs. 3... -
Page 6: Set Includes
Before You Start Set includes Set Includes Before you start, ensure that you have all components listed below. Simulated blood Puncture unit (Swab type) ① Skin (outer) ② Skin (inner) ③ Artery tube Syring (50mL) ④ silicon tape Tube ⑤ Radius base (Irrigation: black ring) Tube Hand-wrist model (Drainage: red ring) -
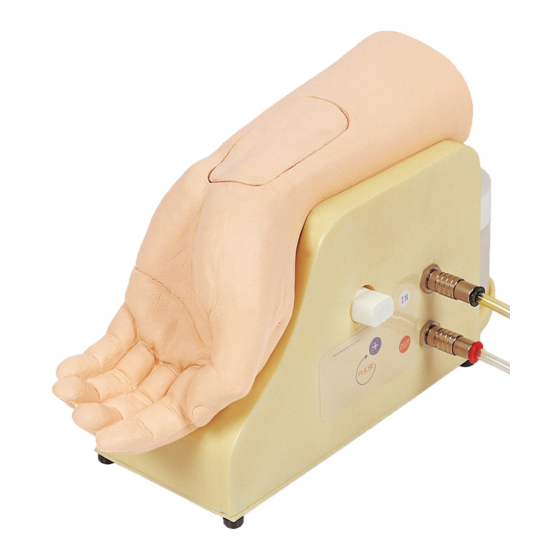
Page 7: Parts Name And Functions
Before You Start Parts name and functions Parts name and functions Puncture unit Suction tube Discharge tube Hand-wrist model Drain tube Jar holder Adjustment knob (pulse strength) Power switch Tube socket (In) Tube socket (Out) AC adapter and power cable Tube socket (IN) Tube socket (OUT) Recommended operation environment for the circulation pump... -
Page 8: Preparation
Preparation of simulated blood Preparation Connection of the circulation pump Please note: We recommend performing preparation and training on the included vinyl sheet. Preparation of simulated blood 1 1. Pour 1000mL of water into the plastic beaker. Put the simulated blood (swab type) into the beaker and stir the water sufficiently to prepare the simulated blood. - Page 9 Preparation of simulated blood Preparation Connection of the circulation pump Connection of the circulation pump 2 1. Connect the simulator base and circulation pump with tubes. Base Simulator base Circulation pump In (black) Out (red) tubes Pump Push the tube toward the wall Push the tube toward the wall Push the tube toward the wall Push the tube toward the wall...
-
Page 10: Setting Up The Wrist Model And Puncture Unit
Setting up the wrist model and Preparation puncture unit 3 Setting up the wrist model and puncture unit ① Set the silicon tape on the radius base. 1. Insert one end of the silicon tape to one of the slits on the radius base edge so that the tape is anchored by the knot. - Page 11 Setting up the wrist model and Preparation puncture unit 3 Setting up the wrist model and puncture unit 3. Place the tube in the gutter on the radius base, connect the other end of the tube to the black socket and lock it by turning clockwise until it clicks.
-
Page 12: Training Training
Training Training After training Discharge the simulated blood 1 Training 1. Connect the power plug to a power supply. 2. Turn the knob counter-clockwise until it stops to release the pressure to the tube. Then switch on the circulation pump and run for a few minutes to let the simulated blood fill the tubing. -
Page 13: Disassembly Of The Hand-Wrist Model
Disassemble the hand-wrist model After training and puncture unit 2 Disassemble the hand-wrist model and puncture unit ① Take o the hand-wrist model Lift Lift 1. Holding the puncture unit with one hand, lift the back of the hand-wrist model and remove from the simulator base. -
Page 14: Cleaning
Disassemble the hand-wrist After training model and puncture unit Cleaning 2 Disassemble the hand-wrist model and puncture unit ④ Take o the radius base 1. Take o the radius base from the simulator base. Cleaning 3 ① The skin covers 1. -
Page 15: Trouble Shooting
Trouble shooting Quick check-up before calling the customer service Use the table if you have problems using the system. Look in this section for a description of the problem to nd a possible solution. What to Do Possible Reason Trouble Power plug is not properly connected to The system cannot be Connect to the power source. - Page 16 Do not mark on the model and other components with pen or leave printed Caution materials contacted on their surface. Ink marks on the models will be irremovable. ・For inquiries and service, please contact your distributor or KYOTO KAGAKU CO., LTD. 2022.02...
Need help?
Do you have a question about the M99 and is the answer not in the manual?
Questions and answers