Table of Contents
Advertisement
Quick Links
MW50
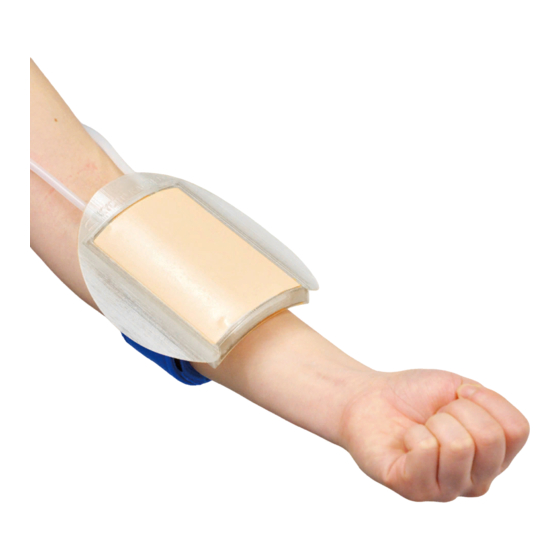
装着式採血静注キット"SASUKE"
Strap-on Venipuncture Trainer Ⅱ
脱
卯
取扱説明書
.
Instruction
Instruction
manua l
manual
次/ Content s
目
●日本語取扱説明 書
●English manual
D KYOTO KAGAKU
I
△注 意
モデル表面に印刷物などが直接触れないよう
にしてください。
樹脂にインクが吸収されて消えなくなります。
I
&
Do not let ;nk from pens, newspapera, pcod,ct
Attent;on
manual or other sources contact the manikin.
Ink marks on the manikin will be irremovable.
・ ・ ・ ・ ・ ・ ・ ・ ・ ・ ・
・ ・ ・ ・ ・ ・ ・ ・ ・ ・ ・ ・ ・
CO.,LTD
P .1 ~ P.09
P.10 ~ P.18
Advertisement
Chapters
Table of Contents

Related Manuals for Kyoto Kagaku Strap-on Venipuncture Trainer Ⅱ


Summary of Contents for Kyoto Kagaku Strap-on Venipuncture Trainer Ⅱ
- Page 1 ・ ・ ・ ・ ・ ・ ・ ・ ・ ・ ・ ●日本語取扱説明 書 P .1 ~ P.09 ・ ・ ・ ・ ・ ・ ・ ・ ・ ・ ・ ・ ・ ●English manual P.10 ~ P.18 D KYOTO KAGAKU CO.,LTD...
- Page 3 モデル表面に印刷物などが直接触れないように 注意 してください。 樹脂表面にインクが吸収されて消えなくなりま す。 MW50 装着式採血静注キット“SASUKE” 取扱説明書 目 次 はじめに・ご注意 ················· P.01 ご使用の前に ····················· P.02 実習の準備 水の注入 ····················· P.03~04 ホルダーの装着 ··················· P.05 実習 ····························· P.06 後片付け ························· P.07 消耗品の交換 ····················· P.08...
- Page 4 はじめに 製品の特長とご使用上の注意 はじめに この度は「装着式採血静注キット“SASUKE”」をお買い上げいただき、誠にありがとうございます。 本製品は、 静脈注射の手技上達を目的としたシミュレーションモデルです。 医学・看護教育の実習教材とし てご使用ください。 必ずお読みください 本来の使用目的以外にはご使用にならないでください。また取扱説明書に記載された方法以外でのご使 用による万一の破損や事故に関して、当社は責任を負いかねますのでご了承ください。 特 長 穿刺耐久回数が大幅に向上した新素材を用いたパッド。 パッドをホルダーにセットする簡単セッティング方式を採用。実習をすぐにはじめることができます。 SP(模擬患者)や全身モデルの腕部に装着し、臨場感のある静脈内注射実習が可能。 注 意 取り扱いにご注意ください。 ボールペンやサインペンで書き込まないでください。 落下や強い衝撃を与えると破損の原因となり ボールペン、サインペンなどでモデルに書き込 ます。 むと、インクが吸収されて消えなくなります。 印刷物をモデル表面に置かないでください。 汚れは水又は中性洗剤で拭き取ってください。 モデル表面に印刷物などが直接触れないよう モデル本体の汚れは水又は中性洗剤で拭き取 にしてください。 り、よく乾燥させてベビーパウダーを塗布して 樹脂にインクが吸収されて消えなくなりま おいてください。シンナーなどの有機溶剤は絶 す。 対に使用しないでください。...
-
Page 5: ご使用の前に
ご使用の前に ご使用前の確認 セット内容と各部の名称 ご使用の前に、構成品が全て揃っているかご確認ください。 a. ホルダー・・・・・・・・・・・・5 体 b. 注射パッド・・・・・・・・・・5 点 c. ベルト・・・・・・・・・・・・・・5 点 d. 血液ボトル・・・・・・・・・・5 点 e. シリンジ・・・・・・・・・・・・5 点 取扱説明書 構成品の他に、水を排出するための容器をご用意ください... -
Page 6: 水の注入
実習の準備 準備 ① 水の注入 1.模擬血(水)の準備 ボトルに水または模擬血液(別売:水に溶かし赤 色に着色してご使用いただけます) を約 300 ㏄入 れます。 2.チューブコックを開ける 給水用チューブについているチューブコックを 開いてください。 3.チューブの接続 血液ボトルの注ぎ口に給水用チューブ (チューブ コックがついているチューブ) を 1cm 程度差し込 んでください。... - Page 7 実習の準備 準備 ①水の注入 4.排水用チューブの先端にシリン ジをとりつける 排水用チューブの先端の三方活栓にシ リンジをとりつけます。 三方活栓のツマ ミの位置が右の画像の向きに合ってい ることを確認してください。 5.給水する シリンジの押し子 (プランジャ) をゆっく り引いてチューブ内部に水を導き入れま す。 6.給水を確認し、三方活栓のツマ ミを閉じる シリンジ内部に水が流入したことを確 認できたら押し子(プランジャ)を引く のをやめて、三方活栓のツマミを閉じて ください。 7.シリンジを取り外す 三方活栓のツマミを閉じたのちにシリンジ を三方活栓から取り外してください。...
- Page 8 実習の準備 準備 ②ホルダーの装着 1.ベルトを腕に巻く 穿刺したい位置に合わせてベルトを腕に巻きま す。 マジックテープは 2 か所留めるところがあり ます。 ベルトのオモテ面は全面凹面になっており任意 の場所で留めることができます。 2.ベルトにホルダーを留める ホルダー裏面のマジックテープ(凸面)でベルト (凹面)に固定します。...
- Page 9 実習 実習の手順・ご注意 実習の手順 1.実習 実習の際は、 腕を置く台と血液ボトルを同じ高さ にして行ってください。 穿刺部位 穿刺部位は右図の位置になっています。 模擬血液は、衣類等布地に付着すると 注意 シミになる可能性があります。 2.給水 実習で血液ボトルの水が少なくなりましたら、 ホルダーを腕から取り外した後、実習の準備 P3 ~4 の手順で水を補給してください。 v...
-
Page 10: 後片付け
後片付け 後片付け 水の排出 実習で模擬血液を使用した場合、下記手順を行う前に血液ボトルの模擬血液を捨てて中に水を入れます。 そののち、p.3~4 にしめす手順で水を注入してチューブ内を洗浄します。その後、下記1~3の手順でチ ューブ内の水を排出します。 1.給水チューブを取り外す チューブコックを閉じてから給水チューブ をボトルから取り外します。 2.排水用チューブの先端からシリンジを取 り外す 三方活栓が閉じている(右の画像の向きに合って いる)ことを確認したのち、三方活栓からシリン ジを取り外します。 3.排水 給水および排水チューブの先端を排水用容器に 入れてから、チューブコック、三方活栓を開き ます。パッドを持ち上げてチューブ内の水を流 し出します。 穿刺部分の軟質部品を取り外さ 注意 ないで下さい。 (右写真) 水漏れ発生の原因となる恐れが あります。 4.汚れの拭き取り 注射パッドが汚れましたら、水または中性洗剤・アルコールで軽く拭き取ってください。... -
Page 11: 消耗品の交換
消耗品の交換 注射パッドの交換 注射パッドの交換 1.注射パッドの取り外し 注射パッドから水を抜き、 ホルダーから 注射パッドをスライドして取り外しま す。 2.注射パッドの取り付け 新しい注射パッドをホルダーにスライ ドして取り付けます。 注意 注射パッドはしっかりと押し込んでからご使用 ください。 押し込みが不十分な状態でご使用になると取り 付け部分から水が漏れることがあります。... - Page 12 消耗品 コード番号 部品名 11431-010 注射パッド 5 枚組 注射パッド 5 枚組 別売部品 コード番号 部品名 11430-010 解剖アームカバー 11388-400 着色用綿棒(赤) 10 本組 解剖アームカバー 着色用綿棒(赤) 10 本組...
-
Page 13: Table Of Contents
Caution Do not mark on the product and its components with a pen or allow printed materials to come in contact with the surface. Ink marks cannot be removed. MW50 Strap-on Venipuncture TrainerⅡ Instruction Manual Content Before you start Features ··································... -
Page 14: Features
Features Before using Before you The simulator is designed for training in IV injection and blood collection. Do not use for improper purpose. Please read the instruction carefully before use. Features ● Pads made from a new material with significantly improved puncture durability. ●... -
Page 15: Set Includes
Set includes Before using Set includes Before your first using, ensure that all components listed below are included. a. Supporting frame・ ········· 5 b. Puncture Pad ··············· 5 c. Strap belt ····················· 5 d. Water bottle ·················· 5 e. Syringe ························ 5 And Instruction manual In addition to the included components, please prepare a container for draining water. -
Page 16: Preparation For Training
Preparation Preparation for training ① Advanced Preparation 1.Preparation of simulated blood Pour about 300 cc water or simulated blood into the water bottle. 2.Unlock the pinchcock Unlock the pinchcock for the water supply tube. 3.Connection of the water supply tube Insert tip of the water supply tube (approx.1cm) to the spout of the water bottle. -
Page 17: Filling Water
Preparation Filling Water ① Filling 1.Connection of the drain tube Insert the three way cock connected to the tips of the drain tube to the tips of the syringe. 2.Water supply Pulling plunger of the syringe, fill the tube with water. 3.Check filling and close three way cock. -
Page 18: Fitting The Pad
Preparation Fitting the pad ② Attaching the pad 1.Wrap the strap belt Wrap the strap belt around the site on the arm/hand for training. 2. Fix the pad holder to the strap belt Fix the pad to the strap belt. The back of the pad holder has the Velcro. -
Page 19: Training Procedure And Notes
Training Training procedure and notes Training procedure 1.Training During the practice session, keep the bottle at the same height with the trainer. The two lines of puncture sites are on the pad as shown in the picture to the Puncture right. -
Page 20: After Training
After training After training After training After training session, discharge water from the trainer and tubes following the procedure below. 1. Disconnect the water supply tube. After lock the pinchcock, disconnect the water supply tube form the spout of the water bottle. 2. -
Page 21: Replacing Consumables
Replacing Replacing consumables consumables Replacing consumables 1. Drain all water from the old pad and disconnect both the water supply tube and drainage tube. Then, pull out the pad from the frame. 2. Slide a new puncture pad into the back of the frame. - Page 22 Consumable Code Name 11431-010 Puncture pad (Set of 5) Puncture pad (Set of 5) Optional parts Code Name 11430-010 Arm Vessels Anatomy Sleevelet 11388-400 Cotton Swab for Coloring (Red) 10 pcs Arm Vessels Anatomy Sleevelet Cotton Swab for Coloring (Red) 10 pcs...
- Page 24 Do not let ink from pens, newspapers, product manual or other sources Caution contact the manikin. Ink marks on the manikin will be irremovable. ・本製品についてのお問い合わせや不具合等ございましたら、お手数ですがお買い上げの販売店、 もしくは下記(株) 京都科学まで御連絡ください。 For inquiries and service, please contact your distributor or KYOTO KAGAKU CO., LTD. ・ URL http://www.kyotokagaku.com e-mail rw-kyoto@kyotokagaku.co.jp ●...
Need help?
Do you have a question about the Strap-on Venipuncture Trainer Ⅱ and is the answer not in the manual?
Questions and answers