Table of Contents
Advertisement
Quick Links
Advertisement
Table of Contents

Related Manuals for Shure ADX5D


Summary of Contents for Shure ADX5D
- Page 1 ADX5D Portable Receiver The Shure user guide for ADX5D. Version: 0.1 (2020-L)
-
Page 2: Table Of Contents
Table of Contents Channel Menu ADX5D Portable Receiver ShowLink Remote Control IMPORTANT SAFETY INSTRUCTIONS Setting Up a ShowLink Network ADX5D ShowLink Modes ADX5D Portable Slot-In Receiver ShowLink Test System Components Assigning Transmitters to Transmitter Slots Hardware Callouts Frequency Diversity Hardware Setup... -
Page 3: Adx5D Portable Receiver
Shure Incorporated ADX5D Portable Receiver IMPORTANT SAFETY INSTRUCTIONS READ these instructions. KEEP these instructions. HEED all warnings. FOLLOW all instructions. DO NOT use this apparatus near water. CLEAN ONLY with dry cloth. DO NOT block any ventilation openings. Allow sufficient distances for adequate ventilation and install in accordance with the manufacturer’s instructions. -
Page 4: Adx5D Portable Slot-In Receiver
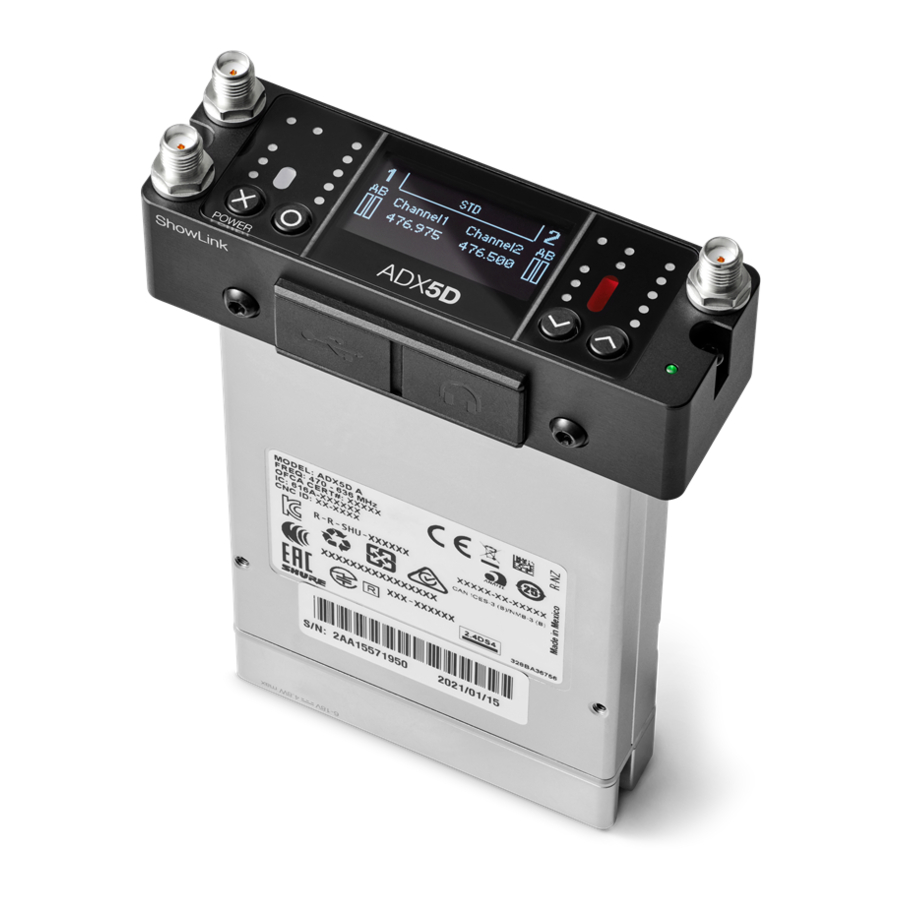
Shure Incorporated ADX5D Portable Slot-In Receiver To hightier broadcast audio professionals, ADX5 is the dualchannel slotin receiver that provides unparalleled RF perfor mance in a portable Axient Digital receiver format, due to its high-performance radio, spectral efficiency and operating range, true digital diversity, wide tuning bandwidth, frequency diversity, and interference detection and avoidance technology. System Components ①... - Page 5 Shure Incorporated DB25 backplate and spacer plate ④ ADX5BP-TA3 Standalone backplate ⑤ ADX5D-AD-MPK Mounting plate ⑥ ADX5D-AD-CSMK Cold shoe mount ⑦ M3 screws (x2) To attach cold shoe to mounting plate ⑧ ¼-20 screws (x2) and M2.5 screws (x2) To attach mounting plate to third-party mounts ⑨...
-
Page 6: Hardware Callouts
Shure Incorporated Hardware Callouts ① Coaxial inputs from Antenna A and Antenna B RF connection for Antenna A and Antenna B. ② Battery sled attachment screws 6/33... - Page 7 Shure Incorporated Captive screws for securing the ADX5BS-L battery sled. ③ Coaxial input from ShowLink antenna ZigBee connection for networking via ShowLink. ④ "Exit" (X) button Push to return to the previous menu screen, hold to power the unit on or off.
- Page 8 Shure Incorporated ⑰ Backplate screw holes Internally-threaded screw holes for securing interchangeable backplates. ⑱ Rear panel connector Transfers data and power from compatible backplates. 8/33...
-
Page 9: Hardware Setup
Shure Incorporated Hardware Setup Antenna Attachment 9/33... -
Page 10: Rear Panel Kits
Attaching the Backplate Align the captive Phillips screws with the threaded holes on the back of the ADX5D receiver and slide the backplate into place. Tighten screws to ensure a solid connection. - Page 11 Shure Incorporated Connectors are (from left to right): 6-pin battery sled power input, two TA3 audio outputs, and Hirose 4-pin power in- put. Connecting a Power Supply Connect a compatible power supply to the power input. Battery Sled The battery sled must be used with the standalone rear panel, as this panel includes the 6-pin connector required for the two components to mate and pass power.
-
Page 12: Db15 Backplate
1+2 stereo, or channel 1+2 summed mono. Note: Automatic interference avoidance when using the DB15 backplate is not available in the United States. The DB15 rear panel kit for ADX5D includes: • A DB15 rear panel, with captive Phillips-head screws that make it easy to mount/unmount the rear panel without losing screws •... - Page 13 Shure Incorporated Connecting to External Hardware Attach the backplate and slot the ADX5D receiver into a compatible DB15 video camera. If needed, attach the included spacer plate to provide a proper fit. 13/33...
-
Page 14: Db25 Backplate
• When serial communication is detected over the DB25 connection on United States hardware, ShowLink is disabled. The DB25 rear panel kit for ADX5D includes: • A DB25 rear panel, with captive Phillips-head screws that make it easy to mount/unmount the rear panel without losing screws •... - Page 15 Shure Incorporated Connecting to External Hardware Attach the backplate and slot the ADX5D receiver into compatible DB25 equipment, such as a video camera or multi-coupler. If needed, attach the included spacer plate to provide a proper fit. 15/33...
-
Page 16: Ir Sync
Shure Incorporated IR Sync Use IR Sync to form an audio channel between the transmitter and receiver. Note: The receiver band must match the band of the transmitter. Select a receiver channel. Tune the channel to an available frequency using group scan. -
Page 17: Home Screen
Shure Incorporated Note: Any change to the encryption status on the receiver such as enabling/ disabling encryption or requesting a new encryption key, requires a sync to send the settings to the transmitter. Home Screen The home screen displays the most critical device and channel properties and statuses. From the main home screen, use the arrow buttons to navigate to the channel home screens. - Page 18 Shure Incorporated Device configuration menu map Device Audio 3.5mm Cfg ◦ 3.5mm Level: Adjust the headphone level from 0-100%. ◦ 3.5mm Limiter: Adjust the limiter threshold to prevent overdriving the headphone amp. 0 to -30 dB. ◦ 3.5mm Output: Choose an output.
- Page 19 Access Ctrl View the status of access control (enabled or disabled). If access control is enabled, the access control PIN appears in this menu. Use Wireless Workbench or other Shure control software to enable or disable access control. Net Browse Use the Network Browser utility to view Shure devices on the network.
- Page 20 Shure Incorporated HW Identify Send a hardware identification message to control applications, like Wireless Workbench, so you can locate your device in the application. Menu Lock Use the locking feature to prevent accidental or unauthorized changes to controls and settings. Use the arrow buttons to change the lock status of the menu.
-
Page 21: Channel Menu
Shure Incorporated Power Status View the power status of the receiver. Channel Menu Use the following menus and parameters to configure the receiver channels. From the home screen, press O to see your menu options. Use the arrows to select the menu of your choice, and press O to open that menu. - Page 22 Shure Incorporated You can individually control the gain and audio output in real time for each channel. ◦ Gain: Adjust the gain in 1dB increments while performing a sound check using typical audio input signal levels and monitor the audio meter LEDs. Reduce the gain if the red LED triggers repeatedly.
-
Page 23: Showlink Remote Control
Shure Incorporated Flashes the display of a transmitter linked to the receiver. Activate (ADX transmitters linked to ShowLink access point) Press O to send RF mute to all other slots. SL Test Press O to measure the boundaries of ShowLink coverage. -
Page 24: Setting Up A Showlink Network
Perform an IR sync to link the transmitter and receiver. ADX5D ShowLink Modes To update the ShowLink mode, go to Device Configuration > ShowLink > SL Mode. For ADX5D, you have the following ShowLink options: •... -
Page 25: Assigning Transmitters To Transmitter Slots
Shure Incorporated To improve coverage, adjust the location of your access points or place additional access points to extend coverage. To activate the ShowLink Test: From the Device Configuration menu, navigate to SL Test. Press the O button to start the test and walk the transmitter around the coverage area. Monitor the number of bars dis played and the state of the ShowLink icon. Coverage boundaries are indicated by 0 bars displayed or the ShowLink icon is empty. -
Page 26: Headphone Settings
CONFIRMED) *When ADX5D is operating in FD-S with Pre selection chosen, the sum will continue to output the Post FD-S audio. Firmware Firmware is embedded software in each component that controls functionality. Installing the latest version of firmware updates the receiver to incorporate additional features and enhancements. -
Page 27: Updating The Receiver Firmware
CAUTION! Ensure that receiver power and network connections are maintained during a firmware update. Do not turn off the receiver until the update is complete. From Wireless Workbench, open the Firmware Update Manager: Tools > Shure Update Utility. Click Check Now to view new versions available for download. -
Page 28: Specifications
Shure Incorporated Band Frequency Range ( MHz) 606 to 714 606 to 790 622 to 698 630 to 787 630 to 698 694 to 703, 748 to 758, 803 to 806 794 to 806 806 to 810 925 to 937.5... - Page 29 Shure Incorporated High Density Mode 125 kHz Image Rejection >70 dB, typical RF Sensitivity −98 dBm at 10 BER Latency Analog Output 2.08 ms 2.96 ms Audio Frequency Response 20 – 20 kHz (±1 dB) Note: Dependent on microphone type ADD FREQ RESPONSE? ADX1 ADD FREQ RESPONSE?
- Page 30 Shure Incorporated Storage Temperature Range -29°C (-20°F) to 65°C (149°F) Dimensions 29 x 88 x 108 mm H x W x D Weight 0.24 kg (0.53 lbs), without antennas and backplate Housing Machined aluminum Power Requirements 100 to 240 V AC, 50-60 Hz, 0.55 A max.
-
Page 31: Certifications
This product meets the Essential Requirements of all relevant European directives and is eligible for CE marking. Hereby, Shure Incorporated declares that the radio equipment is in compliance with Directive 2014/53/EU. The full text of the EU declaration of conformity is available at the following internet address: http://www.shure.com/europe/compliance... -
Page 32: Information To The User
Consult the dealer or an experienced radio/TV technician for help. This radio transmitter [ 6 16A-ADX5D] has been approved by Innovation, Science and Economic Development Canada to operate with the antenna types listed below, with the maximum permissible gain indicated. Antenna types not included in this list that have a gain greater than the maximum gain indicated for any type listed are strictly prohibited for use with this device. - Page 33 Shure Incorporated Canada Warning for Wireless This device operates on a noprotection, nointerference basis. Should the user seek to obtain protection from other radio ser vices operating in the same TV bands, a radio licence is required. For further details, consult Innovation, Science and Econom ic Development Canada’s document Client Procedures Circular CPC2128, Voluntary Licensing of LicenceExempt LowPow er Radio Apparatus in the TV Bands. Ce dispositif fonctionne selon un régime de non‑brouillage et de non‑protection. Si l’utilisateur devait chercher à obtenir une certaine protection contre d’autres services radio fonctionnant dans les mêmes bandes de télévision, une licence radio serait requise. Pour en savoir plus, veuillez consulter la Circulaire des procédures concernant les clients CPC‑2‑1‑28, Délivrance de licences sur une base volontaire pour les appareils radio de faible puissance exempts de licence et exploités dans les bandes...
Need help?
Do you have a question about the ADX5D and is the answer not in the manual?
Questions and answers