Advertisement
Table of Contents
ご使用前には必ず本書をお読みいただき、
ご使用される方がいつでも見ることができる場所に必ず保管してください。
Please read these instructions before use and keep them where
the operator may refer to them whenever neccessary.
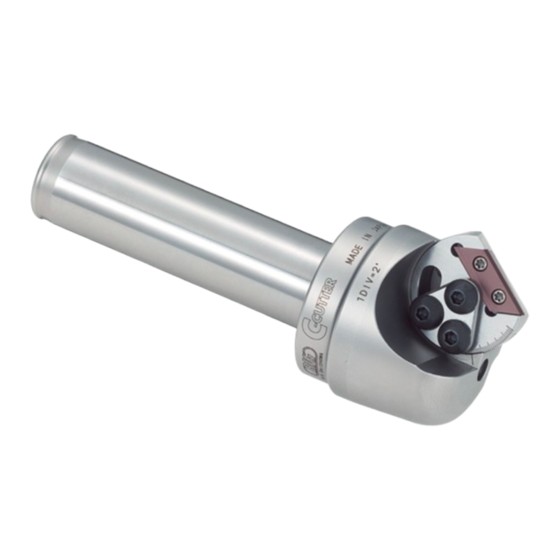
Cカッターミニユニバーサルはアングルアジャスタを手動で回すことによって面取り角度を調整することができます。
C-CUTTER mini Universal Type can adjust chamfering angle by rotating the angle adjuster by hands.
チップを取り付ける前に、チップおよびチップ着座部にエアーを吹き付け、異物を取り除いてください。
1
Before attaching an insert, remove any alien particles on the insert seat with air blowing.
チップをチップ着座部に取り付け、アングルアジャスタが動く範囲でチップクランプスクリュを軽く締め付けてください。
2
Attach the insert to the seat and tighten the insert clamping screw lightly so that the angle adjuster is movable.
3
アングルアジャスタを手動で回し、目標の角度に設定してください。
本体の目盛り線とアングルアジャスタの合マークによって設定の角度を読み
取ることができます。ご使用の角度が45° 以上か、以下かによって目盛り
が異なりますのでご注意ください(図1参照)。目盛りはあくまでも目安で
すので、正確な角度はプリセッタ等で測定してください。
Rotate the angle adjuster by fingers and set it to a target angle. A set angle
can be read with a scale on the main body and a tally mark of the angle
adjuster. Be aware that scales above 45° are different from those below 45°.
The scale is just a rough indication. Measure a correct angle by a presetter.
セットスクリュ(2個)をアングルアジャスタがクランプできるタップ穴
4
(5カ所の内、2カ所)に取り付けてください。
Attach the setting screws (2 pcs) into the tap holes (2 of 5 places) where
the angle adjuster can be clamped.
アングルアジャスタが動かないように注意し、チップクランプスクリュとセットスクリュをしっかりと締め付けてください。
5
While being careful not to move the angle adjuster, clamp the insert clamping screw and the setting screws securely.
面取り角度によって、最大・最少の加工範囲が異なりますので
6
ご注意ください。(図2・表1参照)
Be aware that the maximum and the minimum diameters are
different according to chamfering angle.
L
(図2 Fig.2)
Cカッターミニ
ユニバーサルタイプ
取扱説明書
OPERATION MANUAL
本体仕様 SPECIFICATIONS
セットスクリュ(2個)
Setting screw (2 pcs)
角度の調整方法 HOW TO ADJUST ANGLE
45°
45°
B
A
C-CUTTER mini
Universal Type
OPERATION MANUAL DOWNLOAD SITE
http://big-daishowa.com/manual_index.php
アングルアジャスタ
Angle adjuster
スローアウェイチップ
Insert
チップクランプスクリュ
Insert clamping screw
5°
45°
合マーク
アングルアジャスタ
Tally mark
Angle adjuster
5° 〜45° の場合
In case of 5° to 45°
θ φCmin φCmax
L
5.7
18.8
0.6
5°
6.7
19.7
1.2
10°
7.6
20.5
15°
1.7
20°
8.5
21.2
2.3
25°
9.6
21.8
2.9
10.6
22.3
3.4
30°
11.6
22.7
3.9
35°
12.7
23.0
4.4
40°
13.7
23.3
4.8
45°
A
13.4
23.0
4.8
45°
B
表中の数値はあくまでも目安です。正確な値はプリセッタなどで測定してください。
Values in the table are a rough indication.Measure correct values with a presetter.
45°
85°
45° 〜85° の場合
In case of 45° to 85°
(図1 Fig.1)
θ φCmin φCmax
50°
14.4
23.2
5.2
55°
15.5
23.3
5.6
60°
16.4
23.3
5.9
65°
17.4
23.2
6.2
70°
18.3
23.0
6.4
75°
19.1
22.7
6.6
80°
19.9
22.3
6.7
85°
20.7
21.9
6.8
(表1 Table 1)
■本 社
東大阪市西石切町3丁目3-39 〒579-8013
TEL.072 ( 982) 2312 ( 代) FAX.072 ( 980) 2231
L
No.0718
Advertisement
Table of Contents

Related Manuals for Big Daishowa C-CUTTER MINI


Summary of Contents for Big Daishowa C-CUTTER MINI
- Page 1 Insert clamping screw 角度の調整方法 HOW TO ADJUST ANGLE Cカッターミニユニバーサルはアングルアジャスタを手動で回すことによって面取り角度を調整することができます。 C-CUTTER mini Universal Type can adjust chamfering angle by rotating the angle adjuster by hands. チップを取り付ける前に、チップおよびチップ着座部にエアーを吹き付け、異物を取り除いてください。 Before attaching an insert, remove any alien particles on the insert seat with air blowing. チップをチップ着座部に取り付け、アングルアジャスタが動く範囲でチップクランプスクリュを軽く締め付けてください。...
- Page 2 ご注意 CAUTIONS 付属または純正の部品以外は使用しないでください。 ・ ・ Do not use other parts than the accessory or genuine. ・ チップクランプスクリュとレンチは消耗品ですので定期 Replace the screw periodically since they are ・ 的に交換してください。 consumption parts. 切削条件表 CUTTING CONDITIONS 切削速度 1回転当たり送り 被削材質 チップ材種 Cutting speed Feed rate Material Insert grade (m/min) (mm/rev) 炭素鋼...
Need help?
Do you have a question about the C-CUTTER MINI and is the answer not in the manual?
Questions and answers